WorkBench
Specify Collections Consortium, Updated January 2022
This document describes the Specify 7 WorkBench, a component designed for importing batches of data into a Specify collection database from external sources. This page describes the concepts, behavior, basic and advanced parameters of the WorkBench. The document includes a hands-on, structured walk-through for demonstration and training utilizing a public Specify 7 evaluation server. Contact the Specify Collections Consortium for login credentials to the server. This version of the Specify 7 WorkBench was released September 2021.
Outline
- Specify WorkBench Concepts Workflows, Data Sets, and Components
Figure 1. Specify WorkBench Data Mapper
-
Hands On Walk-Through _Getting Started, Mapping Data Set Columns to Database Fields, and Validating, Editing, and Uploading a Data Set)
-
Advanced WorkBench Settings _Parameterizing Matching Behavior, Allow Null Values, Use Default Values, and Must Match)
-
Workflows. The Specify WorkBench manages Specify Data Sets (DS), which are data records that have been created either directly in the WorkBench's spreadsheet-like web page or imported into the WorkBench from external files. A Data Set is created de novo inside the WorkBench by first using the Data Mapper to create and name the data columns to be recorded, and then by mapping the Data Set columns to Specify database fields. Alternatively, when external data from a spreadsheet or a text file with column headers are imported into the WorkBench to create a new Data Set, the columns are then mapped as a second step to Specify database fields using the Data Mapper. The Data Set column-to-database field mappings and various other settable parameters that control the logic of uploading a Data Set into a Specify Database comprise an "Upload Plan". Once the Upload Plan is completely specified, validated and saved, the Data Set Editor page appears for interactive editing. Edits made to a Data Set can be saved for subsequent sessions. Data Set cells are then Validated, and after all validation errors are cleared, a Data Set can be uploaded into a collection database.
-
Data Sets. Data Sets are spreadsheet-like data structures of columns and rows that correspond to Specify database fields, and new collection data records, respectively. They are temporary containers of data meant for uploading into a database. Data Sets are stored in Specify, even after having been uploaded, until they are explicitly deleted. While Collection Objects are the most common data uploaded into Specify, almost any Specify data type can be uploaded through the Specify 7 WorkBench, including: taxon, agent, locality, geography, paleo, and many others.
The WorkBench has the capacity to create new database records or to re-use existing ones through relational database linking; but it cannot augment, edit, or add data to existing database records.
- WorkBench Components. The WorkBench module comprises two main windows, the Data Mapper and Data Set Editor. These pages are logically linked and work with the Specify database and a collection's configuration settings to enable batch creation, editing, validation, and uploading of data into a Specify database.
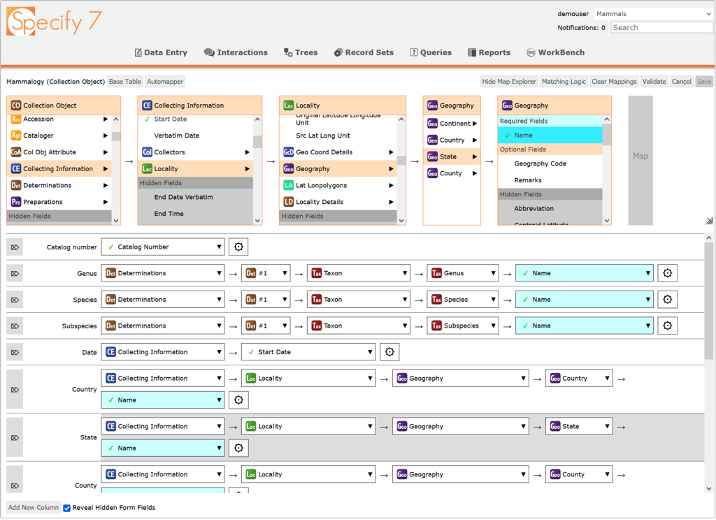
- The WorkBench Data Mapper window (Fig. 1) is divided into two parts, the Data Map Explorer in the top pane, and the Data Map Rows in the bottom pane. The Data Map Rows show Data Set column headers in the first column ("Catalog Number", "Genus", etc.). Thereafter, the boxes within each row show Specify data table names represented as a mapping path with the last box showing the database field that will be the destination for values in that Data Set column. Database fields configured to be required by a collection are highlighted in blue. Gear icons at the end of the map rows lead to additional settings for advanced matching parameters.
At the top of the Data Mapper window, the Data Map Explorer is an interactive, traversable display used for choosing a path through Specify's database tables to designate a field to map to a particular column header. In Figure 1, the Data Set column with the header "State" (highlighted gray row near the bottom of the page) is being mapped to the Geography data table State Name field.
The upper left corner of the page shows the Data Set name, and the Base Table in parenthesis. The Data Mapper Base Table is the starting point for field mapping; it represents the logical data type of the information in the Data Set, in this case Collection Object. The Data Map Explorer starts with a box representing the Base Table on the left and shows the fields and related data tables that traverse out through the Specify data model from there. Database fields that are not configured to be on Specify forms are highlighted in gray within each table box. Those "Hidden Fields" can be mapped to Data Set columns and data in those columns would be uploaded, but they will not be visible in the database unless Specify's data forms are modified to show and un-hide the field.
The Data Map Explorer can be closed with the "Hide Map Explorer'' button in the upper right of the page and can be adjusted larger or smaller using the resize icon in the right side scroll bar. Mapping Data Set columns to Database fields can also be effected a second way, by clicking in the individual mapping rows in the bottom pane of the window. Where possible, Specify will offer options or "hints" for mapping a column. The hints are suggestions and may or may not include the most appropriate mapping option. They should be scrutinized before clicking to accept one.
The "Automapper" is a useful function that attempts to map Data Set columns to Database fields automatically by interpreting Data Set column header text. The Automapper is automatically invoked whenever a Data Set mapping is needed; it attempts to map as many Data Set columns as it can. The mappings it proposes are informed suggestions, but they should always be carefully checked. The Automapper takes a best guess as to the contents of columns, but can be stymied by ambiguous, duplicated, or unusual column header names. Although the Automapper is automatically invoked for a newly imported Data Set without a data map (Upload Plan), one can manually invoke the Automapper with the button at the top left of the page. Clearing mappings (button) and then invoking the Automapper will bring a new set of proposed column-to-field mappings.
Also on the Data Mapper page, the "Validate" button checks that all required fields for your database have been mapped. The button turns green if they have, but Validate will notify you if you forgot any and shows you which ones. "Cancel" reverts any edits made since the window was first opened. "Save" saves the mappings, then opens the Data Set Editor window. Data Maps and associated upload and matching parameters comprise the "Upload Plan" for that Data Set. Upload Plans are initially bound to the Data Sets for which they were created, but they can be re-edited and re-used for other Data Sets.
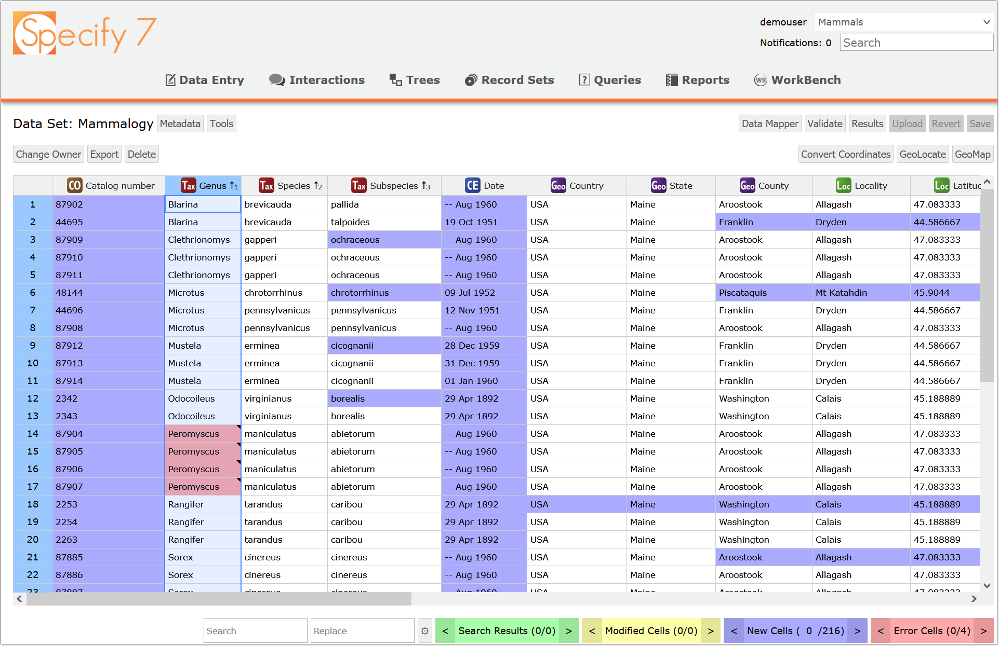
- The WorkBench Data Editor (Fig. 2.) is an interactive, spreadsheet-like page for editing, validating, and uploading data into Specify. It supports many editing functions including: column sorting, drag-and-fill, copy-and-paste, search-and-replace, spatial mapping, georeferencing with GeoLocate, and exporting. The Data Editor is capable of handling Data Sets containing hundreds of thousands of rows. With the Validate function, the Editor diagnostically highlights cells as shown in the lower right of the page. Search results are highlighted in green, edited cells in yellow, cell values "new to the database" in blue, and error cells in red. Counts are shown for each status type and the adjacent navigation arrows move the focus to the next or previously highlighted cell.
Each column header row of a Data Set includes the icon for the mapped database table, along with the name of the field; information that comes from the Data Mapper. Columns without a data mapping show the symbol: 🚫 in the header row. Data in those columns are greyed out, cannot be edited and will not be uploaded. Data Set columns can be sorted and re-ordered for more efficient editing. In addition, data in columns mapped to tree-structured data tables, can participate in cascading sorts by tree rank. For example, Taxon table columns can be alpha sorted on genus, within genus by species, and then within species by subspecies.
Action buttons on the Data Set Editor page, starting from the right side, include: "Save" for saving edits, "Revert" for undoing all changes made during the session, and "Upload" for moving the Data Set into the database. "Results" provides a preview of upload results with the number of new Specify database records that will be created from an upload, and then shows the actual number of new records after an upload has completed (they should be the same). "Validate" checks for "newness" and various (integrity) errors in Data Set Cell values. The "Data Mapper" button returns to the Data Mapper page. On the left side of the page, clicking on the "Tools" button opens a second line of action buttons including "Change Owner" to change the owner (Specify user) of the Data Set, "Export" that creates a copy of the Data Set in .csv file format. "Delete" permanently deletes the Data Set and it's Upload Plan. On the right side, "Convert Coordinates" formats georeference columns to a preferred style, "GeoLocate" invokes the remote GeoLocate service for georeferencing a single Data Set row, or multiple rows. "GeoMap" shows the geographic location of a highlighted Data Set rows on a map, if georeferences are present, with multiple base layer options from internet map servers. The Search/Replace functions at the bottom of the Data Editor page have several parameters accessible through the adjacent settings icon (gear) to optimize search and replace behaviors.
Introduction. Checking WorkBench data for errors and other quality issues is done with the "Validate" action. Validate sends all of the rows in a DS, which are initially loaded in the web browser, to the Specify 7 server as a batch to quickly scan for any data quality issues. Validate looks for various kinds of errors and also determines if the data in each cell are "new" (see Specify's definition of "new" below). "Validate" verifies that data in cells do not violate the format, required presence, or uniqueness constraints imposed by the database schema, your interface schema settings, or by settings in your Upload Plan. Validate actually runs a test upload in order to analyze and display the validation status of Data Set cells.
i. "New Cells" Blue-highlighted cells indicate data new to the Specify database. "Newness" indicators are essentially a "reality check" to visually verify that there are no gross mis-mappings between DS columns and database fields. Newness highlighting also helps ensure that the vocabulary, syntax and spelling of DS cell values correspond to the constraints and properties applied to data in your database. Specify has two different ways of identifying "newness" of a Data Set cell value.
For cell values mapped to Specify database tables that are not tree-structured data, "newness" is evaluated on a database table-by-table basis in such a way that if any Data Set cell value is new to the database field to which it is mapped, all of the Data Set columns mapped to that same database table will also be highlighted blue. For example, if Agent names are being uploaded and there are three mapped columns for a three-parted name and the database has an entry for the person with full names for all three values, and if the Data Set has the middle name abbreviated as an initial, all of the Agent mapped fields in that row will be highlighted new because the WorkBench interprets the Data Set values as a new name. Similarly, differences in syntax or formatting between values in DS cells and those in the database mapped fields, will cause the WorkBench to evaluate all the fields mapped to that database table as new in that DS row. Cells highlighted as "new" in a DS do not always represent values that are new to your database, a cell may be highlighted blue because it is accompanied by one or more cells in a DS row mapped to the same table whose contents will result in the creation of a new database record in that table.
For tree-structured data in Specify, "newness'' is visualized differently to reflect the hierarchical nature of the data elements in those tables. Data in the tables Taxon, Geography, Storage Location, Lithostratigraphy, and Chronostratigraphy are visualized in Specify as trees, with columns reflecting the ranks of a classification, and lines showing the parent-child relationships between data elements. For determining newness in the case of tree-structured data, the WorkBench highlights the highest ranked new value in a row for a database table, and also any columns of lower rank in that row. Newness flags a new term for the database and also any "child" data node in the DS that necessarily must also be new as a child under a new parent. For example, if a genus name in the DS is new to your Specify Taxon tree, it will be highlighted as new, as will a species epithet and any subspecies or variety name in that row. If a term, such as a species epithet, already exists in the database under a different genus and the name of a genus in a DS is new, the WorkBench still flags the species name as new because it is a new taxon in your database--in this case a new species node under a new genus. With tree-structured data, the designation of newness takes into account implicit parent-child relationships among columns mapped to the same database table.
Important usage note: Validate only highlights data cells as "new" the first time it encounters a "new" value within a Data Set column. If you have 100 records with a geographic place (Geography table) named "Middle Earth", which is new to your database, Validate will highlight only one "Middle Earth" cell--the first one it encounters--as well as any other lower rank cell values mapped to Geography. After the Validate process has completed, one can sort a DS column containing cells highlighted as new, and easily see each unique, "new" value in that column.
ii. "Error Cells" Red highlighted "Error" cells identify a data conflict or quality issue (or an issue with an entire column) that will prevent the DS from being uploaded because their contents violate a database or collection customization or data format constraint, e.g. when required field values are not present, or when there are new values in a read/only picklist field column that are illegal, or where a date format is incorrect. All cells flagged as errors must be corrected before a Data Set can be uploaded. Mousing over an error cell will provide a brief description of the issue.
iii. "Ambiguation Errors'' This type of error can arise with columns mapped to Specify tree-structured data tables (Taxon, Geography, Storage Location, Chronostratigraphy, or Lithostratigraphy), and like other error types they need to be corrected before a Data Set can be uploaded. An "ambiguous match" occurs when a cell value to be uploaded to a tree-structured data table, matches two or more existing values in the database field to which it is mapped.For example, with taxon names this can happen when the database Taxon data table (tree) has two or more instances of the same name from previous uploads or from some past determination or tree-editing activity. For instance, a particular genus may exist in a tree under two different families. If that genus occurred as the highest level taxon rank in a Data Set, Specify would not know which of the existing taxon entries should be matched with the taxon name in the DS row. The cell is therefore colored red as an error in the DS because of the ambiguous match. Ambiguous matches between the values in the DS and entries in the database must be disambiguated before the DS can be uploaded. Designating the appropriate database value to match is done by right clicking on an ambiguation error cell and then choosing "Disambiguation" from the context menu. From the resulting dialog window, one can then choose the name in the tree to which the incoming name should be matched. If there are multiple occurrences of a value creating multiple ambiguous matches in a Data Set column, one can click on each row and designate the matching value in the database one record at a time, or by using the "Apply All" button, all cells with that value can be disambiguated in a single action.
Important usage note: The normal workflow for preparing a Data Set for Upload, involves initially using Validate to identify new and error cells, and then editing error cells to correct any bad or missing required values, or multiple-match disambiguation errors. The Data Set can be saved at any time for subsequent editing. (Saving a Data Set activates the optional Upload button.) If saved, a Data Set can be subsequently opened, validated and edited again as many times as needed. At the end of each editing session the Data Set must be Saved to record changes that have been made.
Specify does not retain disambiguation designations for ambiguous match cells if any other cell in a row is subsequently edited.
For that reason disambiguation errors, if there are any, should usually be corrected after all other types of errors are fixed. (A better long-term solution would be to remove duplicate values occurring at the same rank in a tree.) Re-validating a Data Set does not drop disambiguations, but editing any cell in a row will remove them for that row. If that happens, the ambiguous match error will reappear after re-Validation and will need to be re-disambiguated, and then saved, before the Data Set can be uploaded.
This has since been removed. If you are interested in a demo, please contact support@specifysoftware.org.
This section is a guided walk-through of managing Data Sets in the new WorkBench using a demonstration installation of Specify 7. The demonstration server is linked to an active development branch of Specify; if we make software changes, a new software build will be automatically installed at the top of the hour. If you are exploring this version and the server stops responding, check the clock--if it is on the hour, an updated version is probably being installed. Also the demonstration database used by this demonstration server refreshes once a day at: 3:00 UTC. The refresh replaces the database and Data Sets with fresh copies. Any uploaded test data will be erased with the refresh. If you find a demo Data Set has been uploaded or mutilated, please come back for a fresh copy after the daily refresh. We have not prevented concurrent access and for testing there is only one user "Demouser". It is possible that someone else could log-on and try to edit the same Data Set at the same time.
a. Getting Started
-
Point a web browser at: http://workbench.test.specifycloud.org/
-
Login to Specify 7. Contact support@specifysoftware.org for username and password.
-
Pick a collection to use. For demonstration purposes, we pre-imported external data files to create Data Sets for data mapping, validating, editing, and uploading for these databases: Fish Voucher, Fish Tissues, Entomology, Mammalogy, Invertebrate Paleontology, Lichens, and Vascular Plants. After choosing a collection, click on "WorkBench" in the top level menu to see if a Data Set (DS) is available. You can also exercise the WorkBench by importing your own data files, .xls, .xslx, or .csv file formats are supported. Remember the test server database refreshes every 24h, any imported Data Sets will be removed during the daily refresh.
-
Click on a Data Set or import one of your own.
b. Mapping Data Set (DS) Columns to Specify Database (DB) Fields
- Choose a Base Table to start your mapping process. The Base Table is the type of data object you would like to upload. All of the sample Data Sets contain Collection Object data, except Fish Tissues which is DNA data ("DNA Sequence" Base Table). Typically that will be Collection Object (specimen or lot) records. For any collection Data Set except Fish Tissues, click on Collection Object, then the Data Mapper page will open.
[Note: Another user may have already assigned a Base Table for a particular Data Set and mapped its fields. If someone has already created a data map for a Data Set you can view the existing mapping, edit, and re-save it. You will know if a mapping has been created by seeing the Specify data table icons in the header row cells in the Data Set editor page. All existing Base Table assignments and Data Mappings will be deleted during the database refresh every 24h.]
-
The Data Mapper page shows the names of your Data Set columns in the first column of the screen (see Figure 1).
-
The WorkBench Automapper automatically tries to map DS columns to DB fields by interpreting the names used in DS column headers. The Automapper makes its best guess as to the mapping, but it can guess wrong, e.g. it might assign a column with the ambiguous label "Date" to a date field in the wrong database table.
-
Carefully inspect the path and end point of each column-field mapping row to verify or change the Automapper's suggested mapping. If a column mapping is incorrect, delete the mapping with the [X] button at the start of the row, or open the first table box in that row and select "UNMAP", then map the DS column to the appropriate Specify database field.
-
Map any unmapped DS columns for Specify required fields. The Mapper might suggest some options ("hints") for mapping an unmapped column if you click on the table box labeled "NOT MAPPED". Some DS column names cannot be interpreted to generate mapping hints; if you want to upload those data columns from the DS into Specify, they will need to be mapped by you, either by traversing the data tables in the row, or using Map Explorer at the top of the page.
-
If for a row, the Automapped DS column--DB field pairings are not available or not appropriate, there are two ways to create a correct mapping interactively. The first way is to use the Data Map Explorer on the top half of the screen. One can start in the base table box with choosing a field or a table to extend out the mapping path to an additional table or ultimately to a database field. When you find the database field you want to map to the DS column, press the large "Map" button to complete the mapping. Fields are shown at the top of each list (listed alphabetically by name), tables near the bottom (also listed alphabetically) with arrows to open up the next mapping box of fields and tables. Fields in the Specify database schema that are not present on your customized data forms are shown in gray. You can upload data to hidden fields, but you will not see those data in Specify forms unless those fields are added to the forms by updating the Specify forms definitions. The second way to fill in the mapping rows and interactively map a Data Set column to a Database field, is to use the bottom half of the mapping window. Inside the mapping rows navigate through the tables (like you would at the top using the Map Explorer) until you get to the database field you want to map that DS column to.
-
Optionally, map any additional unmapped DS columns that are not required by Specify but which you would like to upload. Not all DS columns need to be mapped. Unmapped columns are not discarded during uploading, they are simply ignored.
-
Optionally, on the Data Mapper page one can add a new column to an existing DS and then map that column to a database field. This is handy if you have forgotten a field of data or need to add more data before uploading. Click on the "Add New Column" button in the lower left corner of the Data Mapper page. The new column must then be mapped to a database field. Then Validate the mappings and Save the Upload Plan for the new column to appear in the Data Set. A default value for all of the cells in a new column can be set on the Data Mapper page by clicking on the settings icon (gear) for that row, and specifying the value to be placed in all of the cells in the column, or these values can be added using the Data Editor.
-
Use the "Save" button to Validate and Save the Upload Plan. One can also click "Validate" at any time as an intermediate check to see if the Upload Plan contains mappings for all required database fields. After clicking "Save" the Data Set Editor page will open.
c. Validating, Editing, and Uploading a Data Set
-
In the Data Set Editor, click on its "Validate" button to determine if there are any data errors and to review data highlighted as new.
-
Edit the Data Set, make changes and corrections. Fix disambiguation errors last in each row before Saving.
-
Save changes using the "Save" button.
-
Execute "Validate" again to confirm that there are no errors remaining in the Data Set. It's not uncommon for errors in some cells to mask additional underlying errors in the same row. After correcting errors cells in a row, running Validate again after Saving, checks for that possibility. If there are no errors after the last Validate, skip the next step, the Data Set is ready for uploading.
-
Continue editing if any error cells remain, by repeating steps 16, 17, and 18.
-
Upload the Data Set using the "Upload" button.
-
If the Upload fails, none of the records in the Data Set will be uploaded, the DS will remain intact for additional editing. Return to Validate, step 15.
-
If the Upload is successful a dialog box will confirm. Optionally review the summary of new database record counts by clicking on the "Results" button.
-
Using the "Revert" button, the Upload can be reversed. Uploaded records can only be backed out of the database while they have not been updated, or linked to, by actions of other Specify users. After an Upload is Reverted, Specify will restore the Data Set for editing.
-
A Specify Record Set is automatically created when a DS is uploaded to enable inspection of uploaded records in Specify data forms. (Record Sets contain pointers to data objects, not the data records themselves.) Click on "Record Sets" in the Specify top level menu and select the Record Set to review the uploaded records to look for any problems.
-
A Data Set is labeled "Read-Only" after uploading and cannot be uploaded a second time.
-
If it is not needed for archival reference, a Data Set can be deleted after uploading. Its Upload Plan will also be permanently expunged and will become unavailable for re-use. The upload-generated Record Set remains until deleted.
Important Usage Note: This section describes settings for advanced uploading use cases. For evaluation, this section can be safely skipped. For most WorkBench uses there is no need to modify the WorkBench defaults for the parameter settings described below.
- Parameterizing Matching Behavior
Specify WorkBench "Match Behavior" parameters influence how it evaluates the presence of a match between the content of a Data Set cell to be uploaded and the existing content in its mapped database field. These Match settings determine whether a new record is created or an existing record is re-used under various conditions. These advanced settings are used for special upload requirements. To access them click on the settings gear icon (⚙) in a mapping row on the Data Mapper page.
- " Never Ignore" [Default] For most match evaluations uploads, this is the preferred setting.
An existing record in a database table can be reused only when it has values identical to all of the values in the cells of the DS columns mapped to that table. This is the normal, expected behavior for evaluating matches between database table fields and DS columns mapped to that table. For example, if there are three DS columns mapped to three fields in the Locality table, and one of the three mapped value pairs do not match, a new Locality database record will be created. Alternatively, if the contents of the three paired DB fields and DS cells all match, then the existing database record is reused and relationally linked to the new content, and a new database record is not created. Data values or blanks in those columns that are not mapped to database fields play no role in the evaluation of a match.
- " Always Ignore"
This setting eliminates consideration of the cell values in a mapped DS column for purposes of evaluating a match for the cells mapped to a single database table. The contents of the cells in the "Always Ignore" column are only uploaded if the match evaluations of other DS cells mapped to fields in that same table do not match, causing a new database record to be created. Only in that case would the cells in the "Always Ignore" column be uploaded. If all of the other mapped cell-field pairings for that DS row match a DB table record, the "Always Ignore" column cells are not uploaded and the existing database record is re-used.
A simple usage scenario would be where one has a well-curated Taxon table, and an incoming Data Set has genus, species, author, and date of publication columns mapped to the corresponding Taxon table fields. And where the desired result is to not create a new, duplicate Taxon record if the cell values in a Data Set row have matching values in the Taxon table for the fields: genus, species, author, but not for a publication date. Because the WorkBench does not augment existing records, it would normally evaluate the DS row as a new record (if all four columns were using the default "Never Ignore" option) and create a duplicate Taxon record that included the publication date information. Another example of "Always Ignore" for a column might be to ignore spelling, punctuation, or variant abbreviations of person names in a Taxon author column when the Taxon table (tree) already contains curated and standardized author information. The basic idea is that DS columns of little importance, that may have not been carefully controlled or edited, should not be involved in the evaluation of whether a match exists because existing database records are preferred. Existing database records may be known to be correct or they may comprise a controlled vocabulary, and creating a new record to document a minor or trivial difference in DS cell's content is not desired.
- " Ignore When Blank"
This setting functions similarly to "Always Ignore" but in this case only applies to Data Set column cells that are blank. Normally, the WorkBench treats empty cells in the Data Set as values, so that if a mapped cell is empty and the corresponding database field contains data, a new record would be created in a database table because an empty cell would not match the contents of the database field. A usage example for this Match parameter option would be where a Data Set contains Taxon entries including a column containing taxon authors and publication dates, but where for some rows in the Data Set Taxon cells in that column are empty. The desired matching behavior of the WorkBench would be to ignore the blank cells in that column, and to not create a new Taxon record due to a cell without an author/date value. In summary, when "Ignore when Blank" is set, Specify will not use the blank cells for determining a match and therefore do not cause new records in that table to be created.
a. "Allow Null Values" [Default: On]
When "On", Data Set cells containing the "null" value and visualized as blank cells will be considered valid for uploading, unless the Specify database schema or interface schema are configured to not allow blank or null values in the field, in that case the WorkBench will highlight them as errors and prevent the DS from uploading. If this parameter is set to "Off" for a Data Set column, and if the upload would create a null value for that field, the WorkBench will highlight the cells as errors and prevent the DS from uploading. Blanks in DS cells are generally evaluated as nulls.
b. "Use Default Value"
This parameter allows a default value to be specified in the Upload Plan for cells in the designated Data Set column. When set, blank cells in the column will be filled with the default value when uploaded while any existing values will be uploaded as is. If a blank string is set as the default, it will upload a blank string, and the "Allow Null Values" setting will be ignored. Setting a default value does not affect the "Ignore When Blank" behavior allowing blank cells to still be ignored rather than attempting to match the specified default value.
c. "Must Match"
Designating any Specify database table as "Must Match" tells the WorkBench not to create new records in that database table if it detects new data in the DS in columns mapped to that table. This optional preference enables upload workflows where the existing contents of a table, e.g. Taxon table records might need to be protected (as read only) so that new records are not created during Collection Object uploads. In this example, if the WorkBench evaluates matches between DS cells with Taxon table records and determines that the DS has new data, it will reject the DS row and prevent the entire DS from uploading. Note this parameter operates at the database table level and overrides any conflicting settings. Activating this setting ensures that no new data is uploaded to the designated table, effectively making it read-only for the Data Set upload process.
The "Must Match" function is accessed through the eponymous action button on the top right of the Data Mapper page.
The Specify WorkBench is not backward compatible with Specify Data Sets created in versions before 7.6.0. Data Sets created prior to this release will not be accessible after an update to the latest version of Specify.
If you are working with Data Sets in the WorkBench, it would be important to upload them into your Specify database with your current version of Specify 7 before updating to Specify 7.6.0 or later.
If you have old, previously uploaded Data Sets (i.e. with records already merged into a Specify database) and wish to keep the old Data Sets for reference, they should be exported from Specify 7 to an external file before updating to Specify 7.6.0 or later.
Specify Cloud Sites Note : Specify Cloud instances are on the latest version. This migration issue is only for users with versions of Specify 7 before 7.6.0.