Release Process
The steps are simple, and almost everything is done via the Bamboo and Artifactory UIs.
Configure your CI build plan to use the Artifactory Maven 3 or Artifactory Gradle tasks as appropriate. For "Deployer Username", use "buildmaster" (password on request).
- Stage the release into the libs-staging-local repository
- Verify and test the staged artifacts
- Promote the release to libs-milestone-local (or libs-release-local as appropriate).
- Merge release branch
- Announce the release
The Artifactory Bamboo plugin mentioned above also includes sophisticated Release Management capabilities. This feature allows for publishing releases directly from CI, including creating a release branch and/or tag; incrementing the project version; and publishing to the libs-staging-local, libs-milestone-local or libs-release-local repositories as appropriate.
To access this feature, click on the "Default Job" for the Spring 3.2.x build plan, where you'll see a link to "Artifactory Release Management". Fill out the form fields there and click "Build and Release to Artifactory". Typical values -- in this case for a milestone release -- look something like the following:

In the example above, the version property key refers to the property of the same name declared in gradle.properties in the root of the source tree. This value will actually be modified and updated in source control during the release process.
Using a 'release branch' is optional, but recommended. This means that updates to the gradle.properties file will occur on a branch named 3.2.0.M1, helping to isolate the release from changes on the master branch, and also allowing for simplified rollback in case a last minute change needs to be made after staging the release.
'Create VCS Tag' is also checked, indicating that a git tag named 'v3.2.0.M1' should be created, pointing to the commit where the version property is incremented.
Notice that 'Next development version comment' is blank. Because this is a milestone release, the 'next integration value' of the version property is configured to return to it's previous value of '3.2.0.BUILD-SNAPSHOT'. The tooling is smart enough here to avoid creating an additional commit, so no comment is necessary.
Importantly, notice that we're publishing to the 'libs-staging-local' repository - this is just what it sounds like: a staging area that allows us to test out the release internally before finally promoting it to the actual 'libs-milestone-local' repository and announcing it to the world.
With these values supplied, click 'Build and Release to Artifactory'.
When the staging build and release process is complete, you can navigate to the associated build record in Artifactory to verify that all modules were published as expected, e.g.:

Note that in the Artifactory tree view, you can easily drill into jars and zips to inspect their contents, e.g. manifest files, javadoc, reference docs, etc, e.g.:
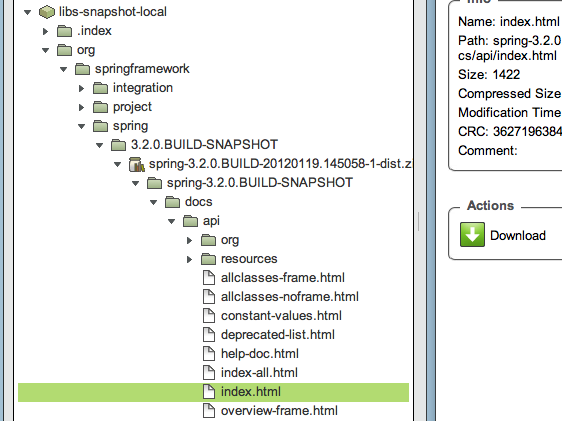
In the example above, clicking the 'Download' button will open the API javadocs in the browser -- a nice convenience.
You may also wish to have internal team members 'smoke test' the release, e.g. change their sample projects and dependent framework builds to point to https://repo.spring.io/libs-staging-local and compile/test/run against the staged artifacts.
When verification is complete, return to the build in Bamboo from which you staged the release and click 'Default Job' and 'Artifactory' at the top, below the Job status bar. Make sure you have the side-bar shown in order to see this. You'll now see 'Promotion' options as follows:

The 'Target promotion repository' is set to 'libs-milestone-local'. Click 'Update' to move all artifacts from 'libs-staging-local' to 'libs-milestone-local'.
At this point, the release is complete and successful, so the release branch should be merged back into master, e.g.
$ cd spring-framework              # your local spring-framework working copy
$ git checkout master
$ git fetch --all                  # to fetch the branch created during the release
$ git merge springsource/master    # make sure you're up to date
$ git merge springsource/3.2.0.M1  # assuming your remote is named 'springsource'
$ vi gradle.properties             # bump the version to 3.1.0.BUILD-SNAPSHOT
$ git ci -am"Increment version to 3.2.0.BUILD-SNAPSHOT"
$ git push springsource master:master
At this point, announcements may be made and users may consume the released artifacts by adding https://repo.spring.io/libs-milestone-local to their build scripts.
GA releases of Spring Framework are published not only to https://repo.spring.io/libs-release-local, but also to Maven Central at https://repo1.maven.org. This allows for maximum convenience for the majority of Spring users, given that most users have Maven-based builds and Maven resolves artifacts by default from Maven Central.
The preferred way of releasing artifacts to Maven Central is via Sonatype's Nexus server at oss.sonatype.org (OSO). This is explained in detail in Sonatype's OSS usage guide.
The Spring Artifactory repository has been customized with a "nexus-push" plugin that allows for automatic propagation of builds from Artifactory to the Nexus server at OSO for publication into Maven Central.
All Spring projects -- that is, all projects having groupid org.springframework -- can publish to OSO under the shared 'springsource' account. This has already been set up in the nexus-push plugin, so there's no additional setup necessary at OSO, even for new projects.
The Artifactory Bamboo plugin supports use of the nexus-push plugin through it's UI. Step 3 of the the FAQ entry above on publishing releases described the process for promoting a build out of staging. If the build is a GA release, simply choose the 'Push to Nexus' option, and select 'libs-release-local' as the target repository:

Choosing this option means that the build will first be published into a staging repository at OSO and 'closed' in Nexus terminology. The 'closing' process will check your build artifacts to ensure they meet the requirements for publication into Maven Central, e.g. that POMs are properly formed, that all artifacts have checksums, PGP signatures, etc. If there are any errors in the repository closing process, they will be displayed in the Bamboo UI and the promotion process will fail. At this point you'll need to correct the issues and walk through the release staging process described above once again.
Note that with regard to requirements for OSO onboarding, Artifactory automatically generates sha1 and md5 checksums for all artifacts, so you don't need to worry about this. Furthermore, a custom plugin has been developed for repo.spring.io that adds PGP signatures (.asc files) on the fly during upload using the buildmaster@springframework.org PGP key. You simply need to make sure that your build produces jars (including -sources and -javadoc jars) and well-formed poms. Any zip files such as distribution or doc zips are excluded from the promotion process to OSO.
When the promotion process is complete, i.e. closing the staging repository at OSO succeeds, there is one additional step - you must log into https://oss.sonatype.org with the 'springsource' account and manually 'release' to Maven Central.
- Go to https://oss.sonatype.org and click 'log in'
- username: springsource; password: on request
- Click on "Staging Repositories".
- You will see your closed staging repository there; click to select it.
- Click the 'Release' button. It looks something like this:

When you're prompted for a description, you can leave it blank.
Pressing the release button means that your artifacts will be published into Maven Central, but beware -- there's no going back after this point!
Synchronization to Maven Central should be complete within three hours of pressing the 'release' button. In practice, it is usually two hours or less, but with just the right timing (or wrong timing as the case may be), you may need to wait the full three. If your artifacts do not show up at https://search.maven.org within four hours, email buildmaster@springframework.org and ask about escalation to Sonatype.
First, you'll find three important tasks in the root build.gradle script: docsZip, schemaZip, and distZip. As you might guess, these create zip files containing docs and schemas in the case of docsZip and schemaZip respectively; distZip aggregates the contents of the first two and adds in all classes jars, -sources jars and -javadoc jars.
As described in the release process documentation above, all artifacts produced by the Spring Framework build are published into Artifactory, including these zip archives. This provides a consistent storage mechanism, but ultimately the docs and schema zips need to be published and unpacked at https://static.springframework.org/spring-framework/docs and https://www.springframework.org/schema, respectively. For example:
- https://static.springsource.org/spring-framework/docs/3.1.0.RELEASE (changelog, api javadocs, reference docs)
- https://www.springframework.org/schema/context (xsd files for spring-context)
Performing these uploads directly from the build script is problematic. It requires the build to use SSH libraries in order to SCP and unpack the zip files, which is already complex, but worse it requires that the operator of the build script has the correct SSH key authentication configured on the remote servers, and that they are within the VMware VPN.
To avoid this complexity, a separate process called 'autorepo' runs periodically (every 20 minutes), querying Artifactory for these for docs and schema zips. When new ones are found, the autorepo process does the heavy SSH lifting to upload and unpack them at the sites mentioned above. This script is currently under development, but you can see the results of the prototype effort at https://static.springsource.org/autorepo/.
In order for autorepo to work properly, these artifacts must be annotated in Artifactory with custom metadata. This metadata is attached to the artifacts on upload by the Artifactory Bamboo plugin. Here's the configuration in the Spring Framework 3.2.x build plan:

And here are those properties in copy-pastable form:
archives *:*:*:*@zip zip.name:spring-framework, zip.displayname:Spring Framework, zip.deployed:false
archives *:*:*:docs@zip zip.type:docs
archives *:*:*:dist@zip zip.type:dist
archives *:*:*:schema@zip zip.type:schema
Note: Full documentation for this feature can be found in the Artifactory Gradle plugin documentation.
The zip.type property tells autorepo that the artifact is a 'docs', 'schema', or 'dist'. The zip.deployed property tells autorepo whether it has already uploaded and unpacked this artifact. When autorepo detects a new docs or schema zip (zip.deployed == false), it performs the uploading and unpacking, and then sets the zip.deployed property to true.
The dist zip, on the other hand, remains within Artifactory.
The zip.displayname value is used by autorepo to determine where in the community download page the artifact should show up. So this value should match whatever name your project already has on the community download page.
Once autorepo is working, you may want to see autorepo version updating