Installing Oppia Android
This wiki page explains how to install Oppia Android on your local machine. If you run into any issues with the installation process, please feel free to ask on GitHub Discussions, so that we can help you while also making these instructions better for other developers. Thanks!
Note: Once you have set up the app locally, you might want to contribute code to the repository. Please follow our onboarding instructions to get started!
-
Download/Install Android Studio Bumblebee | Patch 3.
Note: We recommend installing Android Studio Bumblebee | 2021.1.1 Patch 3 because newer versions of Android Studio do not support running tests where shared source sets are used, a configuration we use at Oppia.
Direct download Url: Windows | Linux | Intel Mac | Apple Silicon Mac
You can have multiple versions of Android Studio installed on your machine at the same time.
-
Configure your Android Studio
-
In Android Studio, open Tools > SDK Manager.
- In the "SDK Platforms" tab (which is the default), select
API Level 28and alsoAPI Level 30(for Bazel support). - Also, navigate to the "SDK Tools" tab, click the "Show Package Details" checkbox at the bottom right, then click on "Android SDK Build-Tools 34-rc1" and select 29.0.2 (this is needed for Bazel support).
- In the "SDK Platforms" tab (which is the default), select
-
Then, click "Apply" to download and install these two SDKs/Tools.
-
Must have JDK 11 selected:
- In Android Studio, open Settings > Build, Execution, Deployment > Build Tools > Gradle and edit the Gradle JDK field.
-
Please follow these steps to set up Oppia Android on your local machine.
-
Create a new, empty folder called
opensource/within your home folder. Navigate to it (cd opensource), then fork and clone the Oppia-Android repo. This will create a new folder namedopensource/oppia-android. Note that contributors who have write access to the repository may either create branches directly on oppia/oppia-android or use a fork.Note: Please keep the folder name as
oppia-android. Changing the project folder name might lead to future issues with running the pre-push checks on your machine. -
Run the
bash scripts/setup.shscript, which adds some development tools for Oppia Android (ktlint, checkstyle, etc.): These tools perform pre-push checks to ensure that your code is properly formatted as per Oppia standards.-
For Mac or Linux
- Open a terminal and navigate to
opensource/oppia-android/. - Run the script
bash scripts/setup.sh.
- Open a terminal and navigate to
-
For Mac with Apple M1 chip
- Locate Terminal in Finder.
- Right-click and create a duplicate Terminal (and rename it accordingly, say Terminal x86, to avoid confusion).
- In the Terminal x86, right-click and click "Get info", and check the option "Open using Rosetta".
- Navigate to
opensource/oppia-android/in Rosetta. - Finally, run
bash scripts/setup.shin Terminal x86 and all the required files should be generated. (You should see messages likeKtlint file downloaded, etc.)
-
For Windows
-
Install Git Bash Command Line
Note: When installing Git bash, check the option to add it to powershell, so that you can run bash commands from within powershell.
-
Open Git Bash Command Line.
-
Navigate to
opensource\oppia-android\. -
Run the script
bash scripts/setup.sh. -
Download the google_checks.xml file. To do this, you can simply right-click on the download button at the top-right of the file.
-
Copy this file to the directory where Git is installed (usually C:/Program Files/Git/).
-
-
-
In Android Studio, select
File > Open, navigate toopensource/oppia-android/, and clickOKto load the project. -
Select the Compile JDK version
- Go to Android Studio > Settings > Build, Execution, Deployment > Build Tools > Gradle
- Under "Gradle JDK", select Android Studio Default JDK 11.
- Then, click "Apply" and "OK" to complete your setup.
-
Click the elephant icon in the toolbar ("Sync Gradle") to ensure that all the correct dependencies are downloaded. (In general, you'll want to do this step any time you update your dependencies.)
-
Go to Tools > AVD Manager, click "Create Virtual Device...". Then:
- Select a preferred device definition. In general, any device is fine, but you can use Pixel 3a as a default (if you're developing for phones) or Nexus 7 (if you're developing for tablets). After selecting a device, click "Next" at the bottom right to continue.
- Select a system image (in general, API Level 28, unless you're an M1 Mac user, in which case use API Level 29). Then click "Next".
- Click "Finish" to complete setup.
-
To run the app, select the emulator device you want from the dropdown menu to the left of the "Run" button in the toolbar.
-
Finally, click the "Run" button.
Testing the app is an integral part of our development process. You will need to test all code changes to ensure that the app works correctly, therefore it is important to ensure that your test configuration works.
We strongly recommend running tests on Robolectric which is faster because it does not require a physical device or emulator setup.
-
Go to Edit Configuration in Android Studio (Bumblebee | 2021.1.1 Patch 3)
-
Click on Add(+) -> JUnit

-
Enter following information:
- a) Name of test. Example: In my case "SplashActivityTest"
- b) Make sure select "java 11" and oppia-android.app
- c) Class path of Test class. Example: In my case "org.oppia.android.app.splash. SplashActivityTest"
- d) Press
OKto select the test.
-
Click on "Run" button to run robolectric test. (In my case "SplashActivityTest")

- In Android Studio, open the desired test file, e.g.,
AnalyticsControllerTest. - In the test file, to the left of the class name, click on the orange and green arrow, and select Run 'AnalyticsControllerTest'.
- You will notice that the emulator is greyed out, but the run window will open to show the running tests:
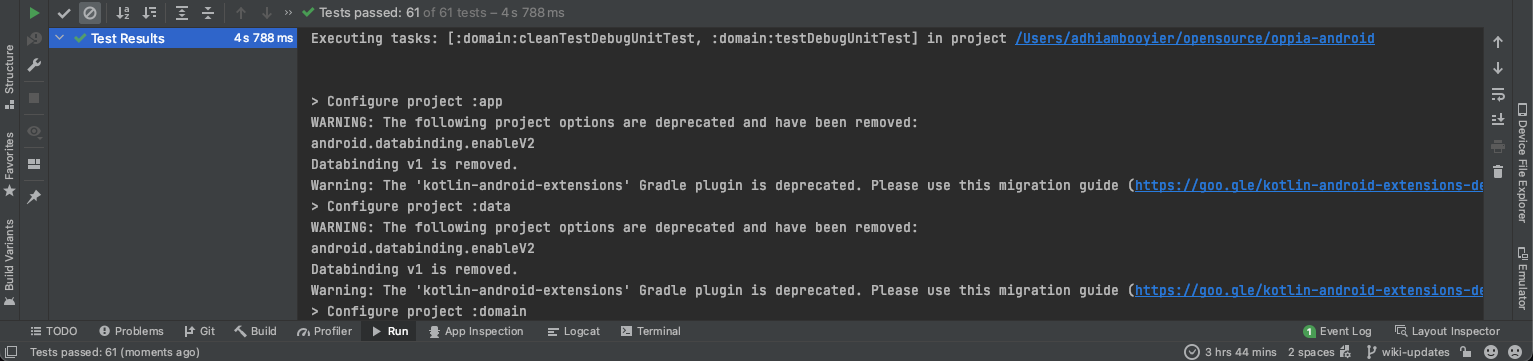
- You will notice that the emulator is greyed out, but the run window will open to show the running tests:
Espresso is slower for running tests, so we recommend using Robolectric.
-
In Android Studio, open the desired test file, e.g.,
HomeActivityTest. -
In the Android Studio toolbar, click on the
Available Devicesoption. Select an emulator that has between API 28-30.Note: If you don't have any available devices in this list, please follow these instructions to create one.
-
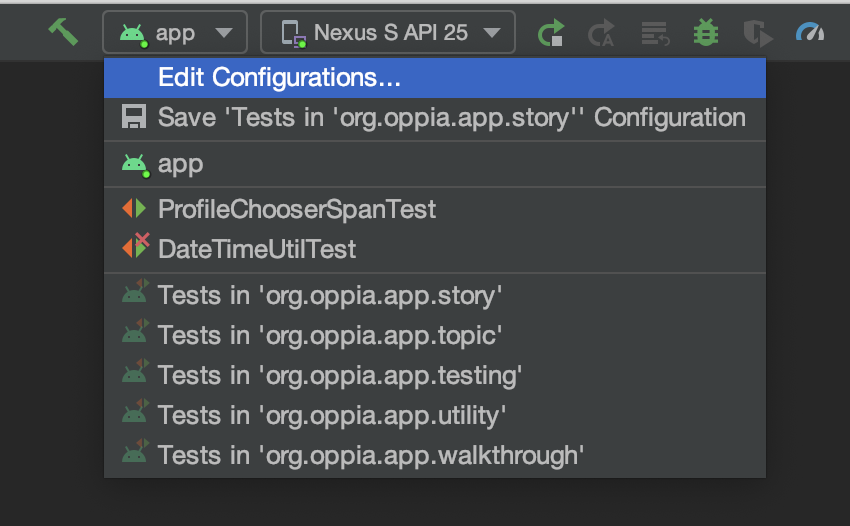
In the test file, to the left of the class name, click on the orange and green arrow, and select Run 'HomeActivityTest'.

-
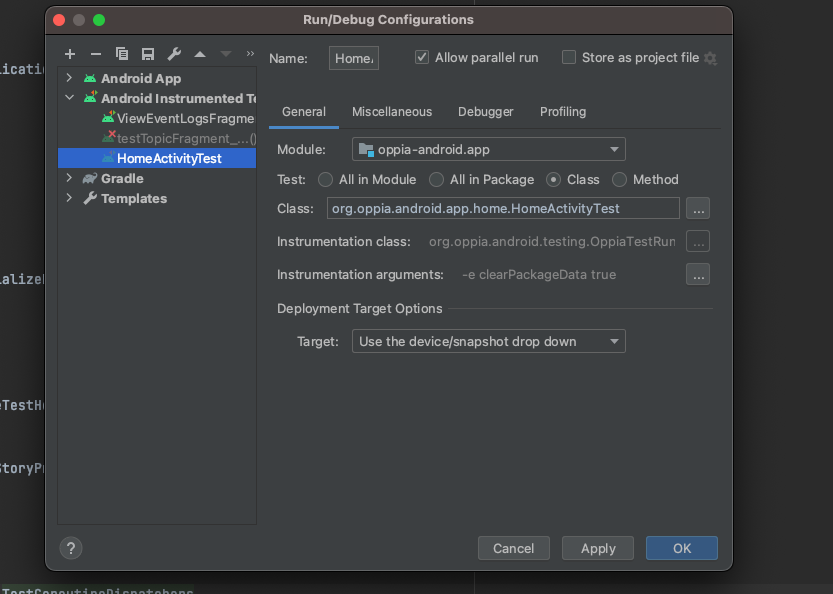
An "Edit Configuration" dialog will show up, and you should add the following settings under the general tab:
-
For module, select oppia-android.app
-
For Test, select Class
-
For Instrumentation class, org.oppia.android.testing.OppiaTestRunner, will be selected by default.
-
For target, select the Use the device/snapshot dropdown option.
-
Verify that your setup looks like below:
-
- Finally, Click the "Apply" and "Okay" buttons.
- You may need to repeat step (3) above to run the test with the new configuration.
- Subsequent runs of any app module tests will not require editing the configuration.
- This configuration will run all the tests in that class.
- To run only a specific test in a file:
- Search or scroll down to the desired test name, to the left of the test name, click on the run icon and select Run '
test name''.
- Search or scroll down to the desired test name, to the left of the test name, click on the run icon and select Run '
-
Congratulations, you are ready to work on your first issue! Take a look at our good first issues and leave a comment with your suggested fix. A maintainer will assign you the issue and provide any necessary guidance.
-
When you are ready to submit a PR, please follow these instructions on submitting a PR.
-
To learn about how we write tests at oppia-android, please refer to: Oppia Android Testing.
-
To get started with Bazel, please see Oppia-Bazel-Setup-Instructions and follow the instructions appropriate to your OS.
-
If you run into any issues during your setup, search our discussions forum or start a new discussion.
-
Please see Troubleshooting-Installation for solutions to some common setup issues.