Guidance on submitting a PR
Working on your first pull request? Pull requests (PRs) can be tricky to understand at first, so if the instructions on this page don't make sense to you, check out these resources:
- The free series How to Contribute to an Open Source Project on GitHub
- Atlassian's tutorial on pull requests.
Here are the steps for making a PR to the Oppia Android codebase:
- Make a local code change
- Create a PR on GitHub
- Address review comments until all reviewers give LGTM (this section is important, please read it carefully)
- Tidy up and celebrate!
Note: If your change involves more than around 500 lines of code, we recommend first creating a design doc. This helps avoid duplication of effort, and allows us to offer advice and suggestions on the implementation approach.
- Step 1: Making a local code change
- Step 2: Create a PR on GitHub
- Step 3: Address review comments until all reviewers give LGTM
- Step 4: Tidy up and celebrate!
Before you make a PR, you'll need to make and test the changes locally. To do this, please follow the following instructions carefully! Otherwise, your code review may be delayed.
- Making a local code change using the terminal
- Making a local code change using Android Studio's UI-based Github workflow
-
Update your repository. The new branch should be based on the latest code in develop, so checkout the latest version of develop like this:
git fetch upstream git checkout develop git merge upstream/develop -
Create a new branch with a descriptive name. In the example below, the branch is named
your-branch-name. The branch name should be lowercase and hyphen-separated, e.g.fuzzy-rules. Make sure that your branch name doesn't start withdevelop,releaseortest.git checkout -b your-branch-name -
Make commits locally to your feature branch. Each commit should be self-contained and have a descriptive commit message that helps other developers understand why the changes were made. However, do not write "Fix #ISSUE_NUMBER" (e.g. "Fix #99999") in your commit messages (or any of the other closing phrases from GitHub's documentation), as this will cause Github to close the original issue automatically.
You can change your most recent commit message using
git commit --amend. Note: It is difficult to change any commit messages other than your most recent one or messages on commits that have been pushed, so write your commit messages carefully!Before making the commit, do some sanity-checks:
- Ensure that your code follows the style rules.
- Run robolectric and espresso tests to make sure you haven't broken anything! If you would to know more about testing on oppia-android, check out Oppia Android Testing
- Run git status to check that your changes are what you expect. To inspect the changes made to any particular file, use git diff your-file-name.
Stage all your changes (the
.at the end refers to your current directory):git add .To actually make the commit, run:
git commit -m "{{YOUR COMMIT MESSAGE HERE}}"Note: There is no maximum or minimum number of commits required in a PR. Instead of aiming for a certain number, you should try to make each commit a logical "chunk" of work. There are many opinions about how big commits should be, but a useful rule of thumb is that you should be able to read the first lines of all your commit messages to get a good idea of what you changed. If you find yourself needing lots of clauses to capture what you changed, your commit is probably too big.
-
Push changes to your GitHub fork. Before pushing, make sure to check the following things, otherwise you will incur delays with the review process or the automated checks:
- Do some manual testing on your local instance of Oppia to check that you haven't broken anything. This is important to avoid breakages.
- Use a tool like
git diff upstream/developto check that the changes you've made are exactly what you want them to be, and that you haven't left in anything spurious like debugging code.
We don't allow force-pushing at Oppia, so once you push your commits, you can't change them. You can still add new commits though.
When you're ready to push, run:
git push origin {{YOUR BRANCH NAME}}Make sure to do this from the command line (and not GitHub's Desktop client), since this also runs some important presubmit checks before your code gets uploaded to GitHub. If any of these checks fail, read the failure messages and fix the issues by making a new commit (see step 3), then repeat the previous instructions to retry the push. Do not bypass these presubmit checks! The checks get run on your PR too, so if you bypass failures on your local machine, you'll just have to fix them later when they fail on the PR.
-
Update your repository. The new branch should be based on the latest code in develop, so checkout the latest version of develop, like this:
On the bottom right side of your android studio screen you will find your branch name. Click on branch_name > develop > Update:

-
Create a new branch with a descriptive name. On the bottom right side of your Android Studio screen, you will find your branch name. Click on branch_name > develop > New Branch from Selected > Enter your new branch name > OK.
Then, create a new branch. In this example the branch is named
github. The branch name should be lowercase and hyphen-separated, e.g.fuzzy-rules. Make sure that your branch name doesn’t start withdevelop,releaseortest.
If you want to go back to "develop" or any other branch/"check-out any branch" you may right-click and find options for that:

-
Make commits locally to your feature branch. Now, when you create a new activity, it will be unversioned and therefore displayed with a reddish-brown colour file name. To add the files to Git/version Select files and click the "Add" button.

New/modified files will be displayed in green /blue colour respectively in the project window. (select file/folder/directory Ctrl+Alt|+A to manually version an unversioned file/files)

Click on the green tick symbol to commit your files.

Now click on commit(This will save the reference of your changes for pushing to Git). If there are errors or warnings, review the code change and fix them before committing.

-
Push changes to your GitHub fork. We need to push the code changes to local branch (origin) and upstream (remote). Right click app > Git > Repository > Push:

Your new branch needs to be added to both origin and upstream remote. Once you push a branch to Git, you won't be able to rename it, so be sure about the naming before pushing:

Once your feature is ready, you can open a pull request (PR)! Here is how to do so:
- Go to your fork on GitHub, select your branch from the dropdown menu, and click "pull request". Ensure that the base repository is oppia/oppia-android and that the base branch is develop. The head repository should be your fork, and the head branch should be your branch. If you don't see the repository, click the link to compare across forks.
- On this page, you can also see your commits and your changes. Read these changes carefully to make sure that the changes are correct. This is a good way to catch obvious errors that would otherwise lead to delays in the review process.
- Click "Create pull request".
You have successfully created a pull request! Now, wait for your code to get reviewed! While you're waiting, it's totally fine to start work on a new PR if you like. Just follow these instructions again from the beginning.
Note: After a while, check your pull request to see whether the CI checks have passed. If not, follow our instructions to diagnose PR failures.
-
UI related issue/bug fix: If your PR introduces changes to the UI/UX part of the app, do the following:
- Include "before" and "after" screenshots (and possibly a video if needed).
- Test the UI/UX with Accessibility Scanner. (Tip: All your dimensions should be in multiples of 4dp.)
- Bug fixes: While fixing an issue labelled Bug, make sure to write test cases which actually catch that bug.
- Self Review: Always self-review your PR first before assigning it to anyone else, so that you can fix nit changes at very early stage. This makes the review process faster.
-
Undo unnecessary changes: Sometimes, Android Studio automatically makes changes to files based on your local studio configuration. Mostly these changes are from
.ideafolder. You can revert these unnecessary changes by following these steps:- Once your PR is created, go to the
Files changedsection available on top of your pull request. For example:
- Then, check all the files in this section and if you see any change which was not done by you, revert it locally and commit again to the pull request. The
Files changedsection should contain only those changes which were done by you.
- Once your PR is created, go to the
- Reviewers: This section is generally ignored by anyone who looks at the PR. It will be filled automatically by Oppiabot. Once this section is filled out, it generally should not change throughout the timeline of the PR.
-
Assignees: The main section to look at is the 'Assignees' field, which indicates the person(s) whom the PR is currently blocked on. Specifically:
- When a PR is created, the assignees section is blank. You can assign a reviewer by leaving a comment on the PR mentioning the reviewer, e.g "@Reviewer, PTAL". Oppiabot will assign the reviewer for you.
- Initially, when the PR is submitted, the Assignees and Reviewers sections should be the same.
- Once a reviewer has reviewed the PR, they should de-assign themselves and assign it back to the PR author.
- Similarly, once the author has made the requested changes, they should assign it back to the appropriate reviewer and de-assign themselves.
When your reviewer has reviewed the code, you'll get an email. You'll need to respond both to the comments and within the code:
-
Make a new commit addressing the comments you agree with, and push it to the same branch. (Continue to use descriptive commit messages. If your commit addresses lots of disparate review comments, it's fine to refer to the original commit message and add something like "(address review comments)".)
-
Always make commits locally, and then push to GitHub. Don't make changes using the online GitHub editor -- this bypasses lint/presubmit checks, and will cause the code on GitHub to diverge from the code on your machine.
-
Never force-push changes to GitHub, especially after reviews have started. This is disallowed and may result in your PR being closed, because it overwrites history on GitHub and makes the incremental changes harder to review.
-
If you encounter merge conflicts, make sure to resolve them using the terminal or Android Studio. (Click the links for more details on how to do this.)
-
-
Reply to each comment via the Files Changed tab, choosing the “Start a review” option for the first comment. Each reply should be either “Done” or a response explaining why the corresponding suggestion wasn’t implemented.
-
When you’ve responded to all comments, submit the review to add all your messages to the main thread. All comments must be responded to and fully addressed before LGTM can be given. You can use the green button in the top right of the "Files Changed" tab to submit any pending comments.
- If you would like the reviewer to take another look, (a) write a top-level comment** explicitly asking the reviewer to take another look (e.g. "@XXX PTAL"), and (b) set them as the assignee for the PR.
At the end, the reviewer will merge the pull request. Note however PRs will only be merged if there are no more requested changes, and all conversation threads have been brought to a conclusion.
- Keep track of the Assignees section, and make sure it's always up to date -- it should always reflect the "next person(s)" who have actionable items left on the PR. If you're ever the assignee, do whatever is currently needed on your end so that you can take yourself off the list (usually, this means addressing open review comments).
- Make sure to address all comments before sending a PR back to a reviewer. Each comment thread should have a reply from you before you send the PR back. This can be either "Done", a follow-up clarifying question, or an explanation for why you don't think a suggestion should be implemented. Don't forget to actually submit your replies (using the green button at the top right of the "Files Changed" tab), otherwise reviewers won't be able to see them!
- Do not "resolve" a thread conversation if you didn't open it. Just re-assign the PR to the reviewer once you address all of the comments. This helps with keeping track of which comments are still "in play".
- Once the PR is ready to merge, add a top-level comment confirming the merge decision, and merge the PR. If any issues need to be filed subsequently, file them and refer to them in the PR via a comment.
To resolve conflicts between ‘new-branch-name’ (in your fork) and ‘develop’ (in the oppia repository), run:
git checkout new-branch-name
git fetch upstream
git merge upstream/develop
git commit -a
git push origin new-branch-name
Usually Git is able to automatically merge files when pulling changes from another branch. But sometimes a conflict arises when two separate branches have made edits to the same line in a file, or when a file has been deleted in one branch but edited in the other.
You can use Android Studio to resolve merge conflicts through its UI-based Git features. Here's how to do it:
-
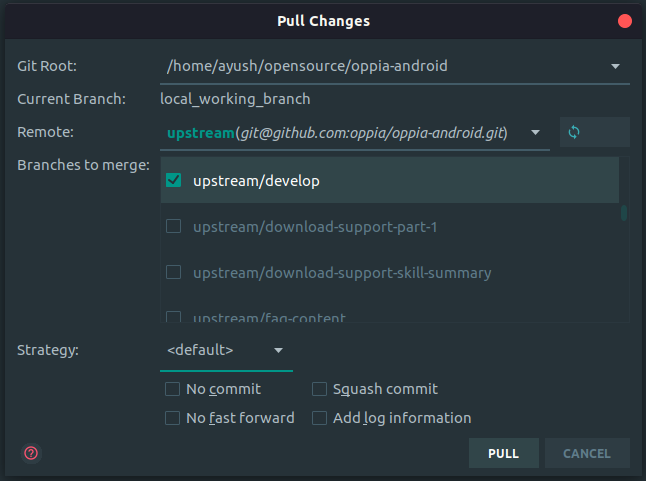
Go to VCS > Git > Pull (set the remote to be upstream and branch to be develop). Or, use VCS > Git > Resolve Conflicts if you have already pulled the changes but haven’t resolved the conflicts.
-
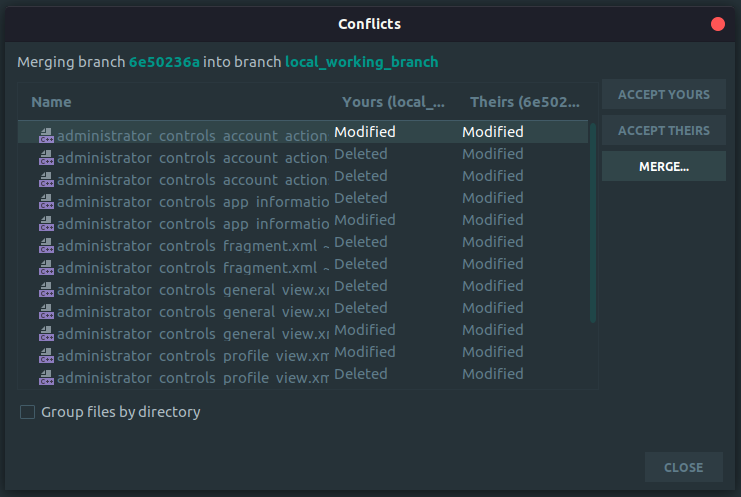
Usually, this will automatically merge the files. However, in the case of conflicts, it will prompt you to tell it what to do with those files.
-
You can either directly accept the changes from develop (discarding your local changes) or keep your own changes (discarding the changes from develop) based on the situation but it is suggested to go through each file line by line using the merge button in the prompt.
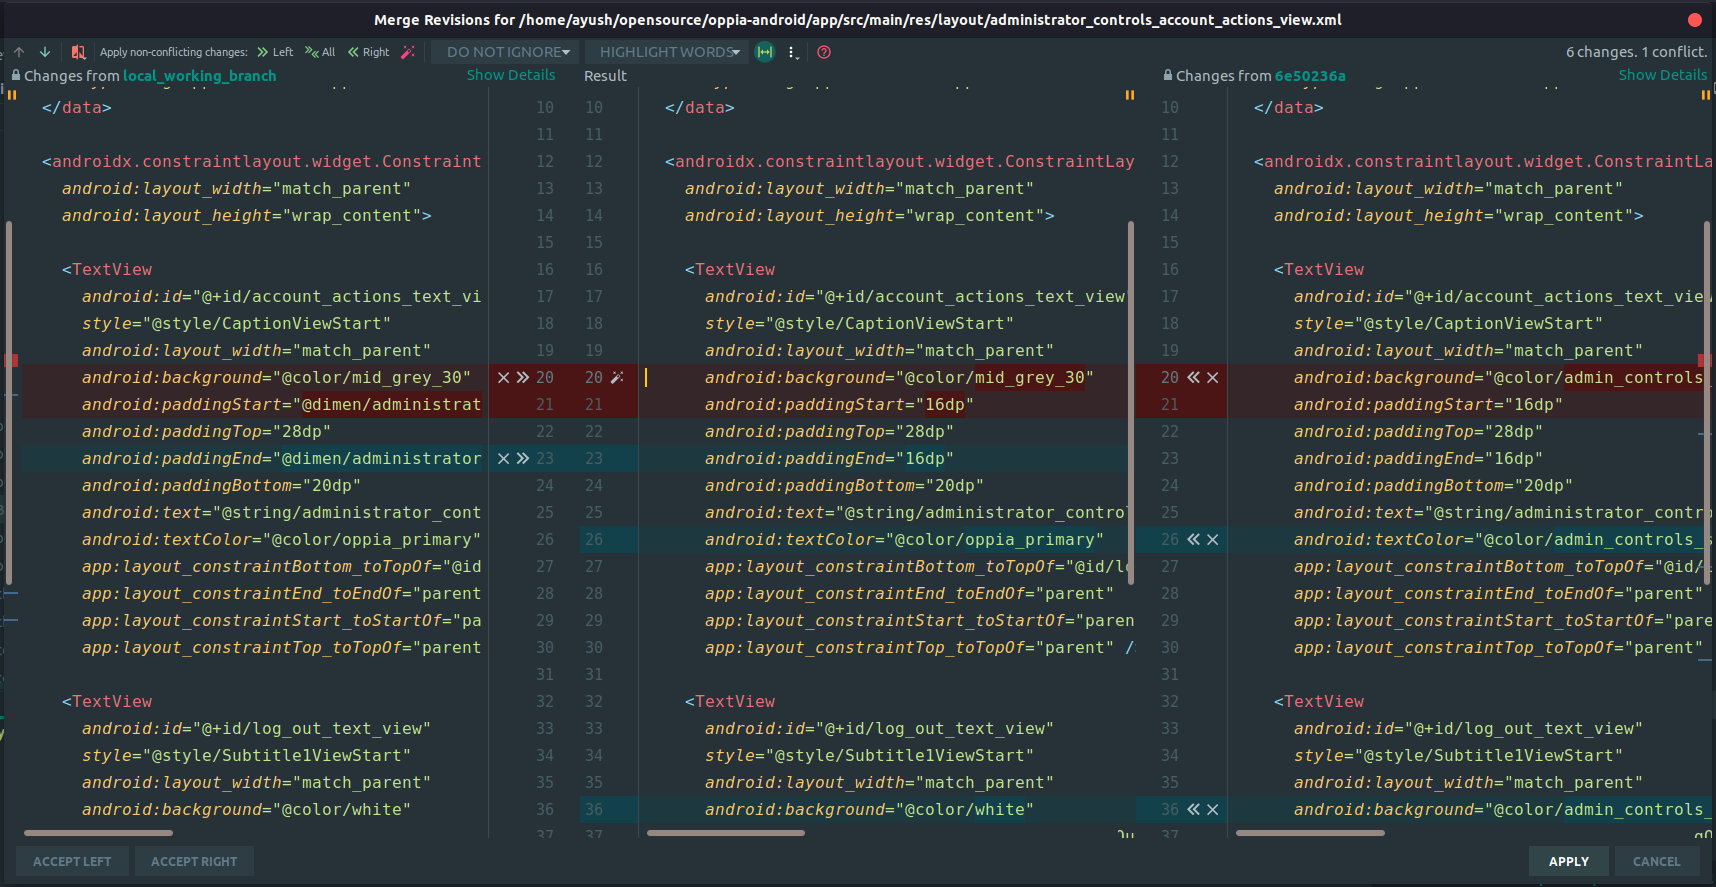
The file on the left shows changes from your local working branch and the file on the right shows the changes from the develop branch while the centre file being the final state of it. You can decide accordingly which change (or both) you want to keep for each conflict one by one using the arrows and cross sign on those highlighted lines. Once the conflicts are successfully resolved you can then commit and push your changes to your working branch.
After the PR status has changed to "Merged", delete the feature branch from both your local clone and the GitHub repository. Congratulations, you have contributed to the Oppia Android project!
If you have already completed 2 pull requests and been added as a collaborator to the project, you should also add a changelog label. If you are a new contributor, you don't have permission to do this. Don't worry! Oppiabot will automatically ask someone to do it for you.