![]()

Veremin is a video theremin based on PoseNet and the brainchild of John Cohn.
It builds upon the PoseNet Camera Demo and modifies it to allow you to make music by moving your hands/arms in front of a web camera.
PoseNet is used to predict the location of your wrists within the video. The app takes the predictions and converts them to tones in the browser or to MIDI values which get sent to a connected MIDI device.
Browsers must allow access to the webcam and support the Web Audio API. Optionally, to integrate with a MIDI device the browser will need to support the Web MIDI API (e.g., Chrome browser version 43 or later).
If you would like to use the pose estimation to control another device you can turn on MQTT to publish the data to an MQTT broker (that supports WebSockets). Other devices or application can then subscribe to receive the positional data.
- PoseNet - a machine learning model which allows for real-time human pose estimation in the browser
- TensorFlow.js - a JavaScript library for training and deploying ML models in the browser and on Node.js
- Web MIDI API - an API supporting the MIDI protocol, enabling web applications to enumerate and select MIDI input and output devices on the client system and send and receive MIDI messages
- Web Audio API - a high-level Web API for processing and synthesizing audio in web applications
- Tone.js - a framework for creating interactive music in the browser
- MQTT - a lightweight publish/subscribe messaging protocol for communicating with IoT devices
- WebSocket API - an interface for sending messages to a server and receive event-driven responses without having to poll the server
- Paho JavaScript Client - MQTT client library written in JavaScript that uses WebSockets to connect to an MQTT Broker
To see the Veremin in action without installing anything, simply visit:
For best results, you may want to use the Chrome browser and have a MIDI synthesizer (hardware or software) connected. See the Using the app section below for more information.
Follow one of these steps to deploy your own instance of Veremin.
Pre-requisites:
- Get an IBM Cloud account
- Install/Update the IBM Cloud CLI
- Configure and login to the IBM Cloud using the CLI
To deploy to the IBM Cloud, from a terminal run:
-
Clone the
vereminlocally:$ git clone https://github.com/vabarbosa/veremin -
Change to the directory of the cloned repo:
$ cd veremin -
Log in to your IBM Cloud account:
$ ibmcloud login -
Target a Cloud Foundry org and space:
$ ibmcloud target --cf -
Push the app to IBM Cloud:
$ ibmcloud cf pushDeploying can take a few minutes.
-
View the app with a browser at the URL listed in the output.
Note: Depending on your browser, you may need to access the app using the
httpsprotocol instead of thehttp
To run the app locally:
-
From a terminal, clone the
vereminlocally:$ git clone https://github.com/vabarbosa/veremin -
Point your web server to the cloned repo directory (
/veremin)For example:
-
using the Web Server for Chrome extension (available from the Chrome Web Store)
- Go to your Chrome browser's Apps page (chrome://apps)
- Click on the Web Server
- From the Web Server, click CHOOSE FOLDER and browse to the cloned repo directory
- Start the Web Server
- Make note of the Web Server URL(s) (e.g., http://127.0.0.1:8887)
-
using the Python HTTP server module
- From a terminal shell, go to the cloned repo directory
- Depending on your Python version, enter one of the following commands:
- Python 2.x:
python -m SimpleHTTPServer 8080 - Python 3.x:
python -m http.server 8080
- Python 2.x:
- Once started, the Web Server URL should be http://127.0.0.1:8080
-
-
From your browser, go to the Web Server's URL
At a minimum, your browsers must allow access to the web camera and support the Web Audio API.
In addition, if it supports the Web MIDI API, you may connect a MIDI synthesizer to your computer. If you do not have a MIDI synthesizer you can download and run a software synthesizer such as SimpleSynth.
If your browser does not support the Web MIDI API or no (hardware or software) synthesizer is detected, the app defaults to using the Web Audio API to generate tones in the browser.
Publishing to an MQTT broker over WebSockets is also possible. You can configure the broker to send messages to. Some keypoints returned by the PoseNet model along with some additional computed values (i.e., distance, angle, etc.) are sent to the broker.
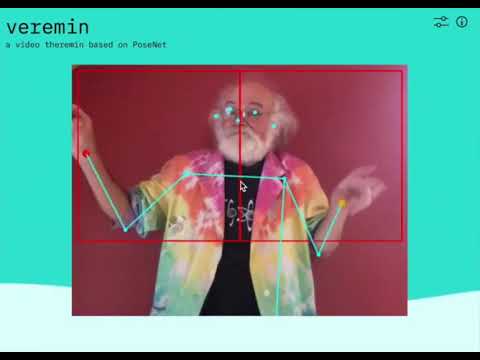
Open your browser and go to the app URL. Depending on your browser, you may need to access the app using the https protocol instead of the http. You may also have to accept the browser's prompt to allow access to the web camera. Once access is allowed, the PoseNet model gets loaded (it may take a few seconds).
After the model is loaded, the video stream from the web camera will appear and include an overlay with skeletal and joint information detected by PoseNet. The overlay will also include two adjacent zones/boxes. When your wrists are detected within each of the zones, you should here some sound.
- Move your right hand/arm up and down (in the right zone) to generate different notes
- Move your left hand/arm left and right (in the left zone) to adjust the velocity of the note.
Click on the Controls icon (top right) to open the control panel. In the control panel you are able to change MIDI devices (if more than one is connected), configure PoseNet settings, set what is shown in the overlay, enable MQTT, and configure additional options. More information about the control panel options is available here.