The is an alternative firmware for the H801 LED dimmer that uses MQTT JSON as a control channel. This makes it easy to integrate into Home Assistant and other Home Automation applications. It also support UDP streams for fast color syncing. Therefore this firmware can be used with Hyperion to sync the color to a TV screen.
It is meant to control the 5 channels of the H801 to simultaneously control an RGB and a Warm-white/Cold-white Led strip such as an 5050 RGB LED strip and a 5025 Dual White strip.

This firmware is based on:
- https://github.com/open-homeautomation/h801/blob/master/mqtt/mqtt.ino
- https://github.com/bruhautomation/ESP-MQTT-JSON-Digital-LEDs/blob/master/ESP_MQTT_Digital_LEDs/ESP_MQTT_Digital_LEDs.ino
- https://www.arduino.cc/en/Tutorial/ColorCrossfader
- https://github.com/ambilight-4-mediaportal/AtmoOrb/tree/master/ESP8266/ESP8266_H801
This firmware offers 4 possible ways of controlling the LED strips connected to the H801:
- Control the RGB strip separately (as a separate light in HomeAssistant)
- Control the dual white strip separately (as a separate light in HomeAssistant)
- Control both the RGB and dual white strip in one light (as one light in HomeAssistant)
- Control only a single color white strip in one light (as one light in HomeAssistant)
Using MQTT discovery HomeAssistant schould automatically discover the H801 and add the 4 coresponding light entities, simply disable the 3 that are not needed and you can immediately control the LED strip.
The RGB strip is controlled using:
| JSON key | value type | possible values | notes |
|---|---|---|---|
| "state" | string | "ON"/"OFF" | |
| "brightness" | int | 0-255 | |
| "color" | dict with 3x int | {"r": 0-255, "g": 0-255, "b": 0-255} | |
| "effect" | string | "color_mode"/"HDMI" | will switch to HDMI/UDP mode or color_mode |
| "transition" | float | 0-66845.7 | transition time in seconds, only for this command |
The Dual white strip is controlled using:
| JSON key | value type | possible values | notes |
|---|---|---|---|
| "state" | string | "ON"/"OFF" | |
| "brightness" | int | 0-255 | |
| "color_temp" | int | 153-500 | |
| "transition" | float | 0-66845.7 | transition time in seconds, only for this command |
A combination of both an RGB and dual white strip is controlled using:
| JSON key | value type | possible values | notes |
|---|---|---|---|
| "state" | string | "ON"/"OFF" | turns on the strip that was last on. |
| "brightness" | int | 0-255 | applies to both strips |
| "color" | dict with 3x int | {"r": 0-255, "g": 0-255, "b": 0-255} | will turn off the dual white strip |
| "color_temp" | int | 153-500 | will turn off the rgb strip |
| "effect" | string | "white_mode"/"color_mode"/"HDMI" | will turn on/off rgb strip and turn off/on the dual white strip or switch to HDMI/UDP mode |
| "transition" | float | 0-66845.7 | transition time in seconds, only for this command |
Global settings:
| JSON key | value type | possible values | notes |
|---|---|---|---|
| "transition_time_s" | float | 0-66845.7 | default transition time, after power-cycle will reset to the value set in the Config.h file |
| "RGB_mixing" | dict with 3x int | {"r": 0-255, "g": 0-255, "b": 0-255} | color balance of the LEDstrip, {255,255,255} is standard operation, lower the r, g or b value to change the balance between the colors of your LED strip. |
Notes:
- When the transition time is set to 0, it will disable the transition time code and just immediately change to the target value.
| MQTT topic | Function |
|---|---|
| LedStrip/LED1/rgb/json_status | JSON status messages are published to this topic about the RGB strip |
| LedStrip/LED1/rgb/json_set | Set RGB strip using JSON messages |
| LedStrip/LED1/white/json_status | JSON status messages are published to this topic about the dual white strip |
| LedStrip/LED1/white/json_set | Set dual white strip using JSON messages |
| LedStrip/LED1/combined/json_status | JSON status messages are published to this topic about both the RGB and dual white strip |
| LedStrip/LED1/combined/json_set | Set both the RGB and dual white strip using JSON messages |
| LedStrip/LED1/settings/json_status | Get additional global settings in JSON format on this topic |
| LedStrip/LED1/settings/json_set | Set additional global settings using JSON messages |
| LedStrip/LED1/active | Topic to receive availability of the device through LWT message (online/offline) |
When sending a {"effect": "HDMI"} command, the H801 will enter HDMI/UDP mode in which it will start listening to a UDP multicast stream configured in the Config.h file (UDP_IP and UDP_Port). The UDP messages received schould contain 3 subsecent bytes coding for Red, Green and Blue respectively. The position of these 3 bytes can be set using UDP_RGB_offset in the Config.h file. In this way fast steams (>5 Hz) of color data can be sent to the H801. In between the received colors a smooth transition will take place configured by the UDP_transition_time_s in the Config.h file. This can be used in combination with Hyperion setup as a UDP raw device to sync the H801 to the colors of a TV screen: https://docs.hyperion-project.org/en/user/leddevices/network/udpraw.html. For more information about Hyperion see https://docs.hyperion-project.org/ and https://hyperion-project.org.
Configuring Hyperion under Configuration -> LED Hardware:
- Controller Type: updraw
- Hardware LED count: 1 (can be increased for multiple H801's in combination with a
UDP_RGB_offsetin the Config.h of the H801) - RGB byte order: RGB
- Target IP: 239.15.18.6 (can be any multicast adress, as long as it is the same as in the Config.h of the H801)
- Port: 49585 (can be any port, as long as it is the same as in the Config.h of the H801)
- Latch Time: 0
- Open the Config.h file and configure your WIFI credentials, MQTT Broker credentials and OTA credentials.
- It is highly recommended to change the username and password to something else for security.
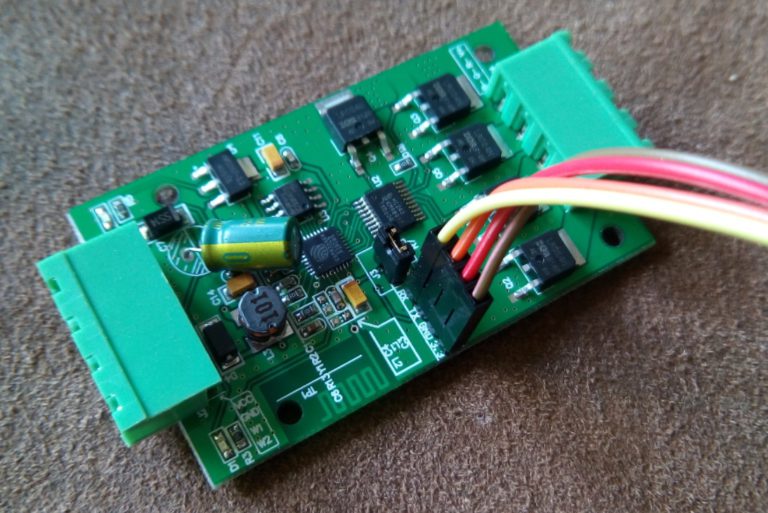
- Open the case and solder 6 Jumers on the board. Four are needed for the serial connection (GND, 3.3V, RX und TX) and two are needed for the Jumper (J1 and J2) to enter the flash mode.
- Download Arduino IDE (in my case 1.8.12) and prepare the IDE by opening the preferences window.
- Enter
http://arduino.esp8266.com/stable/package_esp8266com_index.jsoninto additional board manager URLs field. - Open boards manager from tools > board menu and install esp8266 platform (in my case version 2.5.2)
- Install following new library using the library manager. ("Sketch" menu and then include library > Manage Libraries).
- PubSubClient
- ArduinoJson
- ESP8266WiFi
- IMORTANT: the PubSubClient only allows for a max of 128 bytes by default in a mqtt message. Therefore the MQTT_MAX_PACKET_SIZE needs to be changed for the PubSubClient.h
- open the PubSubClient.h file (default location: documents/Arduino/libraries/PubSubclient/src/PubSubClient.h)
- Go to line 26 of PubSubClient.h
- Change #define MQTT_MAX_PACKET_SIZE 128 --> #define MQTT_MAX_PACKET_SIZE 800
- Connect the wires of your USB Serial adapter with the H801 (3.3V > 3.3V, GND > GND, RX > RX and TX > TX) and place a jumper or cable between J1 and J2
- Connect the Serial USB adapter with your computer. The H801 will be powered with the 3.3V from the USB Serial adapter and enters the flash mode.
- Open the *.ino file
- Select following in the menu tools:
- Board: Generic ESP8266 Module
- Flash Mode: DIO
- Flash Frequency: 40MHz
- CPU Frequency: 80 MHz
- Flash Size: 1MB (FS:64KB OTA:~470KB)
- Upload Speed: 115200
- Port: Select your COM Port of your Serial adapter e.g. COM5
- Select Sketch > Upload
- IMPORANT: do not touch the H801 module or any of the connected wires during flash, otherwise if one of the wires gets disconnected during flash you might brick your h801 module!
- Once the the flash has finished unplug the Serial wires, remove the Jumper and attach a Power Supply on the right side labled with "VCC and GND".
- The device will start with the RED LED lighting up solid, after a few seconds the green LED should flash a couple of times indicating that a succesfull conection has been made to the wifi.
- The H801 should be ready to be used.
Status information:
If you have entered the correct Wifi credentials and the H801 was able to connect to your wifi, it will blink with the green led 10 times If the connection to the MQTT fails it will blink with the red LED 10 times. It will try to reconnect after 5sec.
After you have completed the initial flash of the H801 as described above, you will be able to flash the H801 Over The Air (OTA) using the wifi-connection.
- If the H801 is connected to your wifi you schould be able to open a webbrowser on a PC and go to: "http://opa_update_h801_[Module_Name]/firmware" where [Module_Name] is specified in the Config.h file (default: LED1). Alternatively you can acces the same web-page by using the IP adress of the H801 module: "http://192.168.1.[IP]/firmware" where [IP] is the IP adress of the module which you can retrieve from the
LedStrip/LED1/settings/json_statusMQTT topic or by looking it up in your router. - It will ask for credentials if you browse to that web-page, these are the credentials specified in the Config.h file (OTA_username, OTA_password). After filling in the credentials you should see two buttons: "Choose File" and "Update".
- Open the latest h801-mqtt-json.ino file that you dowload from this github project with Arduino IDE.
- Select following in the menu tools:
- Board: Generic ESP8266 Module
- Flash Mode: DIO
- Flash Frequency: 40MHz
- CPU Frequency: 80 MHz
- Flash Size: 1MB (FS:64KB OTA:~470KB)
- Upload Speed: 115200
- In the top bar select "Sketch" --> "Export Compiled Binary", after it completes there schould be a .bin file in the folder where you saved the h801-mqtt-json.ino file.
- Upload this .bin file to your H801 using first the "Choose File" and then the "Update" button of step 2.
- Done, the H801 should now update and restart with the new firmware version.
Note that all 4 lights schould be automatically discoverd by HomeAssistant. Therefore this manual configuration schould not be nessesary.
light:
  - platform: mqtt
    schema: json
    name: "RGB"
    state_topic: "LedStrip/LED1/rgb/json_status"
    command_topic: "LedStrip/LED1/rgb/json_set"
    availability_topic: "LedStrip/LED1/active"
    brightness: true
    rgb: true
    effect: true
    effect_list: ["color_mode", "HDMI"]
    qos: 0
    optimistic: false

  - platform: mqtt
    schema: json
    name: "White"
    state_topic: "LedStrip/LED1/white/json_status"
    command_topic: "LedStrip/LED1/white/json_set"
    availability_topic: "LedStrip/LED1/active"
    brightness: true
    color_temp: true
    qos: 0
    optimistic: false

  - platform: mqtt
    schema: json
    name: "White single"
    state_topic: "LedStrip/LED1/white/json_status"
    command_topic: "LedStrip/LED1/white/json_set"
    availability_topic: "LedStrip/LED1/active"
    brightness: true
    color_temp: false
    qos: 0
    optimistic: false

  - platform: mqtt
    schema: json
    name: "Combined"
    state_topic: "LedStrip/LED1/combined/json_status"
    command_topic: "LedStrip/LED1/combined/json_set"
    availability_topic: "LedStrip/LED1/active"
    brightness: true
    color_mode: true
    supported_color_modes: ["color_temp", "rgb"]
    effect: true
    effect_list: ["white_mode", "color_mode", "both_mode", "HDMI"]
    qos: 0
optimistic: falsemosquitto_sub -h 192.168.1.??? -p 1883 -u MQTT_USERNAME -P MQTT_PASSWORD -t "LedStrip/#" -v
mosquitto_pub -h 192.168.1.??? -p 1883 -u MQTT_USERNAME -P MQTT_PASSWORD -t "LedStrip/LED1/combined/json_set" -m "{'state':'ON', 'brightness': 255, 'color': {'r': 255,'g': 255,'b': 255}}"
mosquitto_pub -h 192.168.1.??? -p 1883 -u MQTT_USERNAME -P MQTT_PASSWORD -t "LedStrip/LED1/combined/json_set" -m "{'state':'ON', 'brightness': 255, 'color_temp': 327}"
mosquitto_pub -h 192.168.1.??? -p 1883 -u MQTT_USERNAME -P MQTT_PASSWORD -t "LedStrip/LED1/combined/json_set" -m "{'state':'ON', 'effect': 'white_mode'}"