Open Sign is a small NodeJS application that displays pixel art on a LED matrix.
The hardware required is:
- Raspberry Pi - probably best with at least a Raspberry Pi 3 Model B Rev 1.2
- An RGB LED Matrix HAT for Raspberry Pi - I use the RGB Matrix HAT + RTC from Adafruit, or you can wire it up yourself
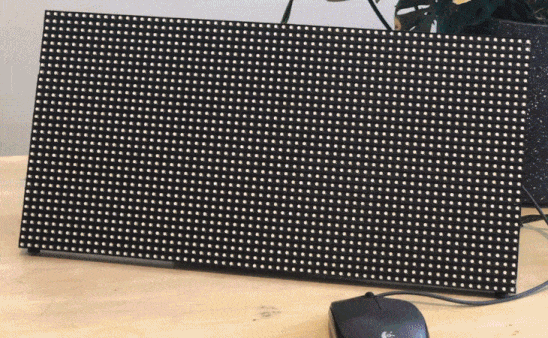
- An RGB LED Matrix board - I use this 64x32 pixel matrix from Adafruit, but any board that complies with the RPI RGB LED Matrix library limitations should work - note: that currently only one board at a time is supported or tested, so no chaining of boards (adding support should be pretty trivial, but I don't have a second board to test this)
- A USB mouse to control the display - use a two button mouse with a scrollwheel to get the maximum functionality
The application requires NodeJS v18, and setup on the Raspberry Pi can be a bit tricky.
Assuming you have Raspian installed on your Raspberry Pi, you'll need to make sure that your RGB LED Matrix HAT is installed properly and working - this could include messing around with raspi-config settings, check the instructions for your particular HAT.
Once things are wired up and you are confident that your Pi, HAT, and LED matrix are working, you can start installing…
Go to the pi user home directory and make a new directory for the application with write permission open to anyone:
cd /home/pi
mkdir open-sign
chmod 777 open-sign
Get a copy of this code into that new directory, it's generally a good idea to clone the Git repository:
git clone https://github.com/sambauers/open-sign.git open-signInstall NVM for the pi user using their instructions.
Once done install NodeJS 18 and make it the default:
nvm install lts/hydrogen
nvm alias default lts/hydrogen
nvm use default
Now update npm and corepack, and install pnpm:
npm -g install npm
npm -g install corepack
npm -g install pnpm
Now go into the application directory and install dependencies (this will take a while):
cd open-sign
pnpm install
Since accessing the LED Matrix hardware requires root privileges, we need to actually launch the application as root, so you'll need to repeat some of the steps as root, switch to the root user using sudo:
sudo -sMake sure you are in the correct directory since you switched to root:
cd /home/pi/open-signInstall NVM for the root user using their instructions.
Once done install NodeJS 18 again for root and make it the default:
nvm install lts/hydrogen
nvm alias default lts/hydrogen
nvm use default
Now update npm and corepack, and install pnpm:
npm -g install npm
npm -g install corepack
npm -g install pnpm
Additionally, install pm2:
npm -g install pm2Switch back to the pi user by exit ing from sudo and ensure you are in the correct directory:
exit
cd /home/pi/open-sign
Now open ecosystem.config.js and adjust the environment variables LED_HEIGHT and LED_WIDTH as needed.
Remaining as the pi user, ensure the correct Node version is being used and build the application:
nvm use
pnpm build
The compiled application should now be in the dist directory.
Switch back to the root user and ensure you are in the correct directory:
sudo -s
cd /home/pi/open-sign
Ensure the correct Node version is being used, and then start the application using pm2:
nvm use
pm2 start ecosystem.config.js --env production
The application will start on a blank screen. Click the left mouse button to display the first image on the RGB LED matrix.
- Left mouse button - go to next image
- Right mouse button - go to previous image
- Scrollwheel up - increase brightness
- Scrollwheel down - decrease brightness
To start the sign automatically on boot, you can use PM2's built-in startup script generator.
Switch to root and run the pm2 startup command:
sudo -s
pm2 startup
Most times it will install the startup script for you, but check the PM2 documentation if you get stuck.
Ensure you are in the correct directory, and ensure the application is started:
cd /home/pi/open-sign
pm2 start ecosystem.config.js --env production
Then simply "save" the list of running PM2 services to ensure they start on boot:
pm2 saveThe sign should now launch automatically on boot.
You may want to start and stop the sign at certain times of the day or week. This can be achieved by configuring crontab.
The simplest version of this starts and stops the application by sending signals to pm2.
You can edit root's crontab file by running:
sudo crotab -eThen setup start and stop actions like:
# Ensure pm2 can be found on your PATH - adjust as
# neccesary depending on your NVM/NPM binaries path
PATH=$PATH:/root/.nvm/versions/node/v18.17.1/bin

# Turn the sign on at 8:30 AM, Monday to Friday
30 8 * * 1-5 pm2 sendSignal SIGUSR1 open-sign

# Turn the sign off at 4:30 PM, Monday to Friday
30 16 * * 1-5 pm2 sendSignal SIGUSR2 open-sign

# In case of power failure and reboot outside these hours, turn off the sign every 15 minutes outside those hours

# Monday to Friday before 8:30 AM
*/15 0-7 * * 1-5 pm2 sendSignal SIGUSR2 open-sign
0-25/15 8 * * 1-5 pm2 sendSignal SIGUSR2 open-sign

# Monday to Friday after 4:30 PM
35-55/15 16 * * 1-5 pm2 sendSignal SIGUSR2 open-sign
*/15 17-23 * * 1-5 pm2 sendSignal SIGUSR2 open-sign

# Saturday and Sunday
*/15 * * * 6 pm2 sendSignal SIGUSR2 open-sign
*/15 * * * 0 pm2 sendSignal SIGUSR2 open-sign
You may need to restart the cron service after editing:
/etc/init.d/cron restartAdding more images is easy.
Simply create new images in PNG format at the correct dimensions for your LED matrix and drop them into the moods directory.
The images are loaded in alphabetical order. You can force the order of the images by utilising a number prefix. See the file names in the moods directory for an example of this.
The images in the moods diroctory that come with the application are 64x32 pixels.
Transparent PNGs are supported (the transparency is treated as black).
If you add new images, they won't be registered by the application until you restart the application.
sudo -s
cd /home/pi/open-sign
nvm use
pm2 restart ecosystem.config.js --env production