
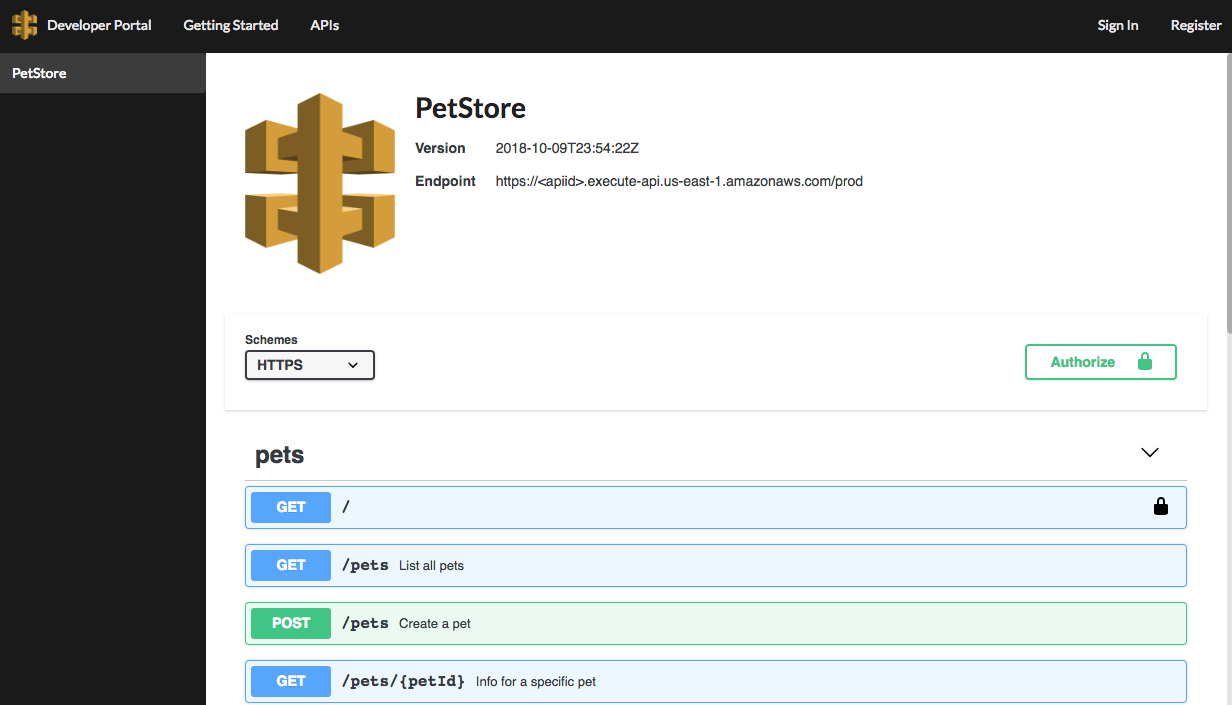
The Amazon API Gateway Serverless Developer Portal is an application that you use for developer engagement by making your API Gateway APIs available to your customers through self-service discovery of those APIs. Your customers can use the developer portal to browse API documentation, register for – and immediately receive – their own API key that can be used to build applications, test published APIs, and monitor their own API usage.
For more information about Amazon API Gateway, visit the API Gateway product page.
It also optionally supports subscription/unsubscription through a SaaS product offering through the AWS Marketplace.

There are 2 main ways to deploy the Developer Portal today:
This deployment model is better if you want an easy way deploy the developer portal and use it as-is out of box. You can deploy the Serverless Developer Portal through SAR in a few clicks! See the documentation.
This deployment model is better if you plan to customize the developer portal heavily and setup CI/CD on it.
First, ensure you have the latest version of the SAM CLI installed. Note that while the instructions specify Docker as a pre-requisite, Docker is only necessary for local development via SAM local. Feel free to skip installing Docker when you first set up the developer portal.
Then, clone this repo into a local directory. Ensure that you have an S3 bucket to put zipped lambda functions into. It can be private, and will be referred to in this readme as "your-lambda-artifacts-bucket-name".
If you have not used the AWS CLI or SAM CLI before, you may need to configure your AWS credentials file.
If you have previously set up a v1 developer portal (non-SAM deployed), you will need to either remove all the v1 developer portal resources (dynamo tables, roles, etc.) or provide new names for the v2 developer portal by passing in parameter overrides for every resource.
Run:
Replace the
your-lambda-artifacts-bucket-namewith a bucket that you manage and must already exist
sam package --template-file ./cloudformation/template.yaml --output-template-file ./cloudformation/packaged.yaml --s3-bucket your-lambda-artifacts-bucket-nameThen run:
Replace
custom-prefixin the command below with some prefix that is globally unique, like your org name or username and run
sam deploy --template-file ./cloudformation/packaged.yaml --stack-name "dev-portal" --capabilities CAPABILITY_NAMED_IAM --parameter-overrides DevPortalSiteS3BucketName="custom-prefix-dev-portal-static-assets" ArtifactsS3BucketName="custom-prefix-dev-portal-artifacts"The command will exit when the stack creation is successful. If you'd like to watch it create in real-time, you can log into the cloudformation console.
To get the URL for the newly created developer portal instance, find the websiteURL field in the cloudformation console's outputs or run this command:
aws cloudformation describe-stacks --query "Stacks[?StackName=='dev-portal'][Outputs[?OutputKey=='WebsiteURL']][][].OutputValue"You can override any of the parameters in the template using the --parameter-overrides key="value" format. This will be necessary if you intend to deploy several instances of the developer portal. You can see a full list of overridable parameters in cloudformation/template.yaml under the Parameters section.
By default the Developer Portal won't list any APIs. You will have to pick and choose which APIs to show. There are 2 types of APIs:
For an API to be subscribable, they must be managed by Amazon API Gateway. The Developer Portal can let a user associate their API Key with these APIs (via the Subscribe button) so they can start calling and developing on these APIs.
To list a subscribable API:
- Associate that API & stage to a usage plan.
- Export the API's Swagger (must export as JSON, with API GW extensions) from the stage
Note: If you're using custom domains in API Gateway, you will need to rename the Swagger file in the format
apiId_stageName.jsonand upload it to theArtifactsS3Bucket(actual name provided as a parameter override on the CLI when deploying) in thecatalogfolder. An example might be namedd89n46zud1_production.json. Note that this is case sensitive!
- Upload the exported Swagger file to the
catalogfolder which will cause acatalog.jsonfile to be generated automatically. This file should contain a mapping of usage plans to api-stage with the Swagger for that api-stage inline.
Note: The
catalog.jsonfile will be automatically re-built every time a file is added or removed from thecatalogfolder. If you associate or disassociate a new api-stage to your usage plan, you will need to add or remove a Swagger file from thecatalogfolder in order for thecatalog.jsonfile to be current.
The Developer can also list APIs that are managed outside of Amazon API Gateway (eg. APIs hosted on-premise). The Developer Portal won't be able to associate an API Key with the API automatically however they can still test the APIs.
To list a non-subscribable API:
- Upload the Swagger file for your API to the
catalogfolder. (See above for additional notes and details).
When logged into the developer portal with an account that has a provisioned api key, you should be able to test your APIs by selecting a resource/method in them and clicking "Try it out!". Note that this requires CORS to be set up on your API to allow the developer portal to call it. Note that the default PetStore has CORS enabled on all resources but /.
You should request and verify an ACM managed certificate for your custom domain name. Then, redeploy the CFN stack with the domain name and ACM cert ARN as parameter overrides. Additionally, you can control if Route 53 nameservers are created using the UseRoute53Nameservers override. A value of true will result in the creation of a Route 53 hosted zone and record set; false will skip the creation of these resources.
sam deploy --template-file ./cloudformation/packaged.yaml --stack-name "dev-portal" --capabilities CAPABILITY_NAMED_IAM --parameter-overrides DevPortalSiteS3BucketName="custom-prefix-dev-portal-static-assets" ArtifactsS3BucketName="custom-prefix-dev-portal-artifacts" CustomDomainName="my.acm.managed.domain.name.com" CustomDomainNameAcmCertArn="arn:aws:acm:us-east-1:111111111111:certificate/12345678-1234-1234-1234-1234567890ab" UseRoute53Nameservers="false"This creates a cloudfront distribution in front of the S3 bucket serving the site, optionally sets up a Route53 hosted zone with records aliased to that distribution, and require HTTPS to communicate with the cloudfront distribution.
If you chose UseRoute53Nameservers=true, after the deployment finishes, go to the Route53 console, find the nameservers for the hosted zone created by the deployment, and add those as the nameservers for your domain name through your registrar. The specifics of this process will vary by registrar.
If you chose UseRoute53Nameservers=false, instead point your nameservers at the cloudfront distribution's URL.
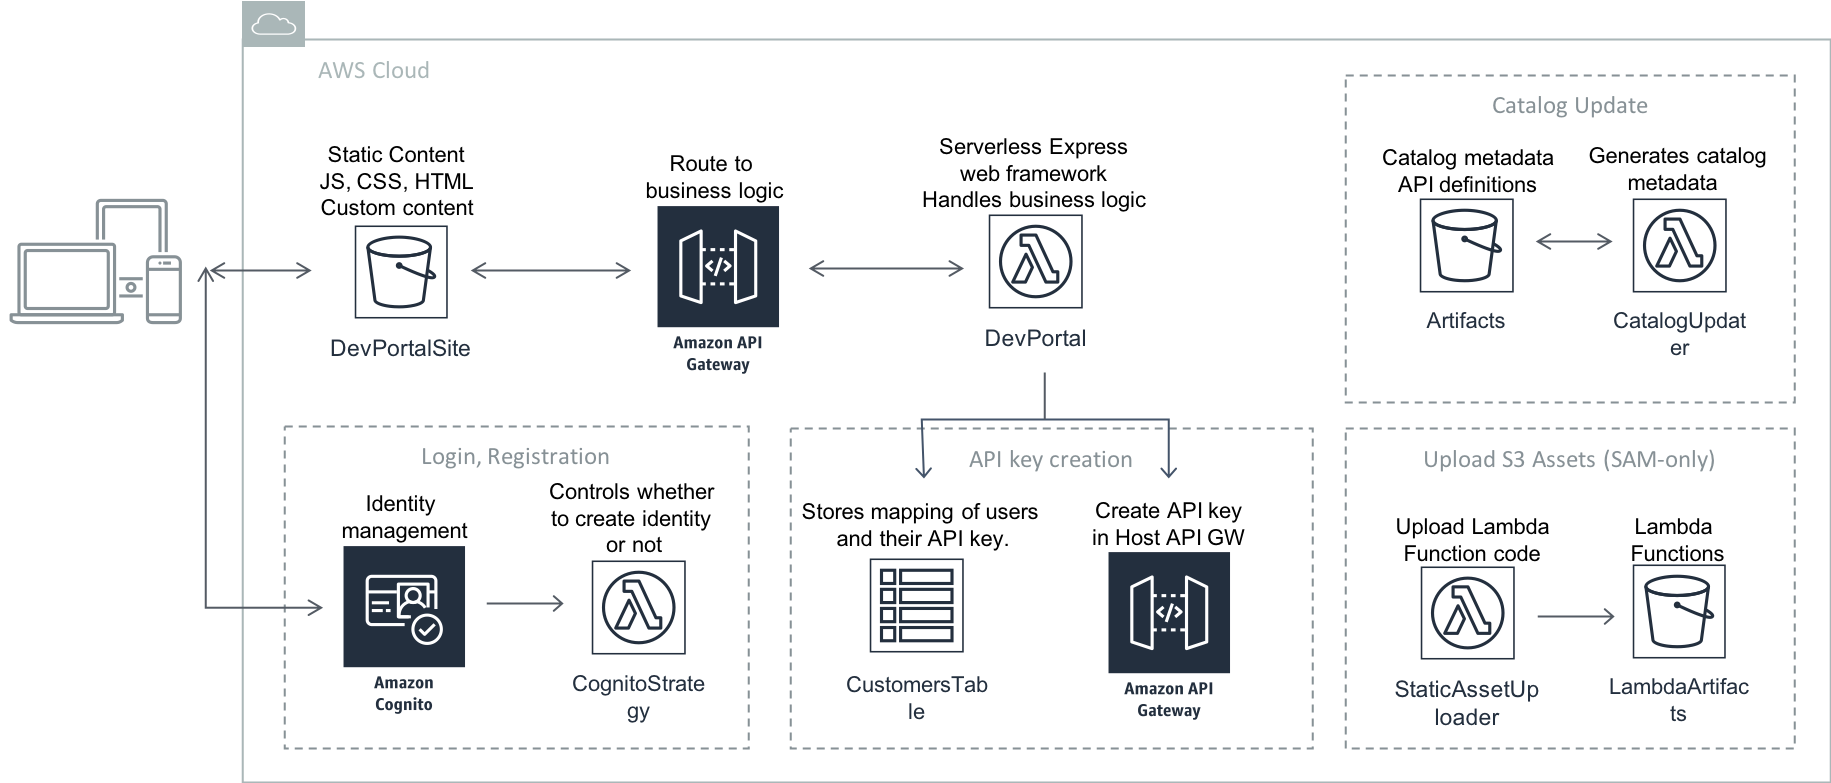
All the components in the developer portal are managed by the SAM stack defined in template.yaml. New application components can be added to this template. Configuration values are fed to this template from the parameter overrides provided on the command line. If overrides are not provided, default values are used.
The UI is a simple React application hosted in an S3 bucket. The assets are uploaded to the S3 bucket by the static-asset-uploader lambda function. The client side code communicates with the application backend via an API Gateway proxy API. For more information on updating the UI, see ./dev-portal/README.md.
The application backend is a Lambda function built on the aws-serverless-express library. The backend is responsible for login/registration, API subscription/unsubscription, usage metrics, and handling product subscription redirects from AWS Marketplace.
The backend function runs with escalated privileges (defined as LambdaExecutionRole in the CloudFormation template) and can be used to call other AWS services such as the API Gateway control plane or DynamoDB.
All resources in the API require AWS SigV4 authentication (i.e. via Cognito) with the exception of /register and the marketplace redirection resource.
By default, the backend implementation assumes a one-to-one association between authenticated users (Cognito identities) and API Gateway API Keys. A given user can be subscribed to multiple usage plans using the same API Key.
This lambda function (right now) is called for every registration request, but always returns true. This is a placeholder function for you to edit with your own logic for approval. We expect there won't be a single approval/workflow logic that will work for everyone, so we created a placeholder Lambda function that you can easily extend to have your own logic.
If you're consuming the dev portal via SAM, you should be able to change the contents of the lambdas/cognito-user-pools-confirmation-strategy/index.js file, then run a CloudFormation stack update with the new lambda body.
The listener Lambda function will be triggered when customers subscribe or unsubscribe to your product through the AWS Marketplace console. AWS Marketplace will generate a unique SNS Topic where events will be published for your product. This is configurable via 'marketplaceSubscriptionTopic' configuration in package.json. After changing this you will need to run 'npm run update-stack' and 'npm run subscribe-listener' to subscribe the listener function.
From the listener function you can manage your Usage Plan Keys through API Gateway to grant/revoke access to your APIs as well as implement any other subscription/unsubscription business logic. If you have multiple marketplace products, you will need to subscribe the listener function to the SNS topic for each product.
You can trace and troubleshoot the Lambda functions using CloudWatch Logs. See this blog post for more information.
After deployment, you can overwrite certain files in the S3 bucket to update images, styling and the content of specific pages. All customizations live in the custom-content folder of the bucket defined by the DevPortalSiteS3BucketName parameter in the sam deploy command (default value "custom-prefix-dev-portal-static-assets").
By default, on upload to the S3 bucket, the permissions are restricted. Make sure that "Everyone" has Read permissions to the files in the S3 bucket otherwise you might see some components not displaying properly.
By default, the easy customizations described below won't be updated by subsequent deployments. This makes it safe to deploy architectural changes to the Developer Portal without overwriting your branding and content changes. To override this behavior, see Advanced Customization below.
You can update the logo that appears in the navbar, the image that appears on the Home page, and the images that appear for each api on the API details pages.
All images must be
.png.
-
/custom-content/nav-logo.pngThe logo in that appears in the navbar. Replace it to use your own image.
-
/custom-content/home-image.pngPrimary image displayed on the Home page. Replace it to use your own image.
-
/custom-content/api-logos/default.pngThe default image used when a specific api image is not provided. Replace it to use your own image.
-
/custom-content/api-logos/{apiId}_{stage}.pngA custom image for a given API and Stage. If provided will be displayed instead of the
default.pnge.g.
/custom-content/api-logos/s8df5s3dd_Prod.png
Replace the /custom-content/styles.css with your own CSS Styling. Note that this stylesheet is loaded before all other styles in the project. Be sure to make sure your styles do not collide.
Content on the Home page, the Getting Started page can be modified by updating the markdown files in /custom-content/content-fragments.
Each file begins with a yaml front matter block. This front matter is used to fill in data beyond the content of the page.
---
title: Navbar Header # Display in the navbar
header: Main Page Header # Main headline on the page
---

Your content starts here.
The content of the page is rendered using GitHub-flavoured markdown. You can also nest HTML inside each markdown fragment if you need more complex layouts.
# My Content Header!

Some content content...

[<button>A button that's a link!</button>](https://aws.amazon.com/api-gateway/)
The Home page takes the following front matter:
title: Text that appears in the navbar.header: Main headline on the Home page.tagline: Secondary headline on the Home page.gettingStartedButton: Text of the "Getting Started" button.apiListButton: Text of the "Our APIs" button.
The APIs page takes the following front matter:
title: Text that appears in the navbar.
The GettingStarted page takes the following front matter:
title: Text that appears in the navbar.
In addition to the easy customization described above, you can make changes in your cloned copy of the repository, version with git, and package & deploy with SAM. You must include the StaticAssetRebuildToken as part of the deployment.
To pull in new versions of the dev portal, merge or rebase in the upstream changes.
By default, the easy customizations described above won't be updated by subsequent deployments. If you would prefer to overwrite all files in the s3 bucket on a deploy, pass the
StaticAssetRebuildMode=overwriteargument to yoursam deploycommand in addition to theStaticAssetRebuildToken. See Advanced Customization below.
Deleting developer portal should be as easy as deleting the cloudformation stack. This will empty the ArtifactsS3Bucket and DevPortalSiteS3Bucket s3 buckets, including any custom files! Note that this will not delete any api keys provisioned by the developer portal. If you would like to delete api keys provisioned through the developer portal but not those provisioned through other means, make sure to download a backup of the Customers DDB table, which will list the provisioned api keys.
NOTE: These instructions are now out of date!
You can sell your SaaS product through AWS Marketplace and have the developer portal manage the subscription/unsubscription workflows. API Gateway will automatically provide authorization and metering for your product and subscribers will be automatically billed through AWS Marketplace.
Overview:
-
Create a Usage Plan in API Gateway
-
Create a SaaS Product in AWS Marketplace:
The redirect URL should be in the format: https://YOUR_DEVELOPER_PORTAL_API_ID.execute-api.[REGION].amazonaws.com/prod/marketplace-confirm/[USAGE_PLAN_ID]
The product billing dimension name should be "apigateway" with description "Requests"
- Update your Usage Plan with the AWS Marketplace Product Code via API Gateway "UpdateUsagePlan" API:
"aws apigateway update-usage-plan --usage-plan-id [USAGE_PLAN_ID] --patch-operations '[{ "path" : "/productCode", "value" : "[MARKETPLACE_PRODUCT_CODE]", "op" : "replace" }]'"
-
Update marketplaceSubscriptionTopic in package.json with the AWS Marketplace Product Code
-
Update CloudFormation stack via 'npm run update-stack'
-
Subscribe your listener function to your subscription topic via 'npm run subscribe-listener'
When buyers subscribe through the AWS Marketplace console, the buyers browser will send a POST request to /marketplace-confirm/[USAGE_PLAN_ID] in your backend API. By default, this redirects the request to the developer portal with the usagePlanId and token in the query string.
From here, the buyer is asked to login or register for the developer portal (or the existing session will be used). Once authenticated, a PUT request is made to /marketplace-subscriptions/[USAGE_PLAN_ID].
This operation makes a request to Marketplace Metering Service to resolve the buyer customer ID as well as the marketplace product code being subscribed to. By default, this operation simply associates the marketplace customer ID with the currently authenticated Cognito identity in DynamoDb for later use. It also calls API Gateway to get or create an API key for this user and associates this API Key with the marketplace customer ID.
At this point the API Key/buyer should not yet be authorized to use the product - the subscription is not technically complete until AWS Marketplace sends a 'subscribe-success' notification to the subscription SNS topic. This will trigger the listener Lambda function with a 'subscribe-success' or 'subscribe-fail' event. By default, on the 'subscribe-success' event, the listener function will lookup the Cognito identity ID associated with the Marketplace customer ID in DynamoDB. It will then call API Gateway to lookup or create an API Key associated with this Cognito identity ID. It will then subscribe this API Key to the Usage Plan associated with the AWS Marketplace Product Code.
At this point, the authenticated user (Cognito identity) is authorized to access your SaaS product. The authenticated user has an associated API Key in API Gateway and an associated marketplace customer ID tracked in DynamoDB. When the buyer makes requests to your product, their API Key will be authorized by API Gateway and they will be billed by AWS Marketplace according to your product configuration.
The unsubscription process is directly analogous to the subscription process - on 'unsubscribe-complete', the listener function will remove the API Key from the Usage Plan.