
WORK IN PROGRESS
This repository serves as the central server application for the Logistics Wizard application and acts as the main controller for interaction between the system's services.
Logistics Wizard is a reimagined supply chain optimization system for the 21st century. It is comprised of a set of loosely-coupled, distributed services that take an existing ERP system and extend its functionality by leveraging various cloud services. The goal of this system is to showcase several common SaaS implementation patterns and provide them to our developer community. This demo exhibits hybrid cloud, microservices, and big data anlytics concepts that can be reused when building enterprise-level applications on Bluemix.

The following services are leveraged in the overall Logistics Wizard solution, yet are built to be extensible for other purposes:
To deploy the full system all at once, check out the Logistics Wizard Toolchain
-
If you do not already have a Bluemix account, sign up here
-
Download and install the Cloud Foundry CLI tool
-
Clone the app and its submodules to your local environment from your terminal using the following command:
$ git clone --recursive https://github.com/IBM-Bluemix/logistics-wizard.git
-
cdinto this newly created directory -
Open the
manifest.ymlfile and change thehostvalue to something unique.
The host you choose will determinate the subdomain of your application's URL: <host>.mybluemix.net
-
Connect to Bluemix in the command line tool and follow the prompts to log in.
$ cf api https://api.ng.bluemix.net
$ cf login
-
Push the app to Bluemix.
$ cf push
And voila! You now have your very own instance of Logistics Wizard running on Bluemix.
-
If you have not already, download Python 2.7 and install it on your local machine.
-
Clone the app to your local environment from your terminal using the following command:
$ git clone --recursive https://github.com/IBM-Bluemix/logistics-wizard.git-
cdinto this newly created directory -
In order to create an isolated development environment, we will be using Python's virtualenv tool. If you do not have it installed already, run
$ pip install virtualenvThen create a virtual environment called venv by running
$ virtualenv venv- Activate this new environment with
$ source .env- Install module requirements
$ pip install -r requirements.dev.txt- Finally, start the app
$ python bin/start_web.pyTo get values for your local environment variables in .env.local, check out the Setting up email section.
There are series of unit tests located in the server/tests folder. The test suites are composed using the Python unittest framework. To run the tests, execute the following command:
$ python server/tests/run_tests.pyThe tests will print a dot for each successfully completed unit test. If a test fails for any reason, it will mark that test with either an F or E and print the reason for any failed tests after the test suites are all completed. For example, here is the output of a successfully complete test_demos_service.py test:
(venv) MyMac:logistics-wizard User$ python server/tests/test_demos_service.py
.......
----------------------------------------------------------------------
Ran 7 tests in 30.597s

OKOne popular option for continuous integration is Travis CI. We have provided a .travis.yml file in this repository for convenience. In order to set it up for your repository, take the following actions:
-
Go to your Travis CI Profile
-
Check the box next to your logistics-wizard GitHub repository and then click the settings cog
-
Create the following environment variables
LOGISTICS_WIZARD_ENV- TESTSMTP_SERVER- smpt.gmail.comSMTP_SERVER_PORT- 587SMTP_USER_NAMESMTP_PASSWORD
To get values for the
SMTP_USER_NAMEandSMTP_PASSWORDvariables, check out the Setting up email section.
Thats it! Now your future pushes to GitHub will be built and tested by Travis CI.
If you would like to perform code coverage tests as well, you can use coveralls to perform this task. If you are using Travis CI as your CI tool, simply replace python in your test commands with coverage run and then run coveralls as follows:
$ coverage run server/tests/run_tests.py
$ coveralls
To determine how to run coveralls using another CI tool or for more in-depth instructions, check out the coveralls usage documentation.
Note: The unit tests are currently hitting the production version of the logistics-wizard-erp application. In the future these tests will be able to be run in isolation.
In order to send welcome emails, we need to configure the app to use an SMTP server. For simplicity's sake, we will use the free SMTP server that Gmail provides. This section will walk you through how to do this:
-
Create a new Gmail account to serve as the
FROMaddress for your application's emails -
Turn on Gmail access for less secure apps so that your app will be able to send emails on your behalf
-
Go to the Forwarding/IMAP tab in your Gmail settings and make sure IMAP is enabled. This ensures emails are properly copied into your sent folder.
-
Lastly, your Gmail username and password must be copied to the service you are using for deployment. Here are some common options:
- CF CLI: Update the environment variables in your
manifest.ymlfile or in your app dashboard's Runtime --> Environment Variables section after deployment. - DevOps Services Toolchain: When configuring your toolchain, set the email parameters in the Delivery Pipleine section.
- Travis CI: Go to the Settings tab for your repo and update the environment variables there.
.env.local: If you would like to test this functionality while developing locally, copy the values into this file.
- CF CLI: Update the environment variables in your
Your app should now be capable of sending welcome emails to any end users that include their email address during signup.
Note: Be aware that Google restricts the number of messages sent per day to 99 emails. The restriction is automatically removed within 24 hours after the limit was reached.
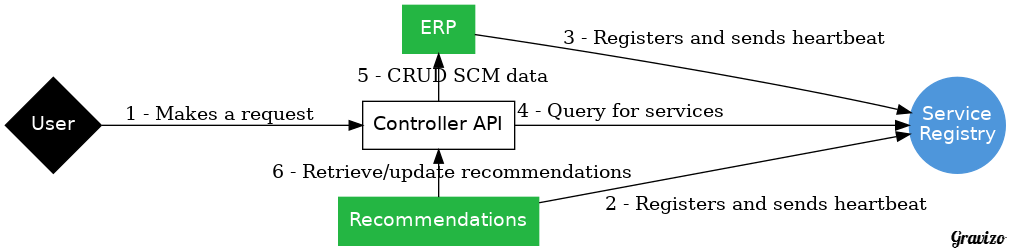
The API methods that this component exposes requires the discovery of dependent services, however, the API will gracefully fail when they are not available.
The API and data models are defined in this Swagger 2.0 file. You can view this file in the Swagger Editor.
Use the Postman collection to help you get started with the controller API:

Please check out our Contributing Guidelines for detailed information on how you can lend a hand to the Logistics Wizard demo implementation effort.
The primary source of debugging information for your Bluemix app is the logs. To see them, run the following command using the Cloud Foundry CLI:
$ cf logs logistics-wizard --recent
For more detailed information on troubleshooting your application, see the Troubleshooting section in the Bluemix documentation.
The logistics-wizard sample web application includes code to track deployments to Bluemix and other Cloud Foundry platforms. The following information is sent to a Deployment Tracker service on each deployment:
- Python package version
- Python repository URL
- Application Name (
application_name) - Space ID (
space_id) - Application Version (
application_version) - Application URIs (
application_uris) - Labels of bound services
- Number of instances for each bound service and associated plan information
This data is collected from the setup.py file in the sample application and the VCAP_APPLICATION and VCAP_SERVICES environment variables in IBM Bluemix and other Cloud Foundry platforms. This data is used by IBM to track metrics around deployments of sample applications to IBM Bluemix to measure the usefulness of our examples, so that we can continuously improve the content we offer to you. Only deployments of sample applications that include code to ping the Deployment Tracker service will be tracked.
Deployment tracking can be disabled by removing cf_deployment_tracker.track() from the server/web/__init__.py file.
See License.txt for license information.