-
In Micro Basic Motion Studio set the following settings:
Roboclaw 1:
Control Mode: Packet Serial
Packet Serial Address: 128
Baudrate: 230400
Roboclaw 2:
Control Mode: Packet Serial Packet Serial Address: 129 Baudrate: 230400 -
Connect you your raspberry PI via SSH over Putty.
-
Install NodeJS:
curl -sL https://deb.nodesource.com/setup_12.x | sudo bash - sudo apt install nodejs -
Run the following commands:
sudo apt-get update sudo apt-get install git -
Checkout the hip simulator repository:
git clone https://github.com/jrj2211/hip-simulator -
Install pigio:
sudo apt-get install pigpio -
Enable I2C in the interface section of raspi config:
sudo raspi-config -
Enable Serial UART Hardware
sudo raspi-config > 3. Interface Options > P6. Serial Port Would you like a login shell accessible over serial: > No Would you like the Serial port hardware to be enabled: > Yes -
Change to the hip simulator directory:
cd hip-simulator -
Run the command to install node dependencies:
npm install
-
Compile the frontend GUI code:
sudo npm run dist -
Start the node server:
sudo npm start -
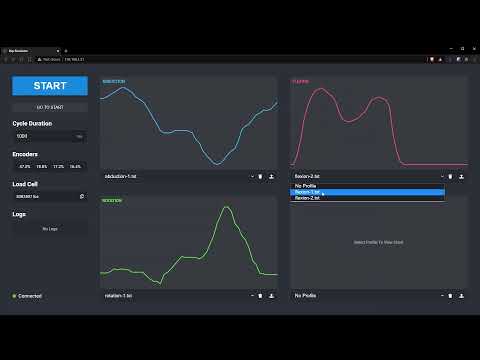
In your web browser, go to your raspberry pi’s IP address. The interface should come up.
To make the system start on boot, create a service file:
sudo nano /etc/systemd/system/hipsimulator.service
Paste the following:
[Unit]
Description=Hip simulator controller
After=network.target

[Service]
Type=simple
WorkingDirectory=/home/pi/hip-simulator
ExecStart=/usr/bin/node /home/pi/hip-simulator/server.js

Environment=NODE_ENV=production
Restart=on-failure

[Install]
WantedBy=multi-user.target
Enable the service and start it
sudo systemctl enable hipsimulator
sudo systemctl start hipsimulator
To update the code, run the following git command:
cd  ~/hip-simulator
git pull origin main
npm run dist
sudo systemctl restart hipsimulator
-
Rotaty Encoders
To calibrate the rotary encoders, go to the web GUI. The values for each encoder is updated in real time so you can rotate them until they all read 0% at your home position.
You also need to calibrate the max value of the encoder:
- Set the max in the config to 1
- Spin the encoder to the largest value you can get
- Copy that number as the max in the config
-
Load Cell
To calibrate the load cell:
-
Remove all weight from the load cell
-
Copy the value from the GUI into loadcell.offset in the config.yaml
-
Place a known amount of weight on the load cell
-
Copy the value from the GUI
-
Using that value calculate the scale to convert to pounds
1 / (value / weight) = scale -
Choose number of decimal places to show in config.yaml
-

- Roboclaw Wiring
In packet serial mode up to eight Roboclaw units can be controlled from a single serial port. The wiring diagram below illustrates how this is done. Each Roboclaw must have multi-unit mode enabled and have a unique packet serial address set. This can be configured using Motion Studio. Wire the S1 and S2 pins directly to the MCU TX and RX pins. Install a pull-up resistor (R1) on the MCU RX pin. A 1K to 4.7K resistor value is recommended. For model specific pinout information please refer to the data sheet for the model being used.


- ADS115 Wiring

- HX711 Wiring
