![]()
![]()
An Interactive Brokers integration for Deephaven.
Interactive Brokers is a very popular brokerage in the quantitative finance world, with about $200B of customer equity. Quants and hedge funds often choose Interactive Brokers because of its low trading costs and API that facilitates automated trading. With low minimum account balances, it is also an attractive choice for individual investors.
Deephaven is the real-time query engine that is the backbone for the quantitative trading of the world's largest hedge funds, banks, and exchanges. Deephaven makes working with real-time data easy and facilitates very concise and easy-to-read code. With Deephaven, quants can create new models and get them into production quickly, traders can monitor the market and their portfolios, and managers can monitor risk.
deephaven-ib combines the low-cost trading of Interactive Brokers with the analytical power and ease of use of Deephaven Community Core to yield an open, quantitative trading platform. Basically, it provides an open platform for building quantitative trading strategies and custom analytics. You can build something simple, like a portfolio monitor, or something complex, like a fully-automated, multi-strategy quantitative hedge fund.
deephaven-ib supports trading essentially all common exchange traded products. These include:
- Stocks
- Mutual Funds
- Options
- Futures
- Futures Options
- Indexes
- Bonds
- Foreign Exchange (Forex or FX)
- Cryptocurrency
- Contracts for Differences (CFDs)
- Warrants
- Commodities

WARNING: Automated trading can go horribly wrong very quickly. Verify your code on a paper trading account before unleashing trading on an account where money can be lost. If you think this can not happen to you, read The Rise and Fall of Knight Capital. The Setup section shows configurations to prevent accidental trade submission.
For more details, see:
For help with deephaven-ib:
For Deephaven how-to guides, see:
For help with Deephaven:
- Gitter: A relaxed chat room about all things Deephaven
- Deephaven Community Slack
- Deephaven Community Core Discussions
The Deephaven query engine is built around the concept of tables, which are similar to Pandas dataframes.
Unlike Pandas dataframes, Deephaven tables can dynamically update as new data is streamed in.
As input tables change, the Deephaven query engine ensures that all queries, no matter how complex,
are kept up-to-date.
Once data is converted to a Deephaven table, it can be used in queries with any other Deephaven tables.
Data available from IB Trader Workstation (TWS) can be accessed as Deephaven tables by using deephaven-ib. As data streams in, the tables and queries using them will automatically update.
These tables include:
- General
errors: an error logrequests: requests to IB
- Contracts
contract_details: details describing contracts of interest. Automatically populated.contracts_matching: contracts matching query strings provided torequest_contracts_matching.market_rules: market rules indicating the price increment a contract can trade in. Automatically populated.short_rates: interest rates for shorting securities. Automatically populated ifdownload_short_rates=True.
- Accounts
accounts_managed: accounts managed by the TWS session login. Automatically populated.accounts_family_codes: account family. Automatically populated.accounts_groups: account groups. Automatically populated.accounts_allocation_profiles: allocation profiles for accounts. Automatically populated.accounts_value: account values. Automatically populated.accounts_overview: overview of account details. Automatically populated.accounts_summary: account summary. Automatically populated.accounts_positions: account positions. Automatically populated.accounts_pnl: account PNL. Automatically populated.
- News
news_providers: currently subscribed news sources. Automatically populated.news_bulletins: news bulletins. Automatically populated.news_articles: the content of news articles requested viarequest_news_article.news_historical: historical news headlines requested viarequest_news_historical.
- Market Data
ticks_price: real-time tick market data of price values requested viarequest_market_data.ticks_size: real-time tick market data of size values requested viarequest_market_data.ticks_string: real-time tick market data of string values requested viarequest_market_data.ticks_efp: real-time tick market data of exchange for physical (EFP) values requested viarequest_market_data.ticks_generic: real-time tick market data of generic floating point values requested viarequest_market_data.ticks_option_computation: real-time tick market data of option computations requested viarequest_market_data.ticks_trade: real-time tick market data of trade prices requested viarequest_tick_data_historicalorrequest_tick_data_realtime.ticks_bid_ask: real-time tick market data of bid and ask prices requested viarequest_tick_data_historicalorrequest_tick_data_realtime.ticks_mid_point: real-time tick market data of mid-point prices requested viarequest_tick_data_historicalorrequest_tick_data_realtime.bars_historical: historical price bars requested viarequest_bars_historical. Real-time bars change as new data arrives.bars_realtime: real-time price bars requested viarequest_bars_realtime.
- Order Management System (OMS)
orders_submitted: submitted orders FOR THE THE CLIENT'S ID. A client ID of 0 contains manually entered orders. Automatically populated.orders_status: order statuses. Automatically populated.orders_completed: completed orders. Automatically populated.orders_exec_details: order execution details. Automatically populated.orders_exec_commission_report: order execution commission report. Automatically populated.
Most tables include a ReceiveTime column. This column indicates the time the data was received by deephaven-ib. It does not represent the time the event occurred.
You may want to combine data from other sources with your IB data. Deephaven can load data from:
- CSV
- Parquet
- Kafka.
See the Deephaven Documentation for details.
Follow these steps to run a Deephaven plus Interactive Brokers system.
These instructions produce a virtual environment with deephaven-ib, Deephaven, and ibapi installed.
For more details on using pip-installed Deephaven, see Deephaven's Installation Guide for pip.
| ❗ Windows users must run these commands in WSL. |
|---|
To setup and configure the system:
-
Follow the TWS Installation Instructions to get IB Trader Workstation (TWS) running.
-
Launch IB Trader Workstation (TWS).
-
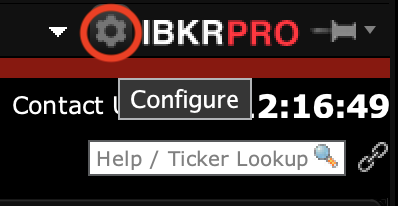
In IB Trader Workstation (TWS), click on the gear in the upper right corner.
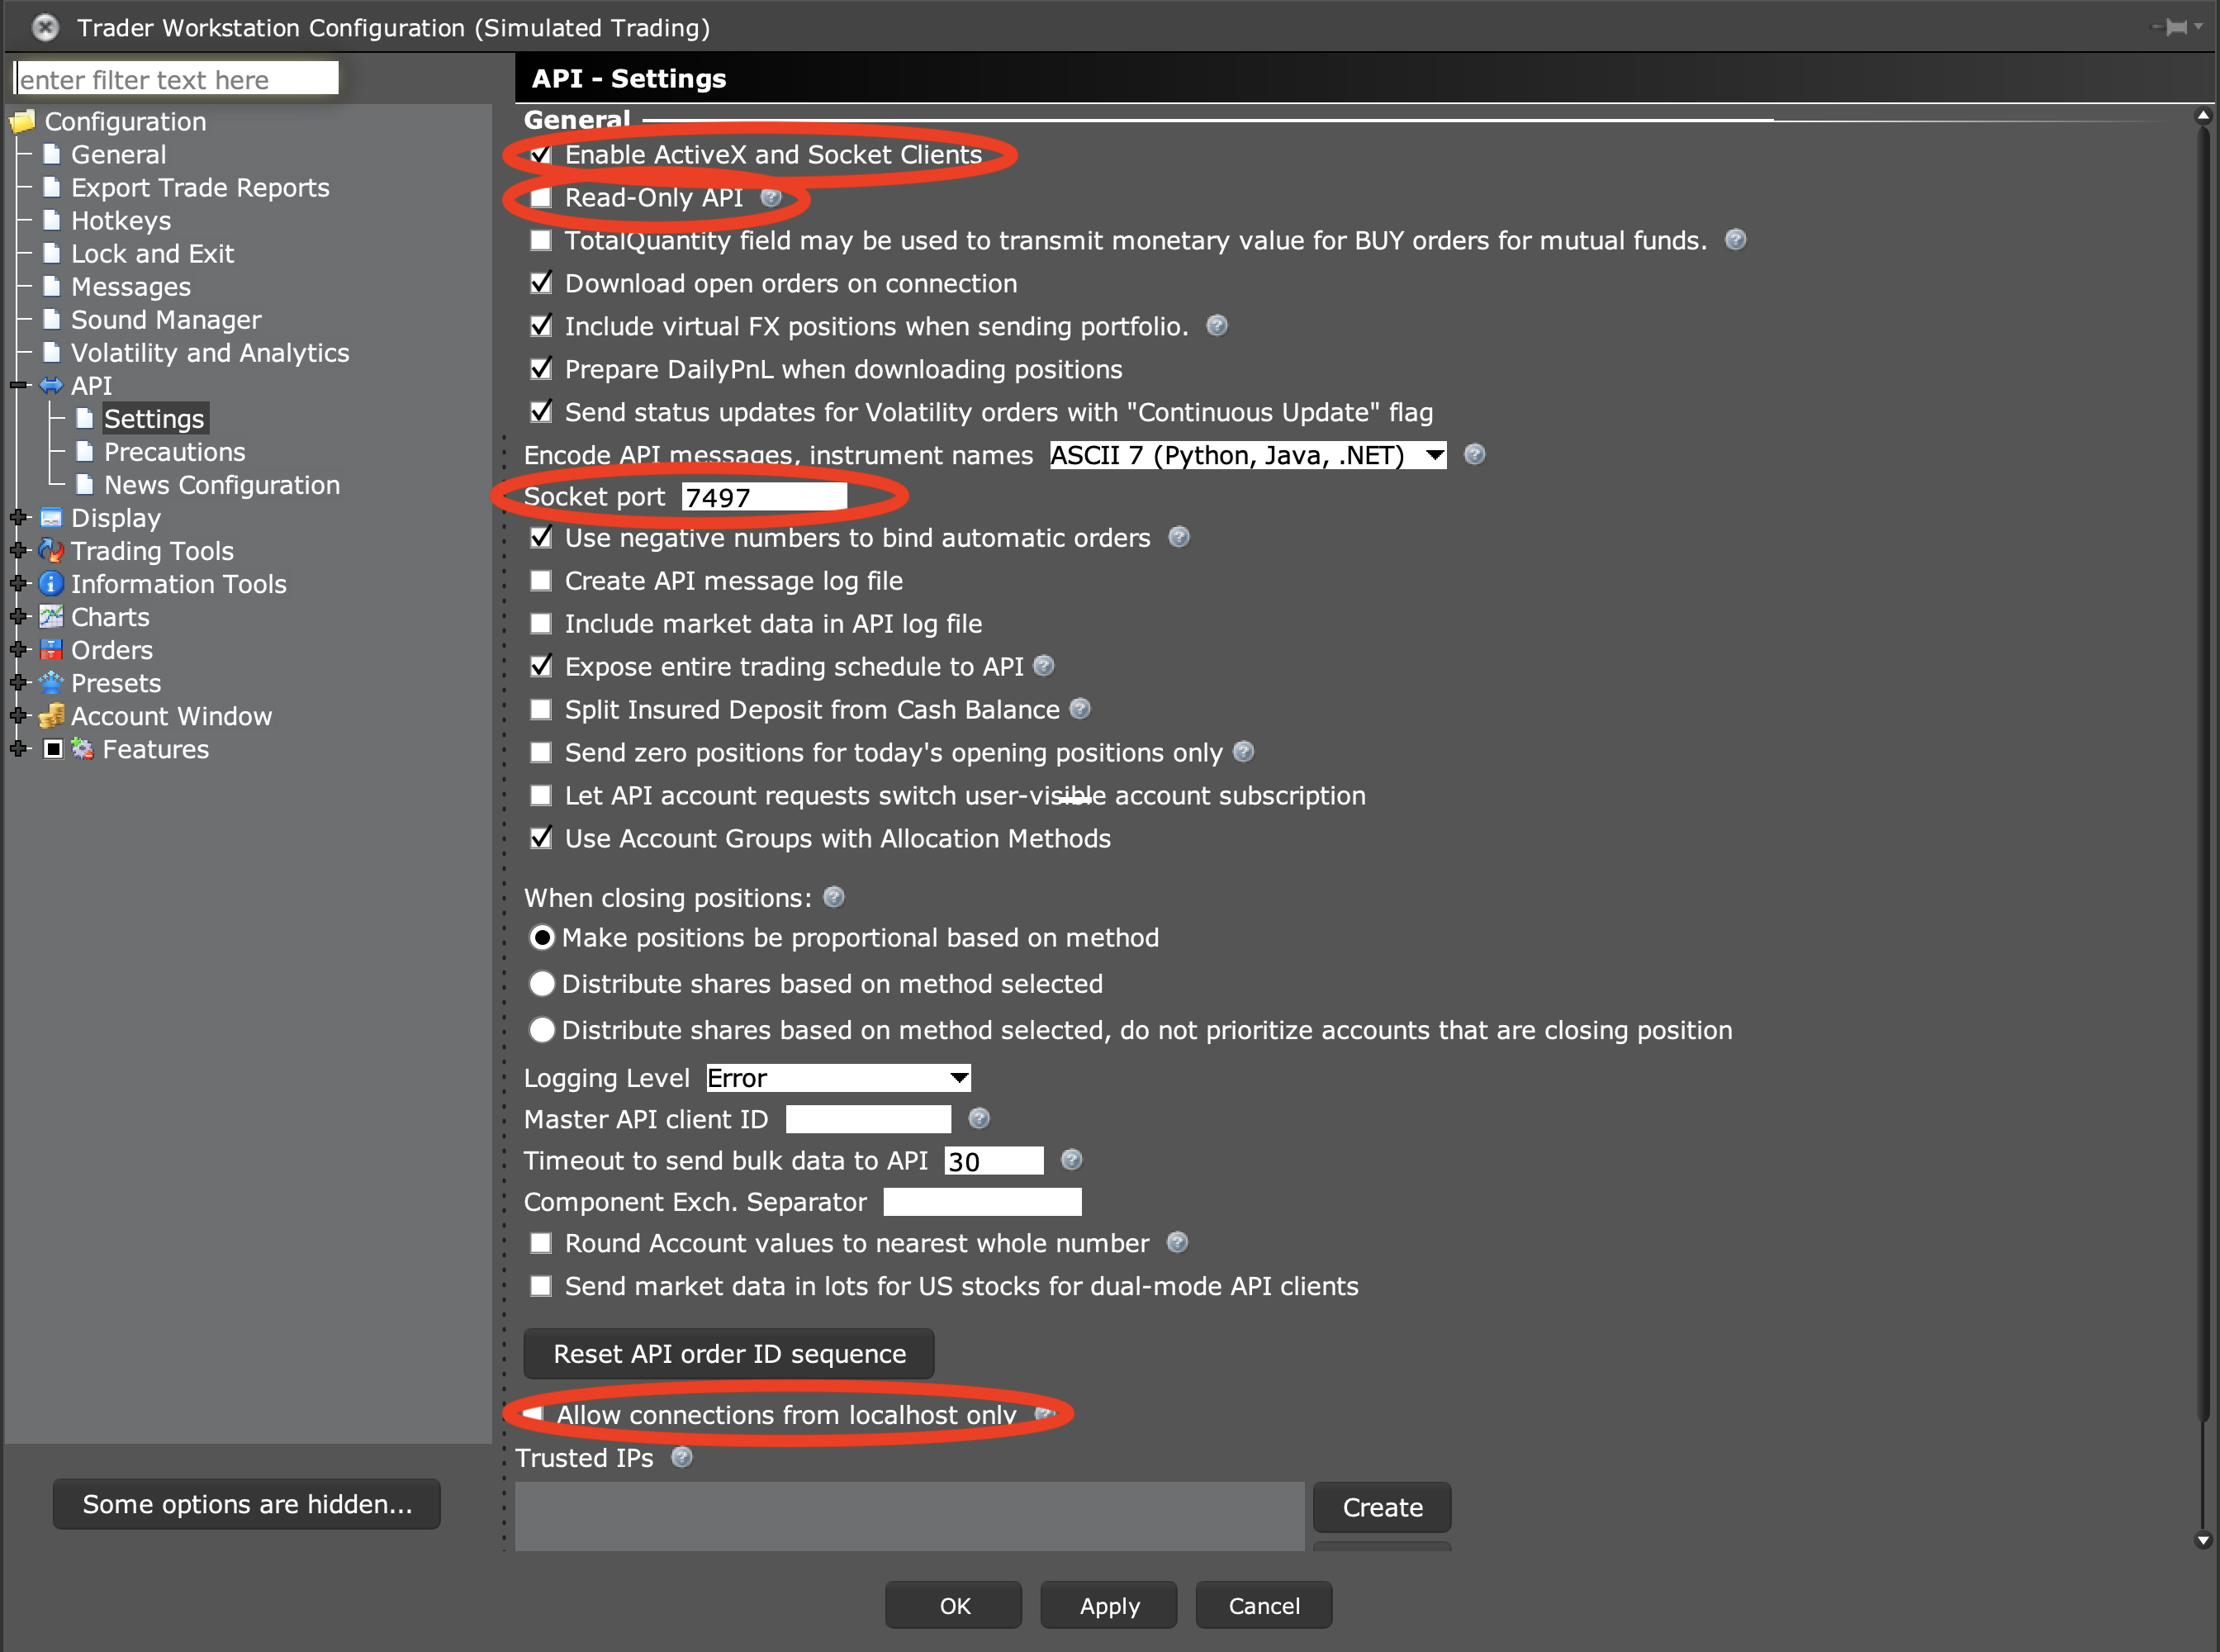
InAPI->Settings, make sure:- "Enable ActiveX and Socket Clients" is selected.
- "Allow connections from localhost only" is not selected.
- "Read-Only API" is selected if you want to prevent trade submission from deephaven-ib.
Also, note the "Socket port" value. It is needed when connecting deephaven-ib.
-
[For Paper Trading] Log into the Interactive Brokers Web Interface.
-
[For Paper Trading] In the Interactive Brokers Web Interface, navigate to
Account->Settings->Paper Trading Accountand make sure that "Share real-time market data subscriptions with paper trading account?" is set to true. -
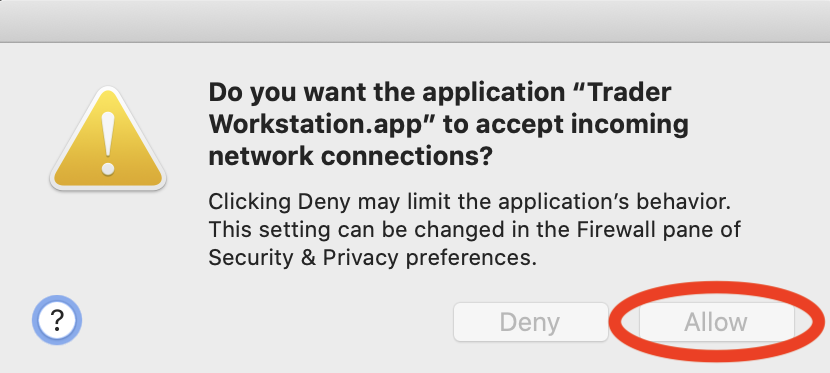
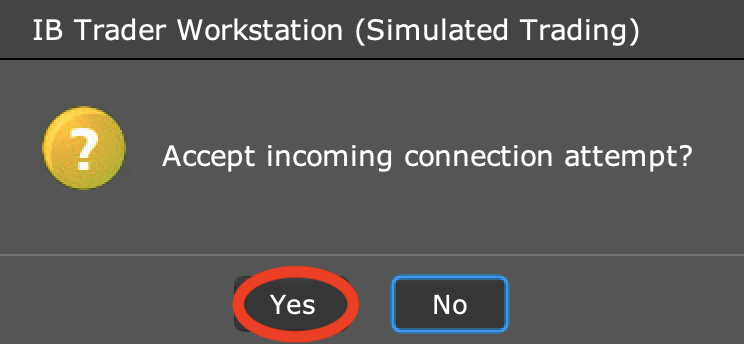
Once deephaven-ib is launched (see below), accept incoming connections to IB Trader Workstation (TWS). (May not be required for all sessions.)
Interactive Brokers does not make their Python wheels available via PyPI, and the wheels are not redistributable.
As a result, installing deephaven-ib requires a Python script to build the wheels locally before installation.
The script installs deephaven-ib, ibapi, and deephaven into the environment.
To keep your development environment clean, the script creates a virtual environment for deephaven-ib. Follow the directions below to build and activate the virtual environment using the ./dhib_env.py script.
An existing virtual environment can be used with the --create_venv false and --path_venv <path> options.
If you prefer to install directly into your system Python without a virtual environment,
you can use the --use_venv false option to ./dhib_env.py.
-
Install Java 17 and set the appropriate
JAVA_HOMEenvironment variable. -
Check out deephaven-ib
git clone git@github.com:deephaven-examples/deephaven-ib.git
-
Change to the deephaven-ib directory:
cd deephaven-ib -
Build a deephaven-ib virtual environment:
First, install the dependencies needed to run the script:
python3 -m pip install -r requirements_dhib_env.txt
To see all options:
python3 ./dhib_env.py --help
To install the latest production release version of deephaven-ib from PyPi plus the release-specified
ibapianddeephavenversions:python3 ./dhib_env.py release
To install the latest development version of deephaven-ib from source plus the default
ibapianddeephavenversions:python3 ./dhib_env.py dev
To create a venv for developing deephaven-ib in PyCharm: (This will not install
deephaven-ib, but it will install the defaultibapianddeephavenversions.)python3 ./dhib_env.py dev --install_dhib false -
In the logs, take note of where the virtual environment is located. It will be in a directory like
./venv-<versiondetails>.
To activate the virtual environment:
source ./venv-<versiondetails>/bin/activateOnce the virtual environment is activated, python and pip will use the virtual environment's Python and packages --
including everything needed to run deephaven-ib.
To deactivate the virtual environment:
deactivateOnce the virtual environment is deactivated, python and pip will use the system's Python and packages.
deephaven-ib will not be available.
To use deephaven-ib, you need to start a Deephaven server and connect to IB Trader Workstation (TWS). You can optionally use the Deephaven IDE to visualize data and run queries.
First, start a Deephaven server. This server will be used to process data and run queries.
The documentation and examples here illustrate using Deephaven's Pre-Shared Key (PSK) authentication
with the password DeephavenRocks!. Other types of Deephaven authentication can also work.
See the Deephaven Documentation for details.
The easiest way to start a deephaven server is using deephaven on the command line.
The deephaven command was added to the virtual environment when it was created.
It is available in Deephaven versions >= 0.34.0.
This command will start a deephaven server with 4GB of memory and the password DeephavenRocks!.
It will also automatically open the Deephaven IDE in a web browser.
source ./venv-<versiondetails>/bin/activate
deephaven server --jvm-args "-Xmx4g -Dauthentication.psk=DeephavenRocks! -Dstorage.path=~/.deephaven"An alternative way to launch a deephaven server is to use a Python script. This works with all versions of
Deephaven and can be used to populate the server with queries.
See Deephaven's Installation Guide for pip for more details on
running Deephaven this way.
To start Python with the virtual environment, run:
source ./venv-<versiondetails>/bin/activate
python
Once Python is running, you can start a deephaven server with the following script:
import os
from time import sleep
from deephaven_server import Server

_server = Server(port=10000, jvm_args=['-Xmx4g','-Dauthentication.psk=DeephavenRocks!','-Dstorage.path=' + os.path.expanduser('~/.deephaven')])
_server.start()

# You can insert queries here

# Keep the server running
while True:
    sleep(1)
⚠️ These deephaven server commands must be run before importingdeephavenordeephaven_ib.
At the indicated place in the script, you can put queries that you want to run when the server starts.
This could be code to conenct to IB Trader Workstation (TWS), request data, analyze data, visualize data, or trade.
See the examples below for more details.
Once the Deephaven server is started, you can launch the Deephaven IDE.
If you used the deephaven command to start the server, the Deephaven IDE will automatically open in your web browser.
The Deephaven IDE is a web-based interface for working with Deephaven. Once in the IDE, you can run queries, create notebooks, and visualize data. You can also run all of the example code below and the more complex examples in ./examples.
To launch the Deephaven IDE, navigate to http://localhost:10000/ide/ in your web browser.
Chrome, Edge, Chrome-based, and Firefox browsers are supported. Safari is not supported.
How you authenticate will depend upon how authentication is configured.
In the examples here, you will use the password DeephavenRocks!.
All deephaven-ib sessions need to first create a client for interacting with IB Trader Workstation (TWS).
host is the computer to connect to. When using deephaven-ib locally, host is usually set to localhost.
When using deephaven-ib inside
of Docker, host should be set to host.docker.internal.
port is the network port IB Trader Workstation (TWS)
communicates on. This value can be found in the IB Trader Workstation (TWS)
settings. By default, production trading uses port 7496, and paper trading uses port 7497. See Setup and TWS Initial Setup for more details.
read_only is a boolean value that is used to enable trading. By default read_only=True, preventing trading. Use read_only=False to enable trading.
is_fa is a boolean value that is used to indicate if an account is a financial advisor (FA) account or a regular acccount.
By using is_fa=True, FA account configuration details are requested. By default is_fa=False.
If is_fa=True is used on a non-FA account, everything should work fine, but there will be error messages.
If is_fa=False (the default) is used on a FA account, FA account configurations will not be populated in tables such as
accounts_groups, accounts_allocation_profiles, and accounts_aliases.
order_id_strategy is the strategy used for obtaining new order ids. Order id algorithms have tradeoffs in execution time, support for multiple, concurrent sessions, and avoidance of TWS bugs.
OrderIdStrategy.RETRY(default) - Request a new order ID from TWS every time one is needed. Retry if TWS does not respond quickly. This usually avoids a TWS bug where it does not always respond.OrderIdStrategy.BASIC- Request a new order ID from TWS every time one is needed. Does not retry, so it may deadlock if TWS does not respond.OrderIdStrategy.INCREMENT- Use the initial order ID sent by TWS and increment the value upon every request. This is fast, but it may fail for multiple, concurrent sessions connected to TWS.
For a read-write session that allows trading:
import deephaven_ib as dhib

client = dhib.IbSessionTws(host="localhost", port=7497, read_only=False)
client.connect()
For a read-only session that does not allow trading:
import deephaven_ib as dhib

client = dhib.IbSessionTws(host="localhost", port=7497, read_only=True)
client.connect()
For a read-only financial advisor (FA) session that does not allow trading:
import deephaven_ib as dhib

client = dhib.IbSessionTws(host="localhost", port=7497, read_only=True, is_fa=True)
client.connect()
After client.connect() is called, TWS requires that the connection be accepted.
IB Trader Workstation (TWS) data is stored in the deephaven-ib client as two dictionaries of tables:
tablescontains the tables most users will want.tables_rawcontains raw IB Trader Workstation (TWS) data.
As an example, the requests table, that contains all of the requests made to IB Trader Workstation (TWS),
can be obtained by:
requests = client.tables["requests"]To display all of the tables in the Deephaven IDE, place the tables in the global namespace. This can most easily be done by:
for k, v in client.tables.items():
    globals()[k] = v
Similarly, raw tables can be viewed by:
for k, v in client.tables_raw.items():
    globals()[k] = v
A list of available tables can be obtained by:
print(client.tables.keys())
print(client.tables_raw.keys())In IB, financial contracts include:
- Stocks
- FX
- Cryptocurrency
- Indexes
- CFDs
- Futures
- Options
- Futures Options
- Bonds
- Mutual Funds
- Warrants
- Commodities
To create a contract for use in deephaven-ib,
the contract must first be created as an ibapi.contract.Contract. Once the contract is created,
it must be registered with deephaven-ib before it
can be used.
Details on creating contracts can be found at https://interactivebrokers.github.io/tws-api/basic_contracts.html.
Registering the contract causes the contract details to appear in the contracts_details table.
from ibapi.contract import Contract

c = Contract()
c.symbol = 'AAPL'
c.secType = 'STK'
c.exchange = 'SMART'
c.currency = 'USD'

rc = client.get_registered_contract(c)
print(rc)
./examples/example_all_functionality.py illustrates the creation and registration of many different types of contracts.
Market data can be requested from the client using:
request_market_datarequest_bars_historicalrequest_bars_realtimerequest_tick_data_realtimerequest_tick_data_historical
from ibapi.contract import Contract

import deephaven_ib as dhib

# Use delayed market data if you do not have access to real-time
# client.set_market_data_type(dhib.MarketDataType.DELAYED)
client.set_market_data_type(dhib.MarketDataType.REAL_TIME)


c = Contract()
c.symbol = 'AAPL'
c.secType = 'STK'
c.exchange = 'SMART'
c.currency = 'USD'

rc = client.get_registered_contract(c)
print(rc)

client.request_market_data(rc)
client.request_tick_data_realtime(rc, dhib.TickDataType.BID_ASK)
client.request_tick_data_realtime(rc, dhib.TickDataType.LAST)
client.request_tick_data_realtime(rc, dhib.TickDataType.MIDPOINT)
./examples/example_all_functionality.py illustrates requesting many kinds of market data.
Market data can be requested from the client using:
request_news_historicalrequest_news_article
from ibapi.contract import Contract

from deephaven.time import to_datetime

contract = Contract()
contract.symbol = "GOOG"
contract.secType = "STK"
contract.currency = "USD"
contract.exchange = "SMART"

rc = client.get_registered_contract(contract)
print(contract)

start = "2021-01-01T00:00:00 ET"
end = "2021-01-10T00:00:00 ET"
client.request_news_historical(rc, start=start, end=end)

client.request_news_article(provider_code="BRFUPDN", article_id="BRFUPDN$107d53ea")
./examples/example_all_functionality.py illustrates requesting news data.
Standard account details are requested by default. IB Trader Workstation (TWS) does not provide an API for requesting all model codes, so deephaven-ib can not subscribe to data for different model codes. If you need details on non-standard account / model code combinations, you can use:
request_account_pnlrequest_account_overviewrequest_account_positions
Orders can be created and canceled using:
order_placeorder_cancelorder_cancel_all
To place an order, register a contract with deephaven-ib,
and create an ibapi.order.Order containing details for the order.
Details on creating orders can be found at https://interactivebrokers.github.io/tws-api/orders.html.
from ibapi.contract import Contract
from ibapi.order import Order

contract = Contract()
contract.symbol = "GOOG"
contract.secType = "STK"
contract.currency = "USD"
contract.exchange = "SMART"

rc = client.get_registered_contract(contract)
print(contract)

order = Order()
order.account = "DF4943843"
order.action = "BUY"
order.orderType = "LIMIT"
order.totalQuantity = 1
order.lmtPrice = 3000
order.eTradeOnly = False
order.firmQuoteOnly = False

req = client.order_place(rc, order)
req.cancel()

client.order_place(rc, order)
client.order_cancel_all()Deephaven has very powerful query engine that allows mathematics and queries to be applied to static and real-time data. The queries can be as simple as filtering data and as complex as artificial intelligence.
The example below computes the real-time price ratio of DIA (Dow Jones Index) and SPY (S&P 500 Index)
every 5 seconds.
For more details, see the Deephaven Coummunity Core Documentation.
from ibapi.contract import Contract

c1 = Contract()
c1.symbol = 'DIA'
c1.secType = 'STK'
c1.exchange = 'SMART'
c1.currency = 'USD'

rc1 = client.get_registered_contract(c1)
print(rc1)

c2 = Contract()
c2.symbol = 'SPY'
c2.secType = 'STK'
c2.exchange = 'SMART'
c2.currency = 'USD'

rc2 = client.get_registered_contract(c2)
print(rc2)

client.set_market_data_type(dhib.MarketDataType.REAL_TIME)
client.request_market_data(rc1)
client.request_market_data(rc2)
client.request_bars_realtime(rc1, bar_type=dhib.BarDataType.MIDPOINT)
client.request_bars_realtime(rc2, bar_type=dhib.BarDataType.MIDPOINT)

bars_realtime = client.tables["bars_realtime"]

bars_dia = bars_realtime.where("Symbol=`DIA`")
bars_spy = bars_realtime.where("Symbol=`SPY`")
bars_joined = bars_dia.view(["Timestamp", "TimestampEnd", "Dia=Close"]) \
    .natural_join(bars_spy, on="TimestampEnd", joins="Spy=Close") \
    .update("Ratio = Dia/Spy")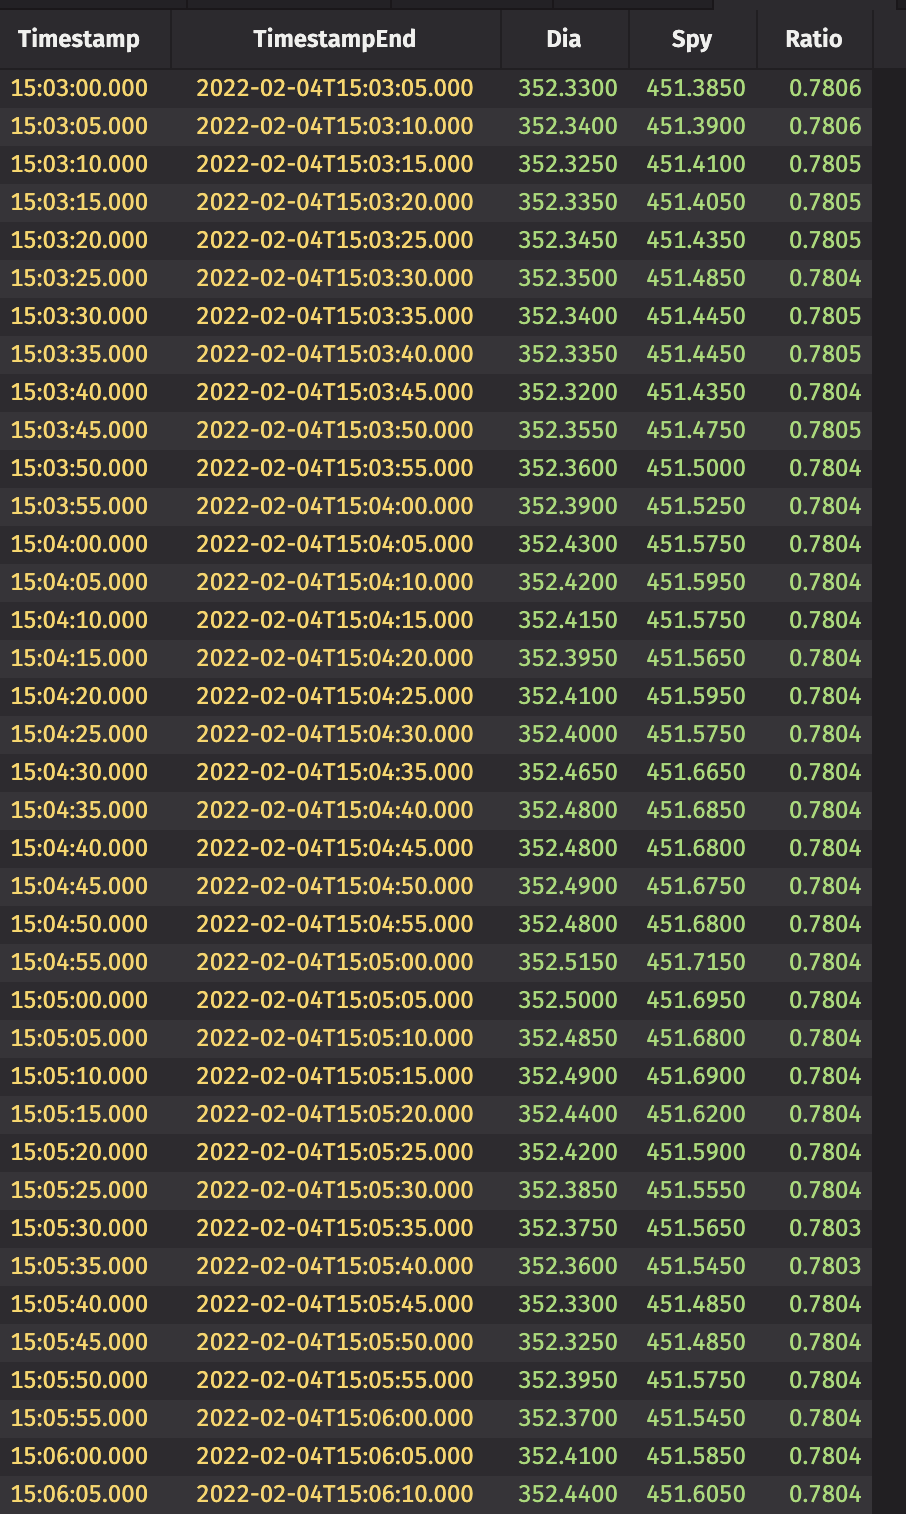
Deephaven has very powerful plotting functionality for both static and real-time data.
The example below plots the bid and ask prices of AAPL for every tick in the market.
For more details, see the Deephaven Coummunity Core Documentation.
from ibapi.contract import Contract

c = Contract()
c.symbol = 'AAPL'
c.secType = 'STK'
c.exchange = 'SMART'
c.currency = 'USD'

rc = client.get_registered_contract(c)
print(rc)

client.set_market_data_type(dhib.MarketDataType.REAL_TIME)
client.request_market_data(rc)
client.request_tick_data_realtime(rc, dhib.TickDataType.BID_ASK)

ticks_bid_ask = client.tables["ticks_bid_ask"]

from deephaven.plot import Figure

plot_aapl = Figure().plot_xy("Bid",  t=ticks_bid_ask, x="ReceiveTime", y="BidPrice") \
    .plot_xy("Ask",  t=ticks_bid_ask, x="ReceiveTime", y="AskPrice") \
    .show()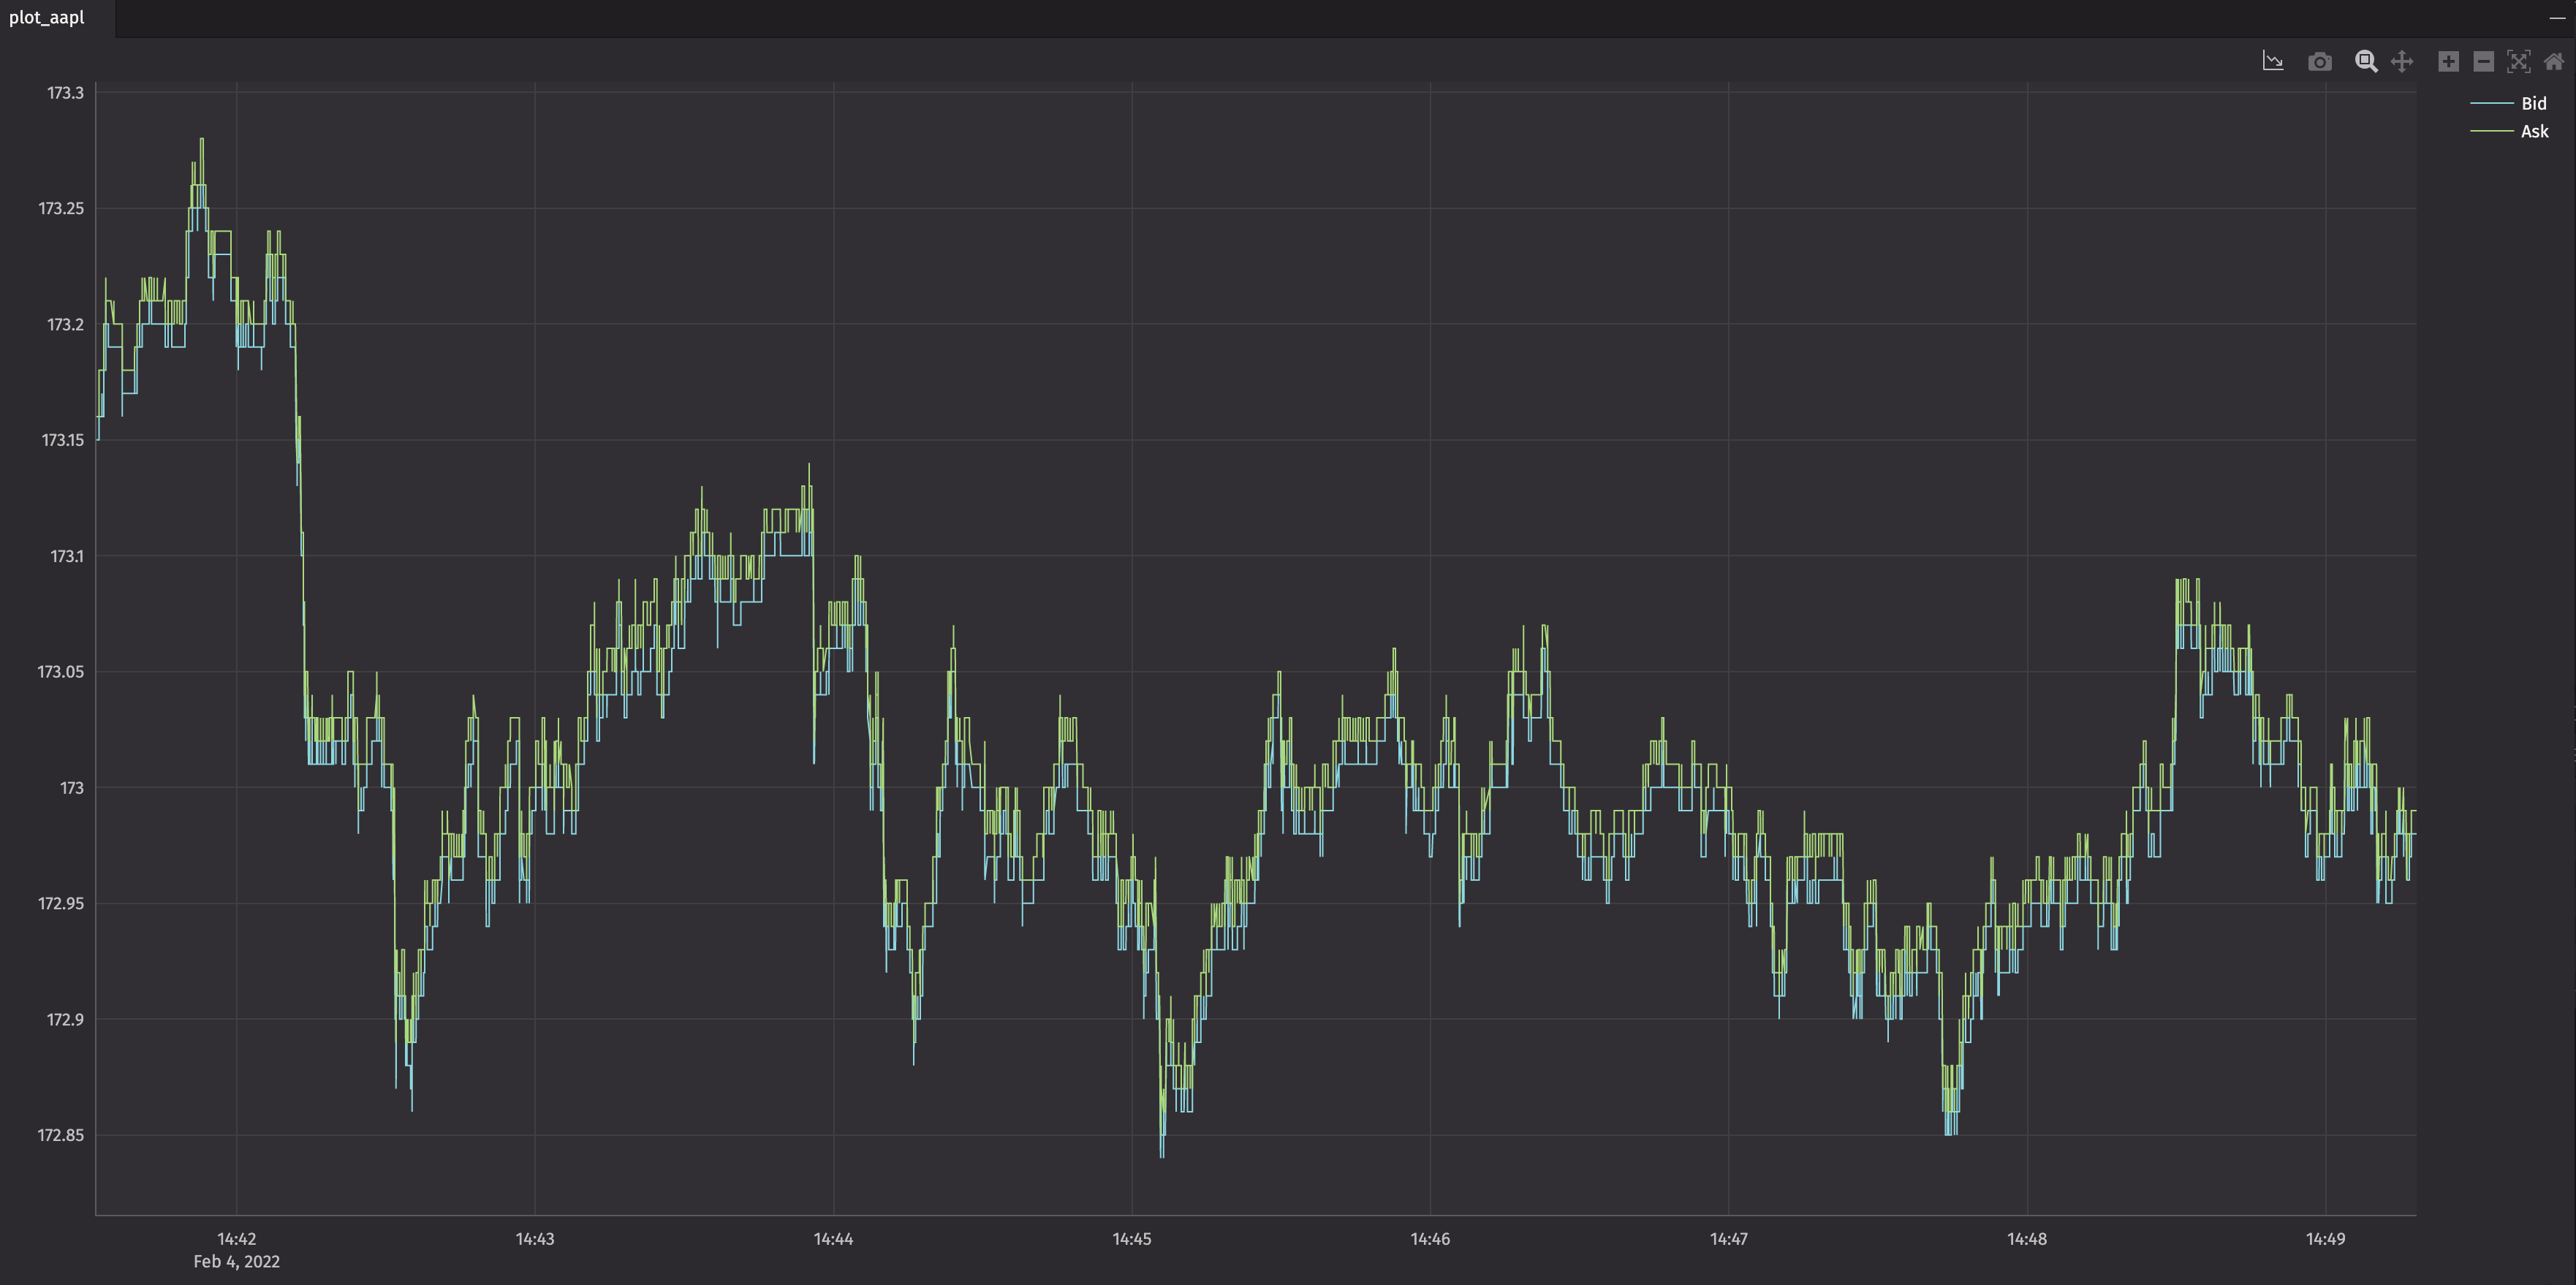
deephaven-ib logs all IB Trader Workstation (TWS)
errors to the errors table. This table should be monitored when using deephaven-ib.
errors = client.tables["errors"]deephaven-ib and ibapi both use Python's
logging framework. By default, ERROR and higher
levels are logged. More or less logging can be displayed by changing the logging level.
To see fewer log messages:
import logging
logging.basicConfig(level=logging.CRITICAL)
To see all log messages:
import logging
logging.basicConfig(level=logging.DEBUG)
A discussion of available logging levels can be found in the Python logging module documentation.
If you can not solve your problems through either the errors table or through logging, you can try:
- deephaven-ib API Documentation
- Interactive Brokers Support
- Gitter: A relaxed chat room about all things Deephaven
- Deephaven Community Slack
You may encounter an error that looks like: Takes N positional arguments but M were given.
If you see a problem like this, your ibapi version does not match the version needed by deephaven-ib.
The ibapi version in PyPI is ancient and appears to have been abandoned by Interactive Brokers.
Currently Interactive Brokers is delivering ibapi either via the IB Trader Workstation (TWS)
download or via git.
To check your ibapi version:
import ibapi
print(ibapi.__version__)
The ibapi API is very unstable. If your version does not exactly match the version needed by deephaven-ib,
you will need to install the correct version. Regenerate your virtual environment as described above.
Examples can be found in ./examples.