
Service Fabrik Broker is an OSBAPI compliant broker which is deployed using BOSH and supports BOSH based and Docker based service deployment. The OSB broker is written in an operator pattern so that it can be used also as a broker for exposing Kubernetes native services written based on operator based pattern in an OSBAPI based way. This flavor of the broker is deployed using helm-chart on Kubernetes and is called as Interoperator. This broker was very initially inspired by the cf-containers-broker. Read the Big Picture behind Service Fabrik Broker.
In the next sections we first discuss about the Deployment layout of BOSH based flavor, Service Fabrik Broker and then the architecture of Interoperator, deployed on Kubernetes.
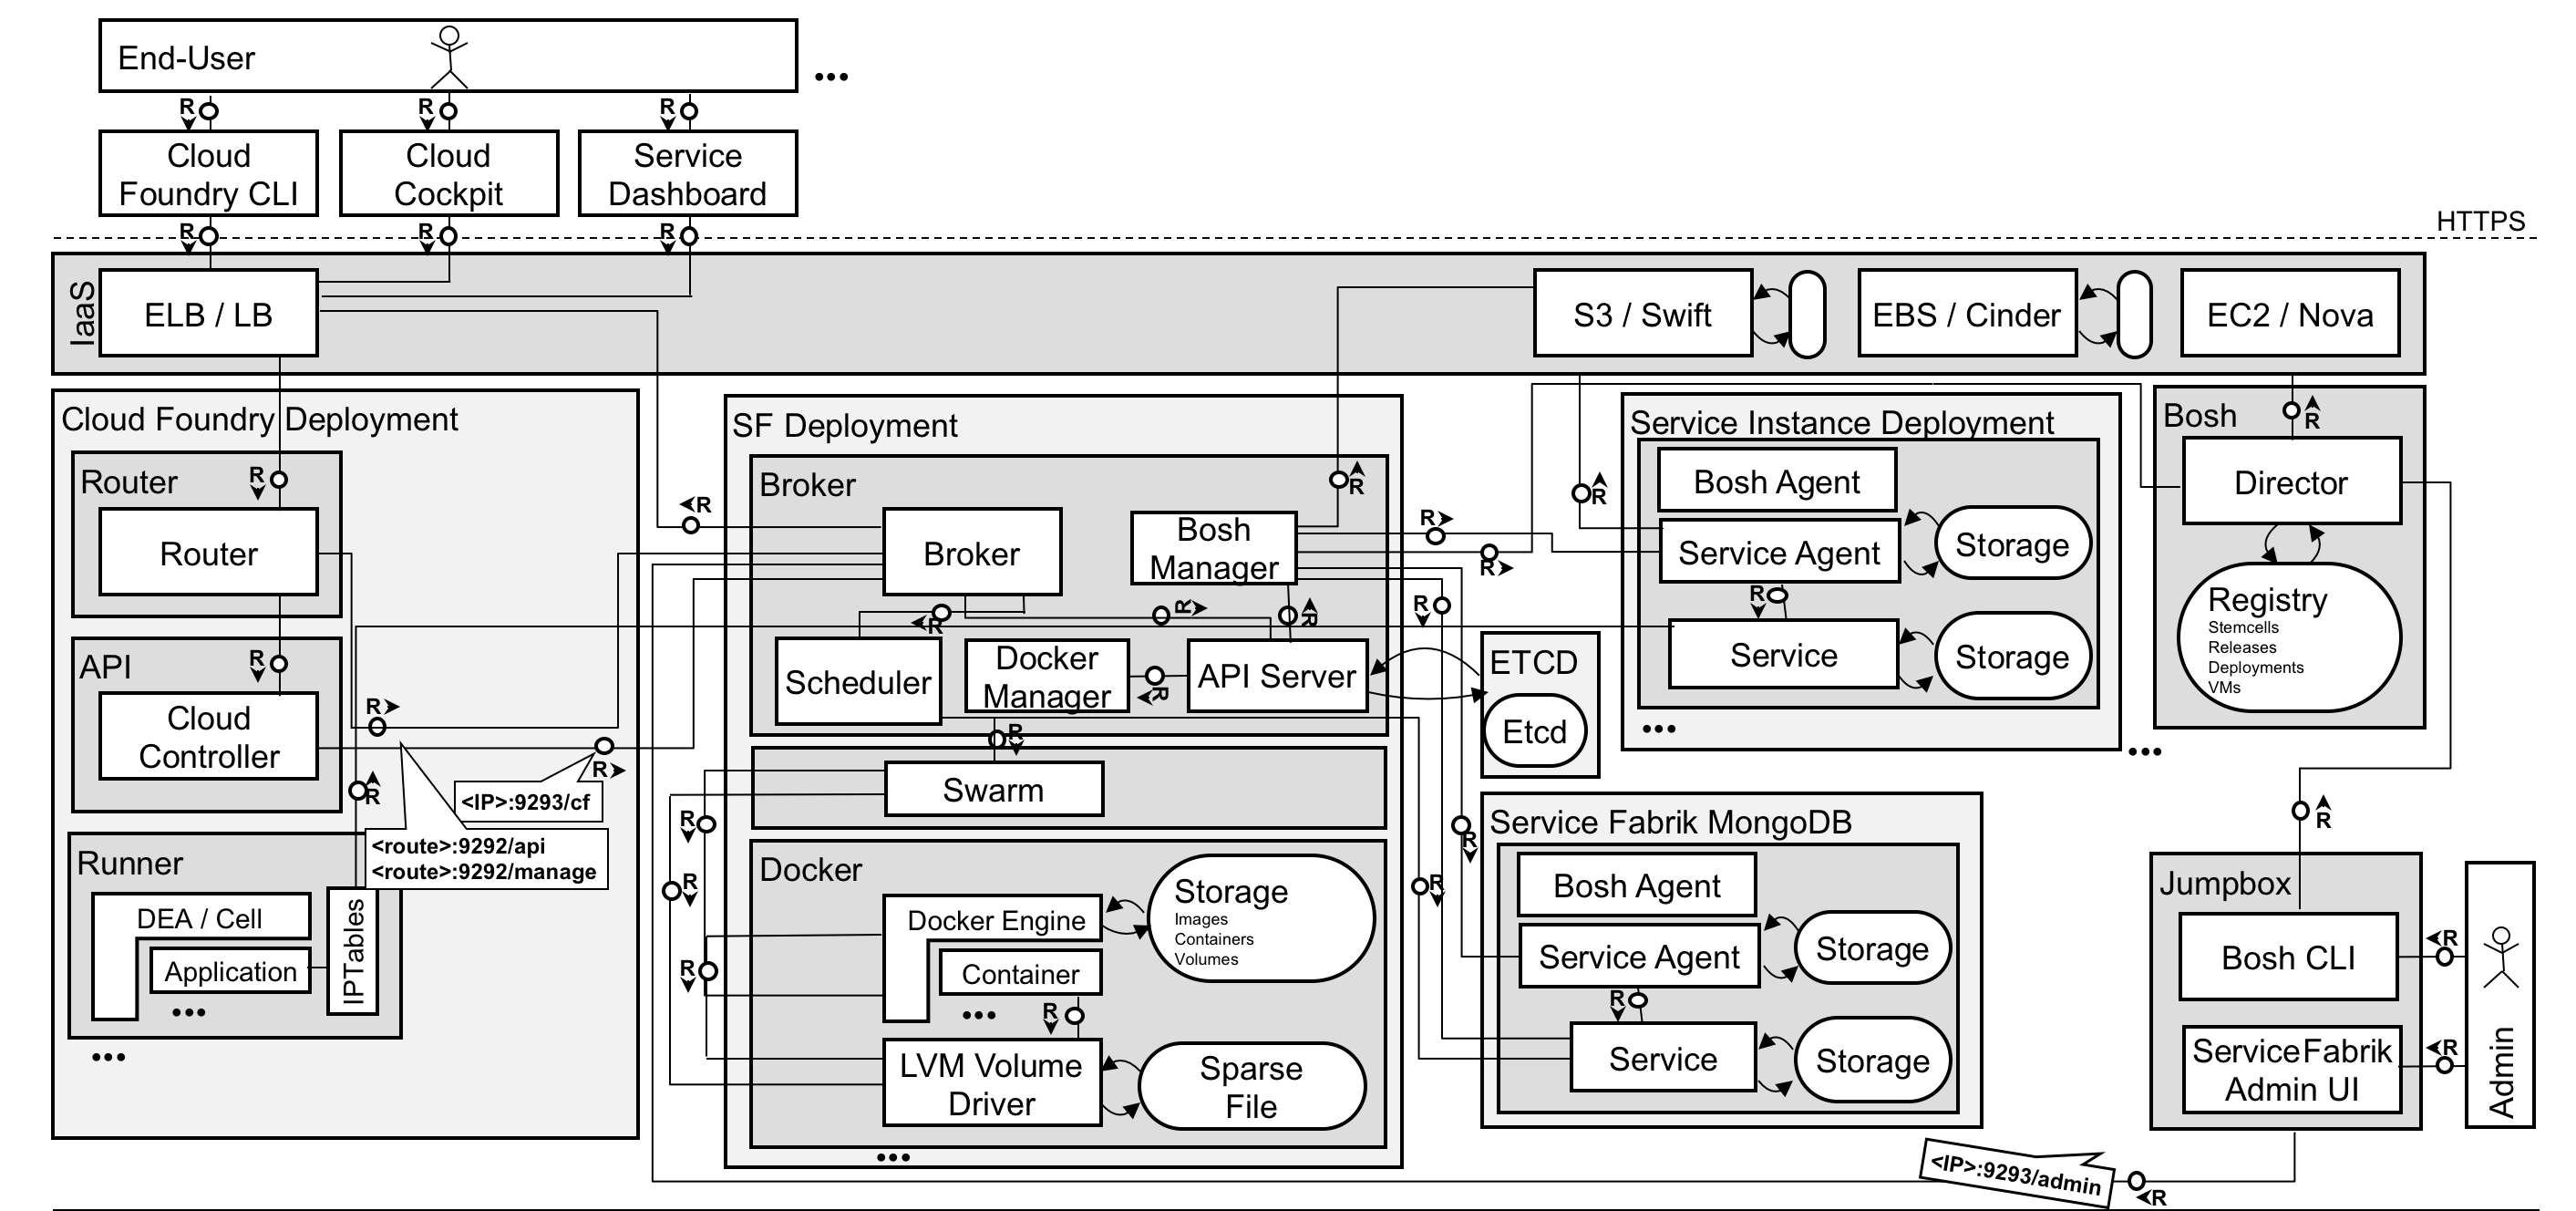 Above is the component diagram of Service Fabrik.
Service Fabrik has been re-designed to a model which is event driven and based on decoupled components which participate and communicate via an APIServer managed by Service Fabrik.
Above is the component diagram of Service Fabrik.
Service Fabrik has been re-designed to a model which is event driven and based on decoupled components which participate and communicate via an APIServer managed by Service Fabrik.
The concept is based on Event Sourcing where the Event Store is point of coordination for different components. This facilitates easy onboarding of external components and modules into the service Fabrik eco-system.
To facilitate plugging in external components, we intend to model service Fabrik on a resource and control loop based programming model.
This allows capabilities like provisioning and operations on provisioned instances to be built independently and plugged into the Service Fabrik APIServer based on specific requirements.
Steps to Integrate new provisioners are mentioned in here
Interoperator Architecture is the heart of the OSB framework of Service Fabrik. The details are discussed here.
Interoperator uses helm charts for deployment. Interoperator requires helm version >= 3.0.0, and is not supported by helm 2.
You have to deploy and run your own operator. Currently SF-Inter-Operator supports only in-cluster operators, so you have to deploy it in the same cluster where SF-Inter-Operator is deployed.
NOTE: It is suggested for Gardener users to refer this before either Fresh Deployment or Update of Interoperator
To add service fabrik interoperator helm chart repo
helm repo add interoperator-charts https://cloudfoundry.github.io/service-fabrik-broker/helm-charts
helm repo update
Deploy SF Interoperator using helm
helm install --set cluster.host=sf.ingress.< clusterdomain > --namespace interoperator [--version <helm chart version>] interoperator interoperator-charts/interoperatorTo deploy using helm chart repo
git clone https://github.com/cloudfoundry/service-fabrik-broker
helm install --set cluster.host=sf.ingress.< clusterdomain > --namespace interoperator interoperator helm-charts/interoperator
NOTE: cluster.host should be within the 63 character limit.
To check how you can upgrade existing interoperator deployment, please check this document here.
Please create sfcluster CRs and add reference to kubeconfig. In the example below, resource_v1alpha1_sfcluster.yaml is the sfcluster CR which refers to secret kubeconfig-secret.yaml, which has the current cluster kubeconfig as the base64 encoded data.
For multi-cluster support, all corresponding sfcluster CRs need to be created and their kubeconfig needs to be supplied in the corresponding secret.
Please note that sfservice, sfplans and sfcluster (along with the secret it refers to) need to be deployed in the same namespace where SF is deployed (default is interoperator).
To understand the CRs and their structures, please check the Architecture. The different templates are described in interoperator-templates
Multiple instances of interoperator can be deployed on a single cluster. But each instance must be deployed in a separate namespace. Only one instance of interoperator can be deployed in one namespace. The the custom resources like sfservice, sfplans and sfcluster (along with the secret it refers to) related on deployment of interoperator must be created in the namespace where interoperator is deployed.
Deploy an instance of interoperator on a cluster using
helm install --set cluster.host=sf.ingress.< clusterdomain > --namespace < namespace > [--version <helm chart version>] interoperator interoperator-charts/interoperatorYou can either register with service manager which then exposes it to consuming environments or register with service catalog to expose in local kubernetes cluster.
Checkout other features like enabling Service Instance sharing, custom service dashboard and quota management here.
Certainly when you are a broker developer, but also if you are a service developer, you may want to work locally with the broker without packaging it into a Bosh release and deploying it. As a pre-requisites, you would need to have the following installed.
NVM helps you manage node versions and isolated environments.
- Follow instructions at https://github.com/creationix/nvm/#install-script
curl -o- https://raw.githubusercontent.com/creationix/nvm/v0.31.3/install.sh | bash
source ~/.nvm/nvm.sh
nvm install node
nvm use node- Clone this repo (assuming your working directory is ~/workspace)
cd ~/workspace- Clone and setup fork and git-secrets ( requires hub and git secrets to be
installed)
sh -c "$(curl -fsSL https://raw.githubusercontent.com/cloudfoundry/service-fabrik-broker/master/broker/bin/clone-for-development)" cd service-fabrik-broker/broker git checkout -b my-new-feature # make code changes git push <github_username> my-new-feature - Install dependencies. Service Fabrik follows monorepo pattern and uses yarn for managing dependencies. Please follow these steps to install required dependencies.
cd service-fabrik-broker/broker
npm install -g yarn
yarn set version 2.4.1
yarn install- Optional: To locally run all unit test To run all the unit tests:
npm run -s testTo run only unit tests for specific processes like broker, deployment_hooks
# help
npm run -s help- Launch the broker process APIServer is a prerequisite for the Service Fabrik. To get more details about the APIs, this can be looked into.
Assuming that apiserver is already deployed on boshlite, to start provisioning, broker process has to be started.
If apiserver is not deployed already, please follow this guide.
Useful prerequisites: When working with the broker, install curl (sudo apt-get install curl), jq, and yaml2json.
Dependencies on other processes: broker process is dependent on deployment hooks process which has to be running for broker to run any lifecycle operation if actions are present in service catalogs.
Before starting broker process SETTINGS_PATH env variable has to be set.
export SETTINGS_PATH=$(pwd)/config/settings.ymlIf you need to change the settings.yml configuration you should copy the file and point the broker to your settings file via the environment variable SETTINGS_PATH.
# env vars you may like to set to different than these default values
# export NODE_ENV=development ## For bosh2.0, use the environment boshlite2, as the passwords and BOSH IP are different.
# cp $(pwd)/broker/config/settings.yml $(pwd)/broker/config/my-settings.yml
# export SETTINGS_PATH=$(pwd)/config/my-settings.yml
npm run -s start
Check endpoint with curl
curl -sk -u broker:secret -H "X-Broker-Api-Version: 2.9" https://127.0.0.1:9293/cf/v2/catalog | jq .- Launch the Deployment Hooks Process
This process executes action scripts provided by services in restricted environment.
More information on how to configure action scripts is documented here: https://github.com/cloudfoundry/service-fabrik-broker/wiki/Deployment-hooks-for-service-lifecycle-operations
If you don't want any predeployment action to run please comment out
actionsproperty in service and plan from catalog.
If predeployment actions are present in service catalog then deployment hook process has to be running. Before starting deployment hooks process, SETTINGS_PATH env variable has to be set.
export SETTINGS_PATH=$(pwd)/deployment_hooks/config/settings.ymlIf you need to change the settings.yml configuration you should copy the file and point the deployment_hooks to your settings file via the environment variable SETTINGS_PATH.
# env vars you may like to set to different than these default values
# export NODE_ENV=development ## For bosh2.0, use the environment boshlite2, as the passwords and BOSH IP are different.
# cp $(pwd)/deployment_hooks/config/settings.yml $(pwd)/deployment_hooks/config/my-settings.yml
# export SETTINGS_PATH=$(pwd)/deployment_hooks/config/my-settings.yml
node $(pwd)/applications/deployment_hooks/src/HookServer.js- Launch the Operators For running lifecycle operations, corresponding operator processes have to be started. Currently Service Fabrik Broker supports Bosh Director based and Docker Based services.
Assuming that all required env variables (SETTINGS_PATH, NODE_ENV) are already set. Both bosh operator and docker operator can be launched.
node applications/operators/StartBoshOperators.js #to start bosh operator
node applications/operators/StartDockerOperators.js #to start docker operator- Install kustomize
- Install kubebuilder
version=2.2.0 # latest stable version
arch=amd64

# download the release
curl -L -O https://github.com/kubernetes-sigs/kubebuilder/releases/download/v${version}/kubebuilder_${version}_darwin_${arch}.tar.gz

# extract the archive
tar -zxvf kubebuilder_${version}_darwin_${arch}.tar.gz
sudo mv kubebuilder_${version}_darwin_${arch} /usr/local/kubebuilder

# update your PATH to include /usr/local/kubebuilder/bin
export PATH=$PATH:/usr/local/kubebuilder/bin

cd interoperator

# install mockgen
go get github.com/golang/mock/gomock
go get github.com/golang/mock/mockgen
go install github.com/golang/mock/mockgen

# update your PATH to include $GOPATH/bin
export PATH=$PATH:$GOPATH/bin
go mod download
make generate manifests
go mod vendor
bash vendor/k8s.io/code-generator/generate-groups.sh client github.com/cloudfoundry-incubator/service-fabrik-broker/interoperator/pkg/client github.com/cloudfoundry-incubator/service-fabrik-broker/interoperator/api "osb:v1alpha1 resource:v1alpha1" --go-header-file hack/boilerplate.go.txt
A step by step series of examples that tell you how to get a development env running
Installing the CRDs
make install
Run it locally
export KUBECONFIG=<path to kubeconfig>
export CLUSTER_ID="1"
export POD_NAMESPACE="interoperator" # namespace should exist in the k8s cluster

# To run the provisioner
make run_provisioners

# To run the scheduler
make run_schedulers

# To run the multiclusterdeploy
make run_mcd
In a new terminal, create an instance of the CRD and check if controller picks it up
kubectl apply -f config/samples/interoperator_v1alpha1_serviceinstance.yaml
The famous Docker will be required for a local start of the broker. You can avoid this by removing any Docker service defintion from the broker settings/configuration/catalog.
- Follow instructions at https://docs.docker.com/engine/installation/linux/docker-ce/ubuntu/
If you're using a Mac, we recommend to use Docker for MAC.
Post installation of docker make modifications to manage docker as a non-root user
You have to do this only once or whenever you modify the catalog. Then of course, use update-service-broker instead of create-service-broker.
- Registration
cf create-service-broker service-fabrik-broker broker secret https://10.0.2.2:9293/cf # host IP reachable from within the Vagrant box
cf service-brokers # should show the above registered service broker
curl -sk -u broker:secret -H "X-Broker-Api-Version: 2.9" https://127.0.0.1:9293/cf/v2/catalog | jq -r ".services[].name" | xargs -L 1 -I {} cf enable-service-access {}
cf service-access # should show all services as enabled, cf marketplace should show the sameYou will need a Cloud Foundry application, let's call it my-app (see below). If you have no specific one, you can use our blueprint-app.
cf create-service blueprint v1.0-container my-service
cf bind-service my-app my-service
# take a look at the generated binding with cf env my-app
cf restart my-app # do this a.) to make binding information available in environment of the app and b.) to activate the security group created with the service
# verify the application sees the service; if you have deployed the above app, run curl -skH "Accept: application/json" "https://my-app.bosh-lite.com/test"
cf unbind-service my-app my-service
cf delete-service -f my-serviceIf you need any support, have any question or have found a bug, please report it in the GitHub bug tracking system. You can also reach us out on our Slack Channel.
This project is licensed under the Apache Software License, v. 2 except as noted otherwise in the LICENSE file.