This gem is a Ruby library for interacting directly with Aurora-based WaterFurnace heat pump systems. It connects directly to the RS-485 communication bus that the AID Tool Aurora Web Link (AWL)/Symphony systems use. WaterFurnace provides zero documentation on this protocol, besides to occasionally mention in their manual that it is standards based ModBus (spoiler alert - it is, but only in the loosest sense). It is ModBus in that is based on a series of registers that can be read and/or written, and even by standard ModBus commands, but the WaterFurnace tools (AID Tool and AWL) use proprietary extensions to ModBus in order to address a large number of registers at once.
This gem relies on the RModBus gem for basic ModBus communication, but the WaterFurnace specific extensions live in this repository. The register map has been deciphered in a number of ways:
- capturing traffic between an AID Tool and the ABC (Aurora Base Control)
- capturing traffic between an AWL and the ABC
- capturing traffic between an AID tool and this code, masquerading as an ABC.
- inspecting the (obfuscated) source of the web AID Tool from an AWL
This code has been tested against several variations of equipment. The amount data available to you will depend on what equipment you have. If you own a different unit, and things aren't working well for you, I would be glad to have your help extending support!
- WaterFurnace 7 Series, IntelliZone 2, DHW, ECM blower, VS Drive, VS Pump
- WaterFurnace 7 Series, IntelliZone 2, DHW, ECM blower, VS Drive, VS Pump (pre-AWL firmware)
- WaterFurnace 5 Series, ECM blower
- WaterFurnace 5 Series split, ECM blower, DHW
- WaterFurnace Versatec Base
- GeoSmart PremiumV, DHW, ECM blower, VS Drive, VS Pump
Note that if your system has firmware that predates the AWL (see https://www.waterfurnace.com/literature/symphony/ig2001ew.pdf), a significant amount of data may be inaccessible.
Don't care for the nitty gritty details? Here's the easy path! You'll need a Raspberry Pi (tested on a Pi Zero W and a Pi 4), a USB RS-485 adapter, and a network cable. Any adapter based on the MAX485 chip is not supported. Additional details can be found in subsequent sections if you want to deviate slightly from the simple path.
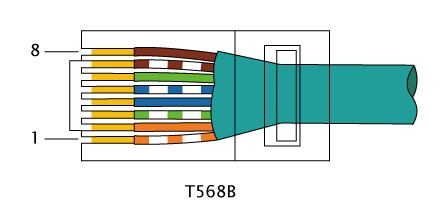
Either cut the end of an existing patch cable, or take some CAT5 and crimp an RJ45 jack on one end. Either way, ensure the end with a jack is wired for TIA-568-B. Then remove some jacket at the other end, and strip and twist together white/orange and white/green, and blue and orange. The first pair goes into the A or + terminal, and the second pair goes into the B or - terminal on your USB adapter:

Plug the jack into the AID tool port on your heat pump:

Or, if you have an AWL, into the AID tool port of your AWL:

Finally, plug the USB adapter into your computer:

Set up your Pi using the latest Raspberry Pi OS, connect it to the network, and then open a terminal window (either SSH to it or launch the terminal app with a local keyboard). Then install the software:
sudo apt install ruby ruby-dev
sudo gem install rake waterfurnace_aurora --no-doc
sudo apt install mosquitto
sudo curl https://github.com/ccutrer/waterfurnace_aurora/raw/main/contrib/aurora_mqtt_bridge.service -L -o /etc/systemd/system/aurora_mqtt_bridge.service
sudo systemctl enable aurora_mqtt_bridge
sudo systemctl start aurora_mqtt_bridge
Congratulations, you should now be seeing data published to MQTT! You can confirm this by using MQTT Explorer and connecting to raspberrypi.local:

For OpenHAB, install the MQTT Binding, and manually add an MQTT Broker thing connecting to raspberrypi.local. After that, the Aurora device will show up automatically in your inbox:

Now all the channels will be automatically created, and you just need to link them to items:

You may or may not want to ignore the Home Assistant copy of discovered things.
Just connect HASS to the same MQTT broker, and ensure discovery is enabled. Everything will automatically show up. You can easily customize entity names and IDs. You can also customize Lovelace if you would like to include more of the WaterFurnace specific controls. One example:
type: vertical-stack
cards:
  - type: custom:simple-thermostat
    entity: climate.waterfurnace_zone_1
    sensors:
      - entity: sensor.waterfurnace_humidistat_relative_humidity
        name: Humidity
      - entity: sensor.waterfurnace_heat_pump_total_power_usage
        name: Consumption
      - entity: sensor.waterfurnace_blower_current_speed
        name: Fan Speed
    control:
      hvac: true
      fan:
        auto:
          name: Auto
        continuous:
          name: Continuous
          icon: mdi:fan
        intermittent:
          name: Intermittent
          icon: mdi:fan
  - type: entities
    entities:
      - entities:
          - entity: sensor.waterfurnace_loop_pump_power_usage
            name: Pump
          - entity: sensor.waterfurnace_loop_pump_waterflow
            name: Water Flow
          - entity: sensor.waterfurnace_heat_pump_entering_water_temperature
            name: Entering Water Temp
          - entity: sensor.waterfurnace_heat_pump_leaving_water_temperature
            name: Leaving Water Temp
        entity: climate.waterfurnace_zone_1
        show_state: false
        name: Loop Details
        toggle: false
        type: custom:multiple-entity-row
      - entities:
          - entity: sensor.waterfurnace_heat_pump_entering_air_temperature
            name: Air Temp In
          - entity: sensor.waterfurnace_heat_pump_leaving_air_temperature
            name: Air Leaving Temp
        entity: climate.waterfurnace_zone_1
        show_state: false
        name: Air Sensors
        toggle: false
        type: custom:multiple-entity-row
      - head:
          entity: sensor.waterfurnace_heat_pump_total_power_usage
          name: Power Consumption
        items:
          - entity: sensor.waterfurnace_compressor_power_usage
            name: Compressor
          - entity: sensor.waterfurnace_blower_power_usage
            name: Fan
        type: custom:fold-entity-row
      - entity: sensor.waterfurnace_domestic_hot_water_generator_water_temperature
        name: Hot Water Heater Temp
Install ruby 2.5, 2.6, or 2.7. Ruby 3.0 has not been tested. If talking
directly to the serial port, Linux is required. Mac may or may not work.
Windows probably won't work. If you want to run on Windows, you'll need to run
a network serial port (like with ser2net), and connect remotely from the
Windows machine. Then:
gem install waterfurnace_aurora On Debian and Ubuntu, the following dependencies are needed to install the gem:
sudo apt install ruby ruby-devA very simple Dockerfile is provided in the docker folder to build a
docker image. This image is meant to run the MQTT bridge by default but can be
used to run any of the other tools. More details here
An MQTT bridge is provided to allow easy integration into other systems. You
will need a separate MQTT server running (Mosquitto is
a relatively easy and robust one). The MQTT topics follow the Homie
convention, making them self-describing. If you're
using a systemd Linux distribution, an example unit file is provided in
contrib/aurora_mqtt_bridge.service. So a full example would be (once you have
Ruby installed):
sudo curl https://github.com/ccutrer/waterfurnace_aurora/raw/main/contrib/aurora_mqtt_bridge.service -L -o /etc/systemd/system/aurora_mqtt_bridge.service
sudo systemctl enable aurora_mqtt_bridge
sudo systemctl start aurora_mqtt_bridge
Be sure modify the file to pass the correct URI to your MQTT server and path to RS-485 device. Also to change the "User" parameter to fit your environnment.
If you use MQTT authentication you can use the following format to provide login information: mqtt://username:password@mqtt.domain.tld. If you use SSL/TLS on your MQTT server, change the URI to be mqtts://. Be sure to URI-escape special characters, and %'s must be doubled in the .service file. You may also need to surround your MQTT URI in single quotes.
Once connected, status updates such as current temperature, set point, and a plethora of other diagnostic information will be published to MQTT regularly. Several properties such as set point and current mode can also be written back to the ABC via MQTT.
You can also host the web AID tool directly from the MQTT bridge by giving
it a port to listen on:
APP_ENV=production aurora_mqtt_bridge /dev/ttyUSB0 mqtt://localhost/ --web-aid-tool=4567
The APP_ENV is necessary if you want it to accept connections from other
devices on the network. See also Web AID Tool for more
details. If you're using systemd, you should add a
Environment=APP_ENV=production line instead to the .service file.
The MQTT bridge has pass through support for direct querying and writing of the
ModBus registers, to assist with debugging. If you send a register, or list of
registers, to the $modbus topic, it will read those registers and send them
back. You can also write to a register by addressing $modbus/:register/set:
813 => homie/aurora-<serialno>/$modbus
homie/aurora-<serialno>/$modbus/813 <= IZ2 Version (813): 2.06

745-747 => homie/aurora-<serialno>/$modbus
homie/aurora-<serialno>/$modbus/745 <= Heating Set Point (745): 68.0°F
homie/aurora-<serialno>/$modbus/746 <= Cooling Set Point (746): 73.0°F
homie/aurora-<serialno>/$modbus/747 <= Ambient Temperature (747): 73.0°F

known => homie/aurora-<serialno>/$modbus
<a whole ton of data sent back!>

valid => homie/aurora-<serialno>/$modbus
<even more data!>

all => homie/aurora-<serialno>/$modbus
<probably the same amount of data, but probably slower>

3 => homie/aurora-<serialno>/$modbus/340/set
homie/aurora-<serialno>/$modbus/340 <= Blower Only Speed (340): 3
This gem supports using an RS-485 direct connection. It is possible to directly connect to the GPIO on a Raspberry Pi, or to use a USB RS-485 dongle such as this one from Amazon. Any adapter based on the MAX485 chip is not supported. The key is identifying the correct wires as RS-485+ and RS-485-. It's easiest to take an existing ethernet cable, and cut off one end. Connect pins 1 and 3 (white/orange and white/green for a TIA-568-B configured cable) to + and pins 2 and 4 (orange and green) -. The other pins are C and R from the thermostat bus, providing 24VAC power. DO NOT SHORT THESE PINS AGAINST ANYTHING, such as the communication pins, or a ground connection anywhere. Best case scenario you blow a 3A automotive fuse in your heat pump that you will need to replace. Worst case scenario you completely brick your ABC board. You have been warned, and I am not liable for any problems attempting to do this. Once your cable is built, connect to the AID Tool port on the front of your heat pump, and then your RS-485 device on your computer.

When using a TIA-568-B terminated cable with a USB RS-485 dongle the connections should be the following:
| Dongle terminal | RJ-45 Pin | Wire color | RS-485 |
|---|---|---|---|
| TXD+ | 1 and 3 | white-orange and white-green | A+ |
| TXD- | 2 and 4 | solid orange and solid blue | B- |
| RXD+ | None | None | None |
| RXD- | None | None | None |
| GND | None | None | None |
If you would still like your AWL to function, you can connect AWL to the AID port on the heat pump, and then connect your computer to the AID Tool pass-through port on the AWL.
Serial ports over the network are also supported. Just give a URI like tcp://192.168.1.10:2000/ instead of a local device. Be sure to set up your server (like ser2net) to use 19200 baud, EVEN. You can also use RFC2217 serial ports (allowing the serial connection parameters to be set automatically) with a URI like telnet://192.168.1.10:2217/.
If you have a dump of registers from an ABC in YAML format (such as generated via aurora_fetch), you can provide the filename instead of a serial port path or a network connection, and any of the tools will work against that nstead.
If you're running the MQTT bridge, and would like to also try out another tool (such as the web AID tool, you can provide an MQTT URI instead of a serial port path. You will need to append the full path to the $modbus topic, like so:
$ web_aid_tool mqtt://mqtt-server/homie/aurora-123/$modbus
If you need to eavesdrop over existing communication, it is possible to mangle an ethernet cable such that it still has both ends, but you're connected in the middle. But I find it much easier to use an RJ45 breakout board such as this one from Amazon. You connect a cable from the heat pump to the board, one from the board to your RS-485 dongle, and one from the board to the AWL or AID Tool. If you're simulating the ABC, you would omit the cable to the heat pump. But the AID Tool still needs power, so you can either build an additional cable as above, but this time breaking out C and R, and connecting to a 24VAC power supply. Or you can just connect directly to the terminals on the breakout board without building a special cable. The cable has the advantage of being able to quickly re-configure by only switching cable connections, rather than screwing or unscrewing terminals.
This tool simply monitors all traffic on the serial bus, and dumps out anything
it can decipher. This includes raw register values for registers that are not
recognized. This is used when you are connected between an AID Tool or AWL and
the ABC. Trigger an action on the AID Tool or the Symphony website, watch the
dump, and guess what's what! It has several options (see --help) to tweak its
output, but the most useful is -q which combines several of them to only
print when registers actually change, and exclude known, frequently updating
values (like power usage sensors):
$ aurora_monitor /dev/ttyHeatPump -q
2021-08-27 14:05:15 +0000 ===== read
Last Fault Number (25): E0
Last Lockout (26): E19
System Outputs (At Last Lockout) (27): blower, accessory, 0x0040
System Inputs (At Last Lockout) (28): Y1, G, 0x0180
System Outputs (30): rv, blower, accessory, 0x0040
Status (31): {:lps=>:closed, :hps=>:closed, :unknown=>"0x0018"}
??? (35): 1 (0x0001)
??? (73): 682 (0x02aa)
??? (74): 715 (0x02cb)
??? (320): 0 (0x0000)
??? (324): 99 (0x0063)
ECM Speed (344): 2
??? (348): 10 (0x000a)
DHW Setpoint (401): 130.0°F
Relative Humidity (741): 51%
??? (742): 0 (0x0000)
??? (743): 0 (0x0000)
??? (744): 24 (0x0018)
Heating Set Point (745): 74.0°F
Cooling Set Point (746): 72.0°F
Ambient Temperature (747): 0.0°F
...
This tool masquerades as an ABC. To date, I've only used this against an AID tool, and not an AWL, in order to not confuse WaterFurnace's servers with potentially bogus data. This tool has not been used in a long time, and may not work. You give it a path to a YAML file, and then it serves it up when the AID Tool requests it. Change some data, go look in the AID tool to see what changed, to see if you guessed right!
This tool simply queries a specific set of registers, and prints the results. This is used when you are connected to the AID Tool port (either of the heat pump itself, or the AWL). It accepts the same syntax as the MQTT ModBus pass through:
$ aurora_fetch /dev/ttyHeatPump 745-746
Heating Set Point (745): 68.0°F
Cooling Set Point (746): 73.0°F

$ aurora_fetch /dev/ttyHeatPump 745-746 --yaml
---
745: 680
746: 730
This is the easiest way to make a "dump" of your system to send if you're having problems:
$ aurora_fetch /dev/ttyHeatPump valid --yaml > myheatpump.yml
This is a reproduction of the web AID tool, as provided on some early AWL
units. It depends on code from an actual AWL. For copyright reasons, these
files are not provided. You will need to download them from your AWL, and
place them into an html directory. You can do this by running
curl https://github.com/ccutrer/waterfurnace_aurora/raw/main/contrib/grab_awl_assets.sh -L -o grab_awl-assets.sh && grab_awl_assets.sh.
If you have an older AID tool, you can provide its IP address as an argument.
Newer AID tools will only allow access to this
in setup mode. You enter setup mode by holding down the mode button for
5 seconds, and then the LED will flash green rapidly for a few seconds.
You will then need to join the WiFi network created by the AID tool,
name AID-*. Then you can run the script and get the assets.
To run the web AID tool:
$ web_aid_tool /dev/ttyHeatPump
After which you'll be able to open a browser to http://localhost:4567/.
If you need to access it from another machine, you'll need to run it in production mode:
$ APP_ENV=production web_aid_tool /dev/ttyHeatPump
Also remember you can proxy modbus through the MQTT bridge if it's running:
$ web_aid_tool mqtt://localhost/homie/aurora-xxx/$modbus