#Kinect v2/Processing 3 Projector Toolkit
Processing library for calibrating a Microsoft Kinect v2 (Kinect for Xbox One) and a projector together, such that projected image is automatically aligned to the physical space it is projecting onto, facilitating the projection of images onto moving bodies and surfaces.
This toolkit was developed by Gene Kogan and adapted to work with the Kinect v2 and Processing 3 by Braden Neufeld and Nash Witkin. Also makes use of work by Daniel Shiffman and Thomas Lengeling.
To see some applications of the software, see this highlight video of a workshop applying the software to live dance.
The calibration methodology used in this toolkit comes from this writeup by Jan Hrdlička at 3dsense blog. For other work on Projector/Kinect calibration, see works and code by Elliot Woods, Kyle McDonald, and Daito Manabe, as well as the OpenFrameworks addon ofxCamaraLucida.
##Installation
The library requires Processing 3.0+ along with the libraries ControlP5 and OpenCV. It also requries an implementation of the libfreenect2 drivers by OpenKinect - this toolkit currently is designed to use Daniel Shiffman's Open Kinect for Processing to access the drivers in Processing. Installing this library is currently the easiest method available to use the drivers.
To install the library, copy the entire contents of this repository into a folder called "KinectProjectorToolkit" inside your Processing libraries folder, as any other library.
The library comes with a program called CALIBRATION.pde in the examples folder, which is the application used for determining the fit between the projector and Kinect. Instructions for calibration follow below.
The original version of this library for Kinect v1 and Processing 2 included several demo examples - however, these have not yet been updated for this version.
##Instructions for calibration
###Video tutorial for calibration
###1) Room setup
After setting the projector, fix the Kinect to face the space onto which you are projecting. Ideally, the Kinect is tracking roughly the full space of the projection; if it is too close it may not see everything the projector sees, and if it is too far, it will be less precise. Unless you have a short-throw projector, the Kinect will probably be closer to the stage than the projector.
The Kinect and projector must be totally immobilized during calibration and after, because a calibration only works for that positioning of the two devices together.
###2) Software setup
Set your computer's display to extended/dual screen and project the secondary screen. Open up CALIBRATION.pde and make sure to set the pWidth and pHeight variables at the top to exactly match the native resolution of the projector, e.g. 1024x768.
Finally, set the calibFilename variable to the exact path to which you want to save the calibration file to.
###3) Getting point pairs
The interface allows you to position a 5x4 chessboard which is being projected onto your stage/room. You can move its position using the XY grid on the right side of the interface, and resize it using the "size" slider. The "searching" button toggles whether the app is actively searching for a chessboard pattern.
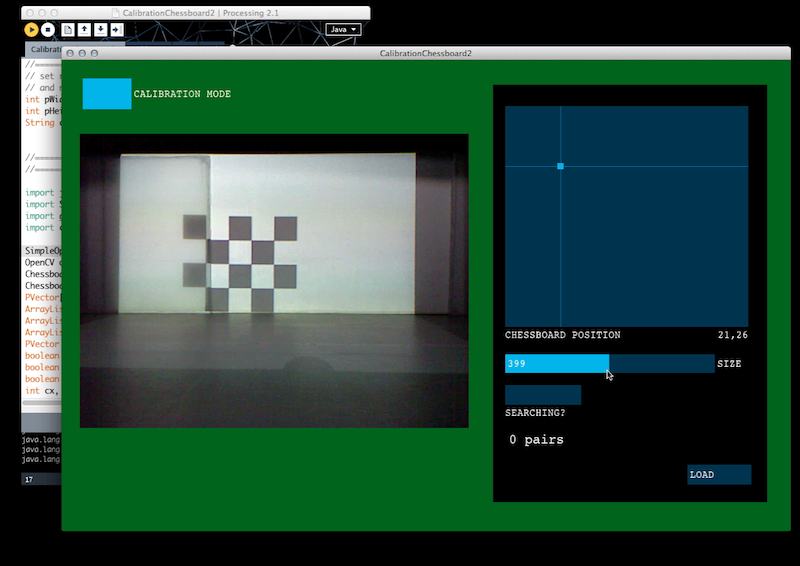
You need some sort of a flat, mobile panel (best if white) to project onto. Place the panel somewhere in front of the Kinect, and position the projected chessboard onto it. When the chessboard is visible in the Kinect RGB view on the left of the interface, toggle the "searching" button to have the program search for the chessboard. If it finds it, you should see 12 green circles pop up over the corners of the chessboard in the interface, and the "add pair" button becomes visible. If the green circles are not coming up, the chessboard can not be found in the image, which means the chessboard is too small or the lighting is not adequate. See the tutorial video for a good example. If the circles do appear, but some or all of them are red, it means the chessboard is either too close or too far from the Kinect and it can't read the depth; move it into an appropriate range. Only when 12 green circles are visible is the "add pair" button accessible.
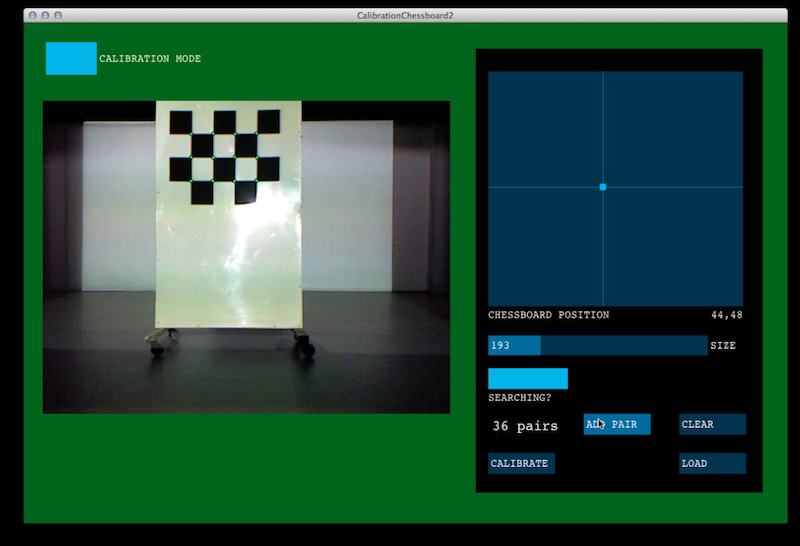
Repeat this process for a series of panel positions throughout your stage space. To get the best possible fit, you should sample the space as widely as possible. Move the board to at least two or three different depths (distance from the Kinect), and position the board at high and low positions as well. The more dispersed your board points are across all three spatial dimensions, the better your fit will be. If the points are mostly coplanar, the model may not generalize well to undersampled regions.
###4) Calibration
Depending on the demands of your application, you may need only a few board positions, or several dozen. Generally, 10-15 board positions gives a good fit, with each position contributing 12 point pairs. When you have a good amount of point pairs, click the "calibrate" button. This will generate a calibration.
Once you have generated a calibration, you can toggle into "Testing mode" which allows you to test the fit. In testing mode, you can click anywhere on the Kinect image to place a red dot over a desired point in the camera image. A corresponding green point should then be projected onto that same location in your physical space. If the calibration is good, the red dot in the Kinect's image and the green one in the physical space should match. Try a few points at different locations to test the accuracy of the calibration.
If the calibration is satisfactory, click "Save." It will generate a text file containing the calibration parameters, which will be located in the path you specified in the calibFilename variable.
##Using the calibration
The core function of the library is the ability to map any 3d point in physical space to the corresponding pixel which falls on that point.
You are not required to continue to use the libfreenect2 drivers in your application - as long as you can provide the toolkit with a "real world depth map" (a point cloud made up of PVectors with an x, y, and z) it will work. The toolkit itself makes no direct calls to the Kinect.
To use the calibration, set up a Kinect v2 object in your Processing sketch using a library/driver of your choice (example code below may have be changed depending on the library).
Next, load your calibration file (replace CALIBRATION_PATH with the path to the calibration file saved from the process described above).
kpt = new KinectProjectorToolkit(this, kinect.depthWidth(), kinect.depthHeight());
kpt.loadCalibration(CALIBRATION_PATH);
In a frame, update the Kinect and then send its real world depth map to the KinectProjectorToolkit object.
kpc.setDepthMapRealWorld(depthMapRealWorld());
Then, given a point from the real world depth map, you can obtain its pixel coordinate by running the convertKinectToProjector() method. The point can be, for example, the real world point of a tracked skeleton's hand. Make sure you are sampling from depthMapRealWorld() not depthMap(). So given real world PVector realWorldPoint, the projected coordinate is accessible via:
PVector projectedPoint = kpt.convertKinectToProjector(realWorldPoint);
The toolkit has some higher level functions which automate some of this, depending on the specific task. For example, if you are tracking a skeleton and have an ArrayList of PVectors which correspond to a tracked object's contour points, you can convert all of them using the function getProjectedContour(ArrayList<PVector> contourPoints).
An optional second parameter "dilates" the projected contour, i.e. stretches or compresses it. For example, getProjectedContour(ArrayList<PVector> contourPoints, 2.0) will return a projected contour which has been stretched out to double its original dimensions; this can be useful, for example, in tracing a user's contour on the screen behind them. The default dilation is 1.0 (original size, no stretching).
##Test applications
Test applications have not yet been updated to work with this version of the toolkit.