Our demo requires a Python interpreter of version 3.9 or forward.
For voting through the browser, it is required to install websockets Python module on the tallier's side.
Implemented inside the administrator.pyw file. If Python is installed in the PATH, you can just double click the file in order to run it.
When initiating the administrator module, a window opens:

The buttons in the image correspond to the following operations:
- Configure a new election, and create a new
config.jsonfile. - Execute a local launch of talliers (useful only for local testing on the same machine).
- Create a "Quick Voting" scenario, using a CSV file (useful for internal validation tests).
- Send an "End Vote" message to all talliers, in order to terminate the elections and find the winner(s).
After selecting "Config Edit" from the administrator's main window, the following window opens:
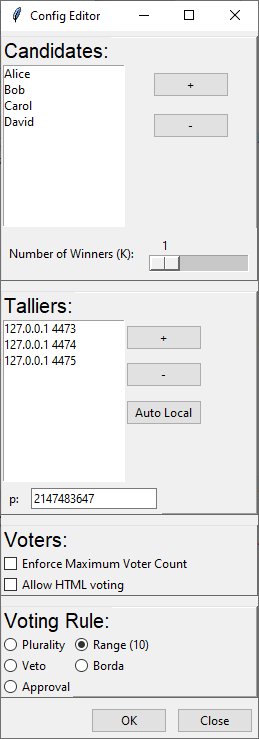
The windows is divided into multiple panels:
- Candidates Panel: By clicking on the Plus and Minus buttons on the right side, a name can be added or removed. Also, by dragging the names up and down inside the list, their order can be manipulated. Finally, the administrator can set the required number of winning candidates.
- Talliers Panel: By clicking on the Plus and Minus buttons on the right side, an address of a tallier can be added or removed. When adding a tallier, a dialog box will open in order to enter the new tallier's IP address and port. The Auto Local button will ask the user for the number of talliers, and then it will automatically generate local addresses (using the
127.0.0.1IP address); see the next subsection for more information. Finally, the size p of the underlying finite field can be selected. The default is the Mersenne prime p=2^31-1. - Voters Panel: Here we can control some of the voting process. By selecting "Enforce Maximum Voter Count", election will terminate once that number of voters had cast their ballots. By selecting "Allow HTML voting", the voters could use browser-based voting; for more information read the Browser based User Interface subsection.
- Voting Rule Panel - select the desired voting rule for the current election.
Local testing is useful when it is needed to observe the whole election process locally, for testing purposes and for demonstrations. Clicking the "Auto Local" button during configuration will select local talliers (located in the
IP address 127.0.0.1). When clicking the "Local Launch", the administrator will create D new talliers processes, all configured to the corresponding tallier number. After the voters cast their ballots, you may click the "End Vote" button and receive a message box with the corresponding winners.
This is the module that runs the tallier code. There are three modes to load the tallier:
- You may import it manually through the code, and call the
main(tallier_id)function, which takes an integer from 1 to D, runs the tallier on that ID, and after ending the vote and finding the winners, returns their names in an array. This is the most useful mode when integrating the tallier in another program or interface. - Pass the tallier id as a program argument (for example using the command
python3.9 tallier.py 1). This mode will directly launch the tallier on that tallier id, perform all the operations of the tallier, but without outputting the winners. - Call the module without arguments, and input the tallier id through the interactive console input (STDIN). Like in the previous modes, all operations are done, but after finding the winners, the winners' names are output to STDOUT.
We implemented a graphical voter interface for each of the five voting rules that our system implements. The main idea was to design the voter graphical interface as simple as possible since this module is to be used by non-expert users. Every voter graphical interface receives configuration information from the election administrator (as an config.json or as an encoded URL).
The voter.py file implements a module that has a main(voter_id, ballot) function. That function performs the connection to all talliers, it sends the ballot shares, and it waits for validation confirmation.
The module expects a config.json file from the administrator.
The module expects a config.json file from the administrator.
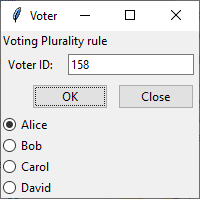
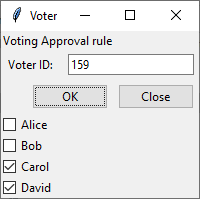
The voter_gui.pyw shows a graphical user interface, which is suitable for the voting rule that was selected during the election configuration. Each rule has its own interface.
![Voting panel in the Range [0,10] rule](https://raw.githubusercontent.com/arthurzam/SecureVoting/master/screenshots/Voter_Range.png)
In these windows, every voter should enter her (or his) ID number, and insert her desired ballot. Then, the voter clicks OK and waits for a confirmation message box (that arrives after receiving the validation confirmation from the talliers).
To accommodate our voting application on most devices, we implemented a voting module written fully in client-side JavaScript and HTML, so that it can be launched in any browser. The voter code is quite simple and compact, meaning it can be easily integrated into existing Web sites of organizations.
The administrator should send specialized voting URLs (that encode the full config.json inside the URL), which include a secret voter id. The voter id is an encoded random UUID, of size 256 bits, rendering it improbable to guess other voter's id. Afterwards, for ease of access, the voter.html file should be uploaded to any Web Server, and by sending an email to every voter, that includes
the URL to the browser and the encoded info, the voter can cast her or his ballot from any device (PC, mobile phones, etc.).

To make election termination on specified time, the administrator should setup a scheduled task (using cron job, or systemd unit, or scheduled run on Windows), which would run at the desired time the end_vote.py file, which would result in the voting phase termination, and start finding the winners. By specifying to the script the config.json location, only that one desired election will terminate.