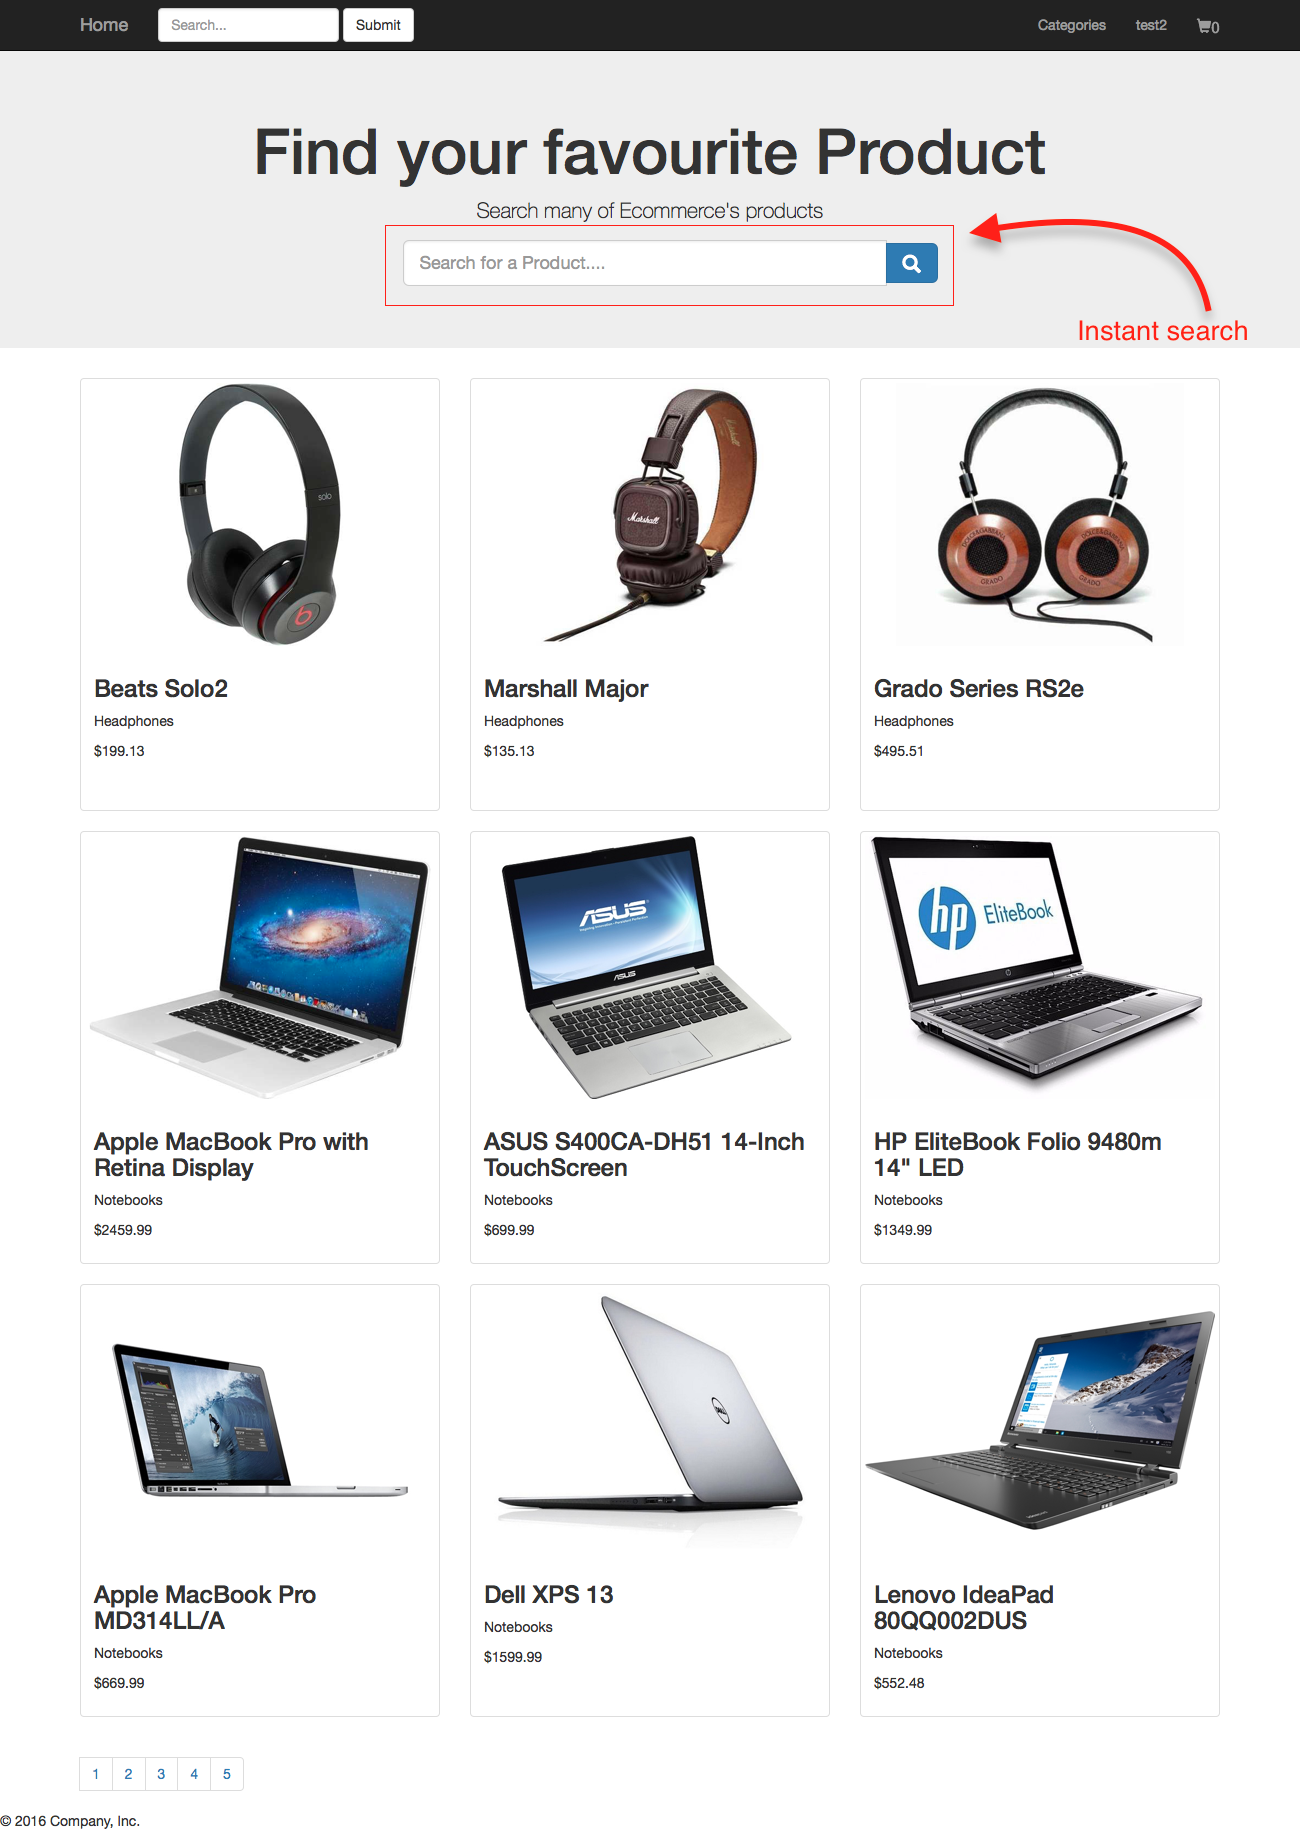
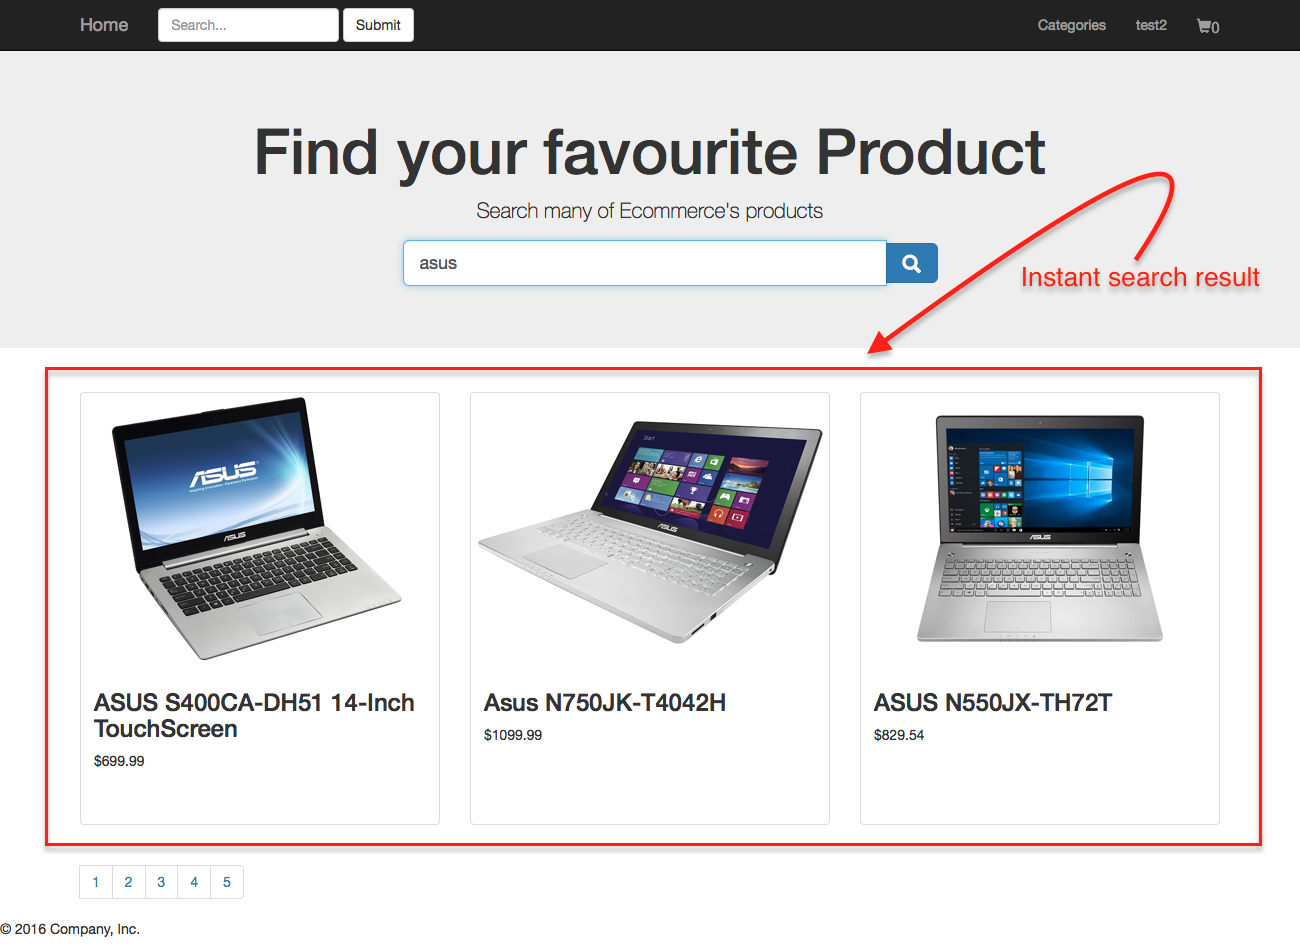
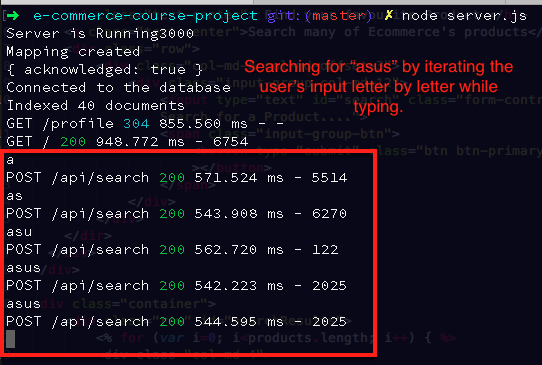
Here is a diagram of how our app is deployed:
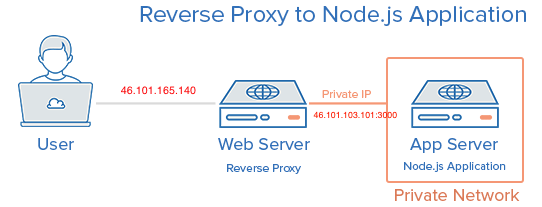
Demo page url:
-
app server: (Node.js application) IP Address: http://46.101.103.101:3000
-
web server: (proxy) IP Address: http://46.101.165.140
This project is using the following technology stack:
- Node.js Runtime Environment
- Express framework (web framework for Node.js)
- EJS template engine (embedded javascript)
- MongoDB database (document based)
- Elastic Search (opensource search library)
- jQuery (for the frontend)
- Stripe (payment gateway)
This project resembles an ecommerce website with full features such as user authentication and authorization, session managing, search and payment features. Our team is: [person1], [person2], [person3], [person4] and person5
The README is structured as a self-contained book, where each chapter reveals details of implementation and functionality of different features within the website. The project created by us is only for illustration purpose, however, if wanted we may launch it in production.
1.0
- Installation
- User Authentication
- Products and Category functionality
- Cart and payment feature
- Facebook login
- Extra
In order to run our web application you will need to do several steps:
- clone the repository (
git clone / wget) - install nodejs (brew install node for OSX users)
- install elasticsearch (brew install elasticsearch for OSX users)
- from the terminal cd into the "e-commerce-course-project"
- get MongoDB, in our example we used free clound mongoDB services that offers www.mlab.com
- get Stripe accaunt www.stripe.com
- configure the application
⋅⋅* edit
config/secret.jswith your mongoDB credentials that can be created on www.mlab.com ⋅⋅* editpublic/js/custom.jswith your Stripe test public key that can be created www.stripe.com ..* edit/routes/main.jswith your Stripe test secrete key that can be created on www.stripe.com - from the terminal run "elasticsearch" (OSX users)
- from the terminal in a new tab from the same location "e-commerce-course-project" run node server.js

- open this URL http://localhost:3000 from the browser
For user authentication we have used morgan library with the aim of logging the user requests to the webserver (e.g. access to different routes). For the User Schema we use mongoose, which is an Object Relational Mapper, which is like a virtual object database, that can be used within Node itself. Basically it connects our Node.js project with MongoDB database, without the need to implicitly connect them using additional code.
The User Schema is defined as follows:
var UserSchema = new mongoose.Schema({
    email: { type: String, unique: true, lowercase: true},
    password: String,

    profile:{
        name: { type: String, default: ''},
        picture: { type: String, default: ''}
    },

    address: String,
    history: [{
        date: Date,
        paid: { type: Number, default: 0},
    }]
})
From the Schema we can derive that the User entity is described by five characteristics:
- password
- profile
- address
- history
In the next chapter we will explain how these characteristics are implemented and used.
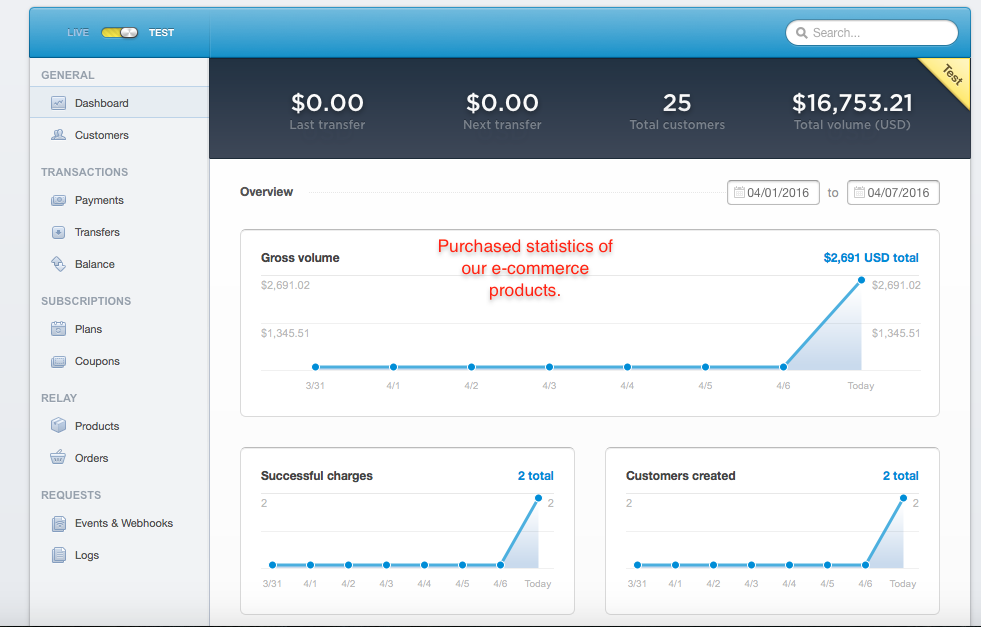
Our MongoDB database is a single-node deployment, hosted on https://mlab.com. Here is a useful representation of our database.
| Name | Description | Value |
|---|---|---|
| collections | Number of collections in this database | 9 |
| objects | Number of documents in this database | 307 |
| indexes | Number of indexes in this database | 10 |
| numExtents | Number of filesystem extents allocated for this database | 13 |
| avgObjSize | Average document size for this database. This is the dataSize divided by the objects. | 0.30 KB |
| dataSize | Total size of all documents stored in this database, including the padding factor (does not include indexes). | 93.33 KB |
| storageSize | Total amount of space allocated for data for this database (does not include index storage). This number is larger than dataSize because it includes additional space (preallocation within data files as well as space left by deleted or moved documents). | 392.00 KB |
| indexSize | Total size of all indexes created on this database | 95.81 KB |
| fileSize | Total size of storage files used for this database. This represents the overall storage footprint for this database on disk. For servers running with the smallfiles option (we use this option on our Shared plans), the first file allocated is 16MB, the second 32MB, the third 64MB... until 512MB is reached at which point each subsequent file is 512MB. | 16.00 MB |
Our database is comprised of the following collections:
- carts
- categories
- products
- sessions
- users
Each collection contains relevant documents, for instance carts collection contains cart for each of the registerde user. The document schema of cart model is defined below:
{
    "_id": {
        "$oid": "cartHashString"
    },
    "owner": {
        "$oid": "userHashString"
    },
    "items": [],
    "total": 0,
    "__v": 0
}Let’s take a look at how we can use EJS to include repeatable parts of our site (partials) and pass data to our views.
We have to set EJS as the view engine for our Express application using:
app.set('view engine', 'ejs');
Notice how we send a view to the user by using res.render(). It is important to note that res.render() will look in a views folder for the view.
Bootstrap is a frontend framework that provides the necessary CSS and Javascript to make your websites responsive and nice looking. A clear advantage of using Bootstrap is that it accelerates web development process by letting you focus on building the application’s functionality instead of tinkering with (hopefully) cross-browser load of styling rules and media.
In our web application we downloaded Bootstrap CSS/JS and serve it from the application’s public folder.
The general idea in order to serve Bootstrap from the web application instead of using CDN is to first download Bootstrap CSS, icon fonts and JS files, place them somewhere in the application’s “public” folder – the one that will be visible from the internet – and reference them in the view templates.
-
The library we use is passport.js
-
If we want to use passport library in one of our routes, which is login, we need to configure it first
-
We can think of it as setting up a new rule in a config file, so that login route will use it (middleware)
-
We require two libraries in the passport file:
- passport - for authentication
- Localstrategy - it is one of passport's libraries, used for the local login
-
There are three sections in this file:
- Serialization/deserialization and user objects
- Middleware that will process the login mechanism
- Custom function to validate if a user is logged in or not
Serialization is the process of translating data structures or object states into a format that can be stored. We want to translate the data structure, which is the user object and we want to translate it into a format that can be stored. Thus, we will store it in connect-mongo. So, the key of this object is provided into the 2nd argument of the callback function in serializeUser, which is user._id. Serialize function will be saved into session and it is used to retrieve the whole object via deserialize function.
Serialize function means that data from the user object should be stored in the session. In our case, we want to store the id only and the result of the serializeUser() method will be attached to the session as request with user._id --> req.user._id. Later on, if we want to access a user that we just logged in, we will type req.user.
In deserialize function we provide as first argument the same key of user object that was given to done func in serializeUser() call. So, the whole object is retrieved with the help of the key.
1. router.get(‘/login’)

2. router.post(‘/login’)
- We are using the middleware we created, namely
local-loginin passport and then we pass in an object to this second parameter, successRedirect to profile url, or if failure, than redirect to /login url
- We have to initialize the passport and also we need to add passport.session
- Passport.session acts as a middleware to alter the req object and change the user value that is currently the session id from the client cookie, into the deserialize user object
As a consequence, we have login and profile routes.
- In
server.jswhen we add the following line:
app.use(function(req, res, next) {
    res.locals.user = req.user;
    next();
});- The user object will get available for all the routes
- This is instead of specifying manually (redundantly) in every needed route, an user object, like
user: req.user - Every route will have the user object by default
res.locals.user- we want to make it equal to req.user, because once logged in we will have req.user based on serialize and deserialize method- The
req.logInfrom the user.js file, in the router.post(‘/signup’)route, is essentially adding the session to the server and the cookie to the browser by using the login function - The user object
objis based on the result of the new user creation which we created here:User.findOne({email: req.body,email… - The user as a saved object, is then passed to the login function, so the user will have the cookie on the browser and the session on the server
The session stores data like user-id in temporary memory store (temp, local, redis, or in our case mongodb).
The cookie parser will parse the cookie header and handle cookie separation and encoding, take the session data, encrypt it and send it to browser.
Few steps are required to set up the cookie and session functionality:
- install db for storing the session (library connect-mongo)
- mongo store library is depending on express-sesion, without express-session (session) it won’t work
- instead of saving anything to a temporary memory store, we want to save the session into MongoDB database
- every session will be saved into DB, which is MongoDB
- MongoStore in our case specifically stores the session on the server-side
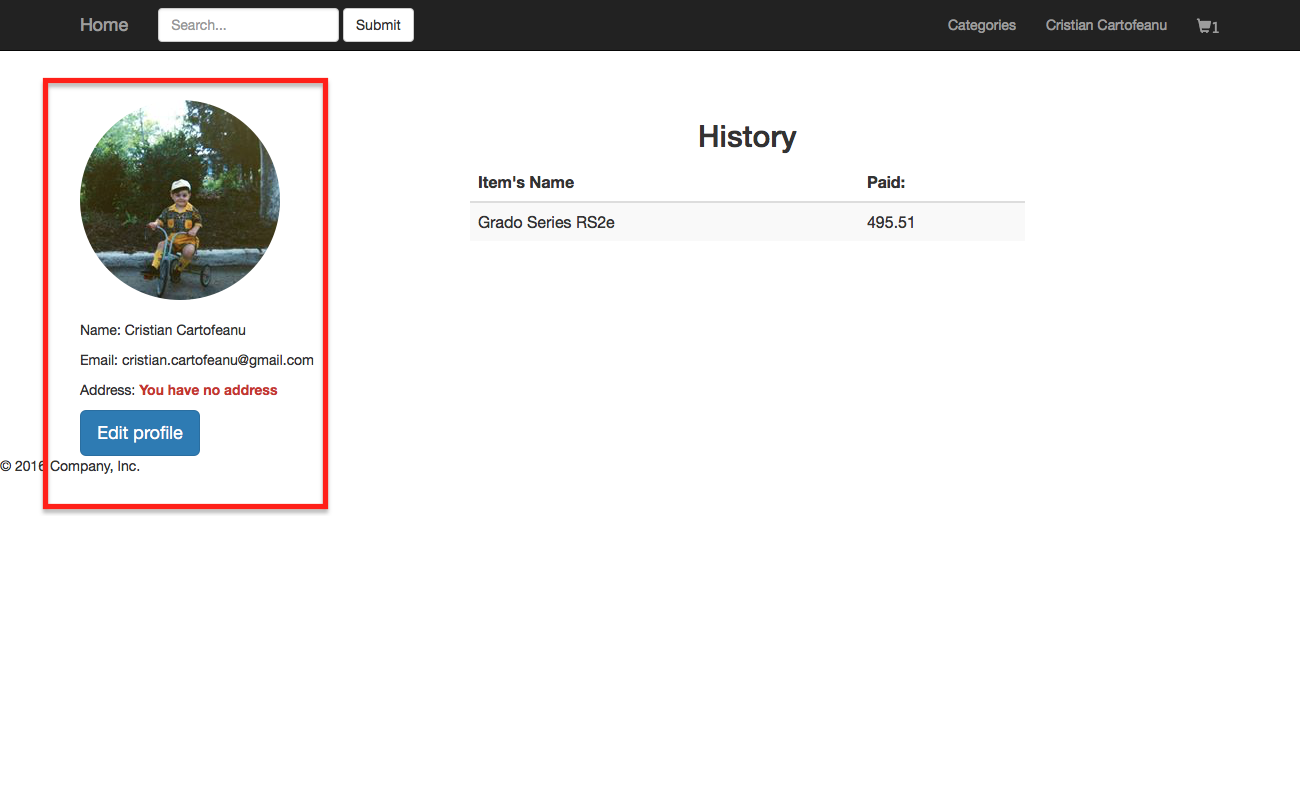
####Gravatar functionality
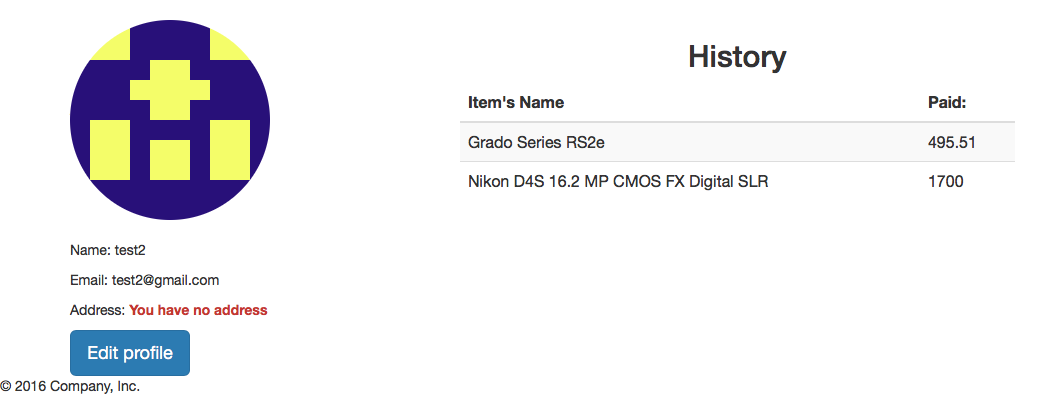
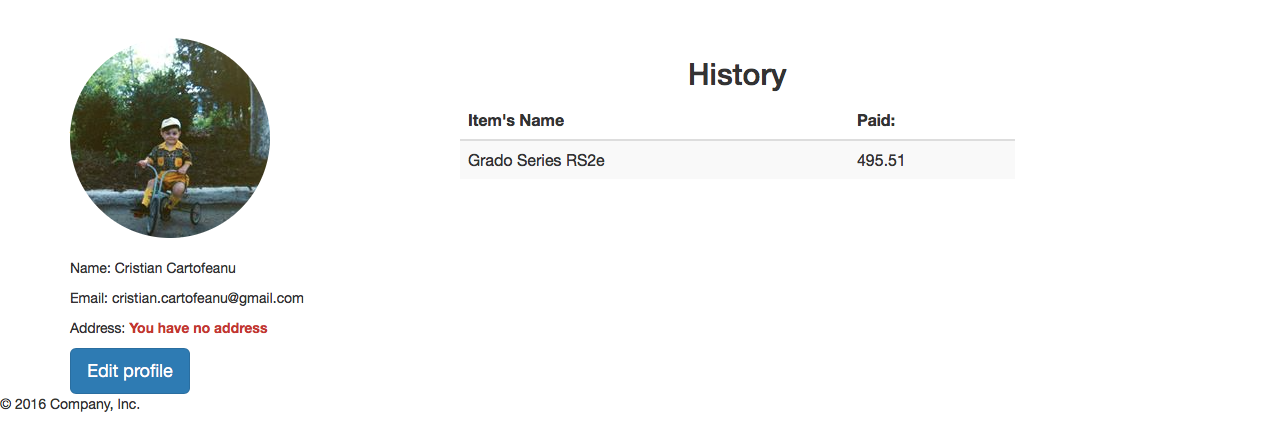
- When the user clicks or is redirected to its profile page, an avatar called gravatar should be displayed
- It is made by creating a custom method inside the user model file, called
UserSchema.methods.gravatar - This method checks the existance of the size of the avatar and the existance of the user’s email
- If the user doesn’t have the email for any reason, a default gravatar is provided
- Otherwise, a unique gravatar is created for each user profile based on the md5digest of the user’s email
- If the user will login using facebook credentials we will import his/her profile picture and from time to time will check if the picture wasn't changed.
![]()
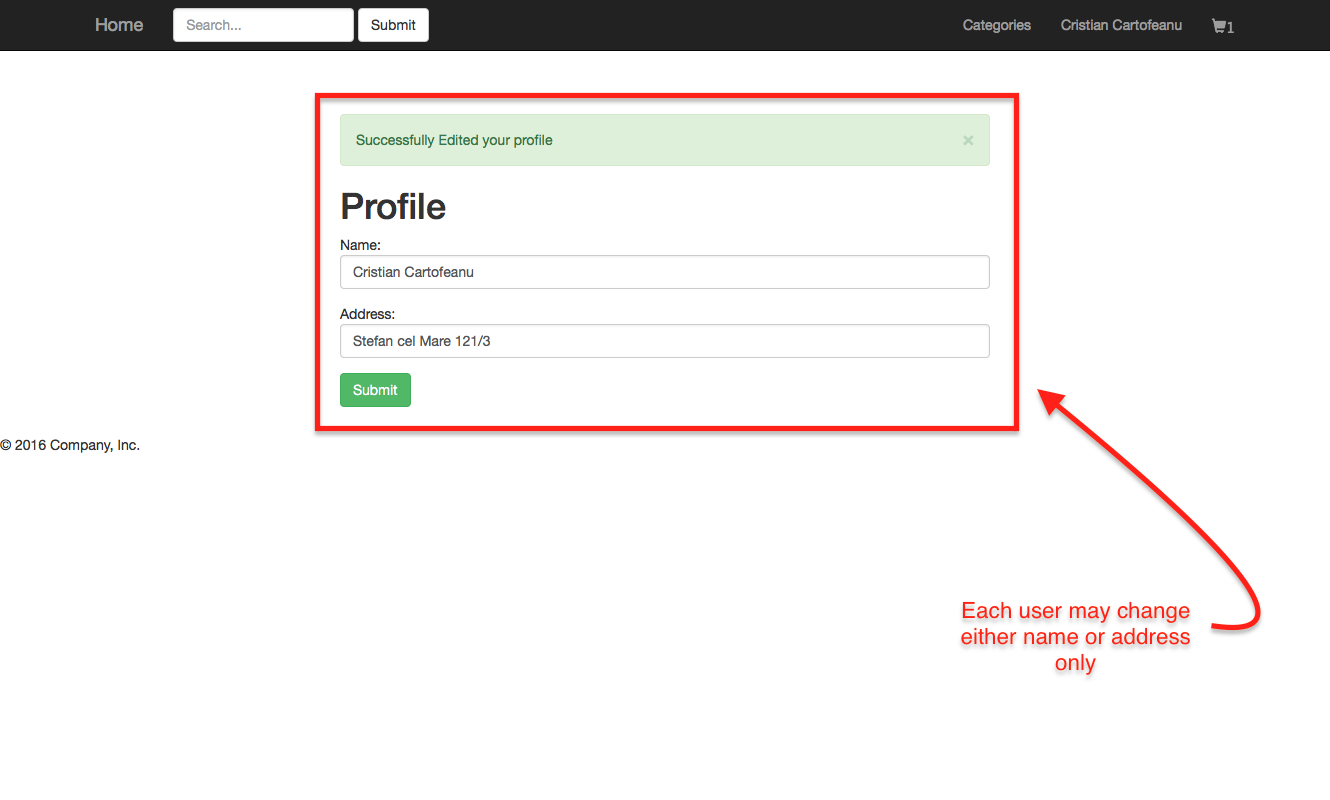
####Edit-profile
- the user types in the req.body.name, or the request to be changed, and according to the name of the body, the user.profile data structure is being modified accordingly
- then simply the user data is saved and flash the message, and store the flash in the session
- so that it can be used in other routes that have success as the name of the flash as is the route
router.get(‘/edit-profile’)which contains the actual render of the edit-profile.ejs file - redirect user back to edit-profile page
- The product model:
var ProductSchema = new Schema({
  category: { type: Schema.Types.ObjectId, ref: 'Category'},
  name: String,
  description: String,
  price: Number,
  image: String
});- The category model
var CategorySchema = new Schema({
  name: { type: String, unique: true, lowercase: true}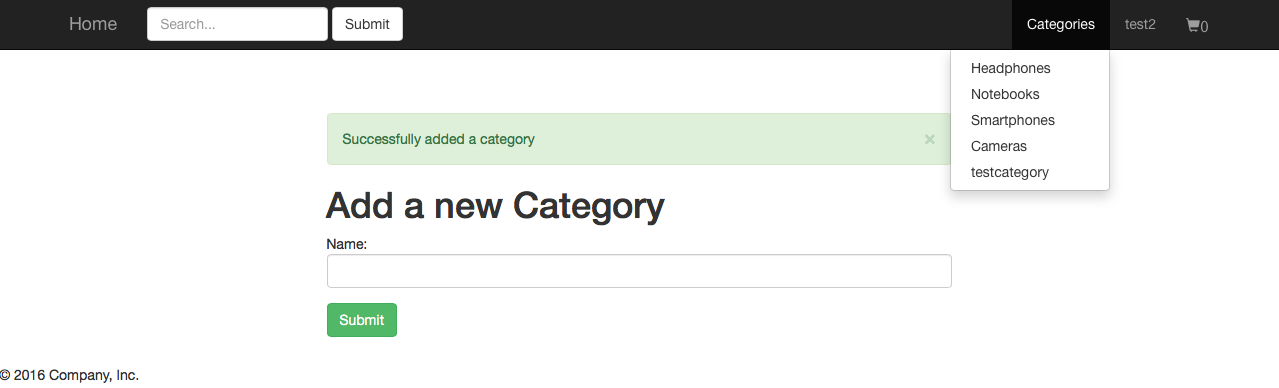
});Now, the routes for adding product category are located in admin.js, because this is the responsibility of only an admin
admin/add-categoryroute will get a page from the server with an extra data which is message- We have also a post route and it is relying on Category Schema because we instantiate a new object from the category
- we want to save the data in the category name field so that it is equal to the input of the request and afterwards save the respective data to the database
We have created the corresponding add-category.ejs for the above route.
We've also added a security layer, so that only admin account can access the page of add-category
This is a js module, which runs an array of functions in series, each passing their results to the next in the array. However, if any of the functions pass an error to the callback, the next function is not executed and the main callback is immediately called with the error.
Installation
- Just include async-waterfall before your scripts.
- npm install async-waterfall if you’re using node.js.
Usage
- waterfall(tasks, optionalCallback);
- tasks - An array of functions to run, each function is passed a callback(err, result1, result2, ...) it must call on completion. The first argument is an error (which can be null) and any further arguments will be passed as arguments in order to the next task.
- optionalCallback - An optional callback to run once all the functions have completed. This will be passed the results of the last task's callback.
var waterfall = require('async-waterfall');
waterfall(tasks, callback);

waterfall([
  function(callback){
    callback(null, 'one', 'two');
  },
  function(arg1, arg2, callback){
    callback(null, 'three');
  },
  function(arg1, callback){
    // arg1 now equals 'three'
    callback(null, 'done');
  }
], function (err, result) {
  // result now equals 'done'
});You can use faker from within your browser or on the server with Node. In our case, we present the usage of faker api in node:
 var faker = require('faker');

 //some basic faker methods
 var name = faker.name.findName();
 var randomEmail = faker.internet.email();
Let’s say we wanted to create a product on the fly. We want this product to have a category, name, description, price and even an image.
In Node, all we would have to do is:
var product = new Product();
        product.category  = category._id;
        product.name = faker.commerce.productName();
        product.description = faker.lorem.paragraph();
        product.price = faker.commerce.price();
        product.image = faker.image.image();

        product.save();
Notice that we create the product object by assigning to the product variable an instance of Product(), which is defined in the Product model. Consequently, we use the faker api to use the corresponding methods for generating fake data.
Just like that, we have a whole product object that we can use within our application! The above code will yield:
{
"_id": {
"$oid": fakerProductHashString
},
"image": fakerHostedImage,
"price": fakerPrice,
"description": fakerDescription,
"category": {
"$oid": fakerCategoryHashString
},
"__v": mongoDBVersionRevisionKey
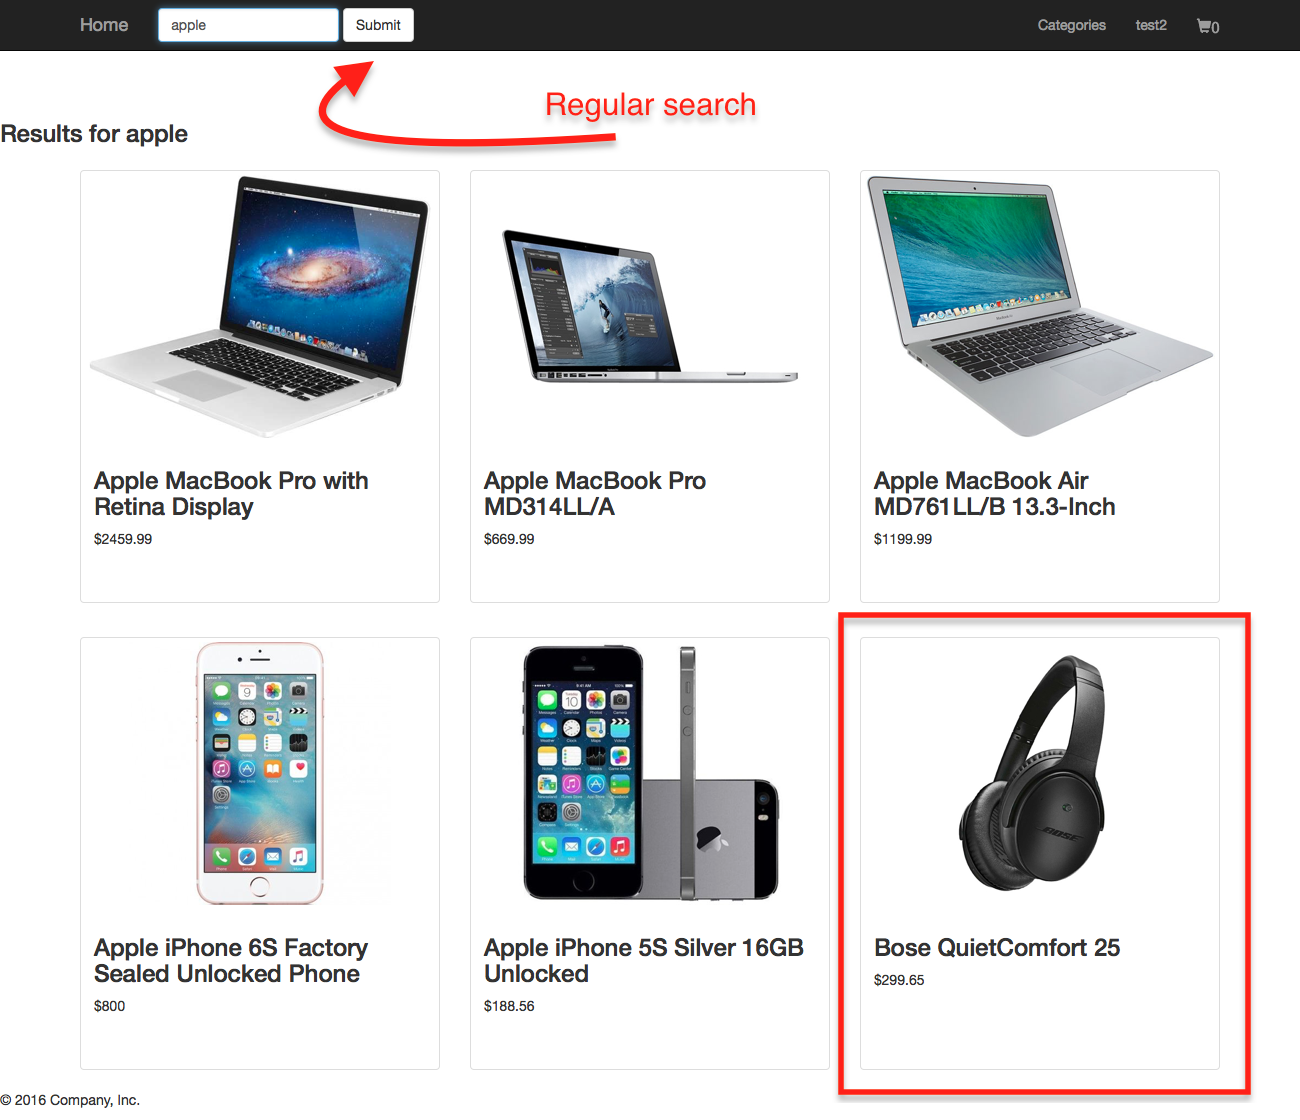
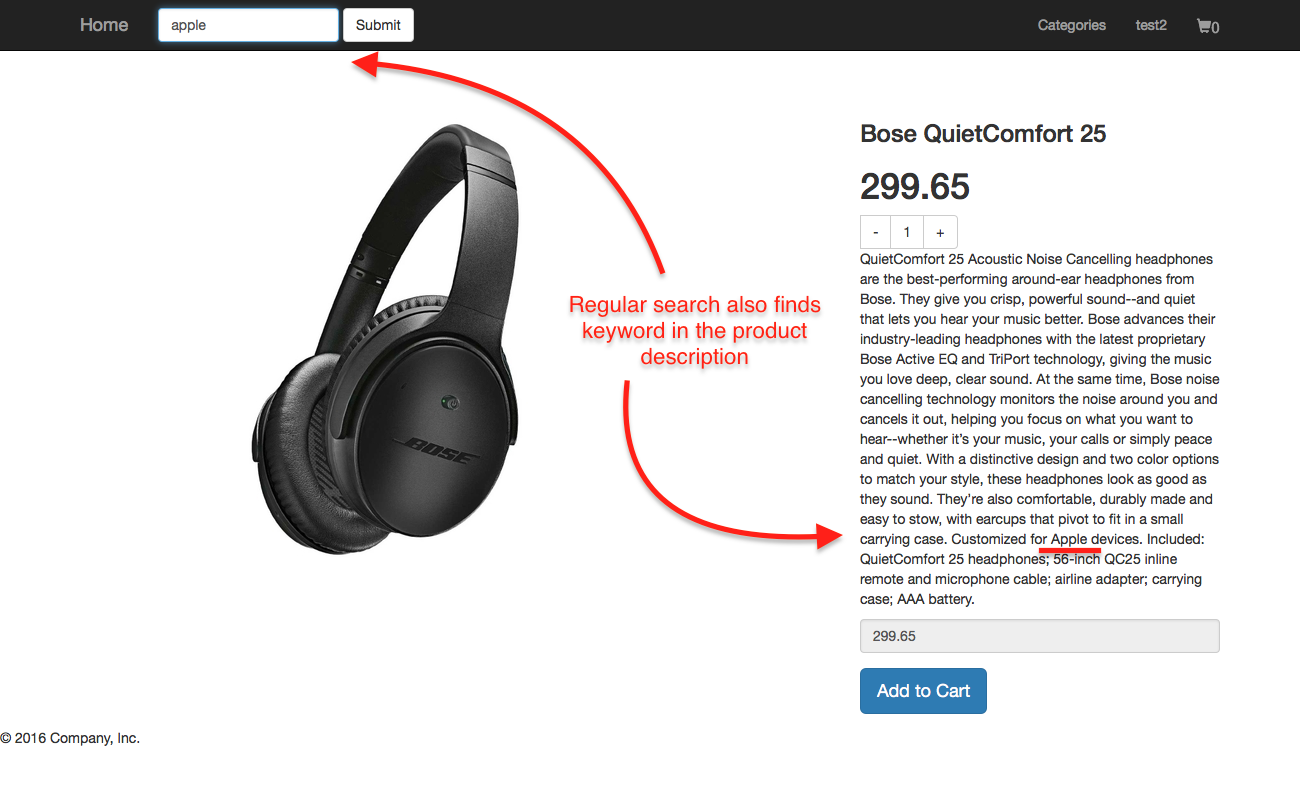
}Install elastic search as follows:
- brew install elasticsearch
- not as sudo, otherwise you get a java runtime error
Add plugin to our product schema:
- mongoosastic ~ a library which uses elasticsearch to replicate the data from mongoDB to elasticsearch
- it lets you search specific data using mongoosastic feature, w/o writing additional code to connect mongoosastic and mongodb
- all within elastic search product set
- logic defined in Product.search and Product.createMapping
The mapping code maps between product DB and elasticSearch, so that it creates a “bridge” between ES replica set and Product DB. Finally we want to stream the whole data from the product to ES, so that it will replicate all data and put in ES.
var CartSchema = new Schema({
  owner: { type: Schema.Types.ObjectId, ref: 'User'},
  total: { type: Number, default: 0},
  items: [{
    item: { type: Schema.Types.ObjectId, ref: 'Product'},
    quantity: { type: Number, default: 1},
    price: { type: Number, default: 1},
  }]
});The cart middleware is defined in ./middlewares/middleware.js and embeds the whole logic of the cart inside the module.exports function. The function has a key check:
if (req.user)which checks if the user is authenticated and if positive, it finds the corresponding cart of the assigned owner by querying MongoDB using findOne() method. An important aspect here is the logic behind the total items variable generation, which is exported as a global variable using the following command, so that it becomes accessible in all the routes:
//logic
res.locals.cart = total;The cart displays the products which have been added to it and consequently, they appear as div frames, following the specification within the ./views/main/cart.ejs view. Each item to be bought may be removed by the user and also may be bought. There is also a frame which links with the payment gateway which is stripe in our case.


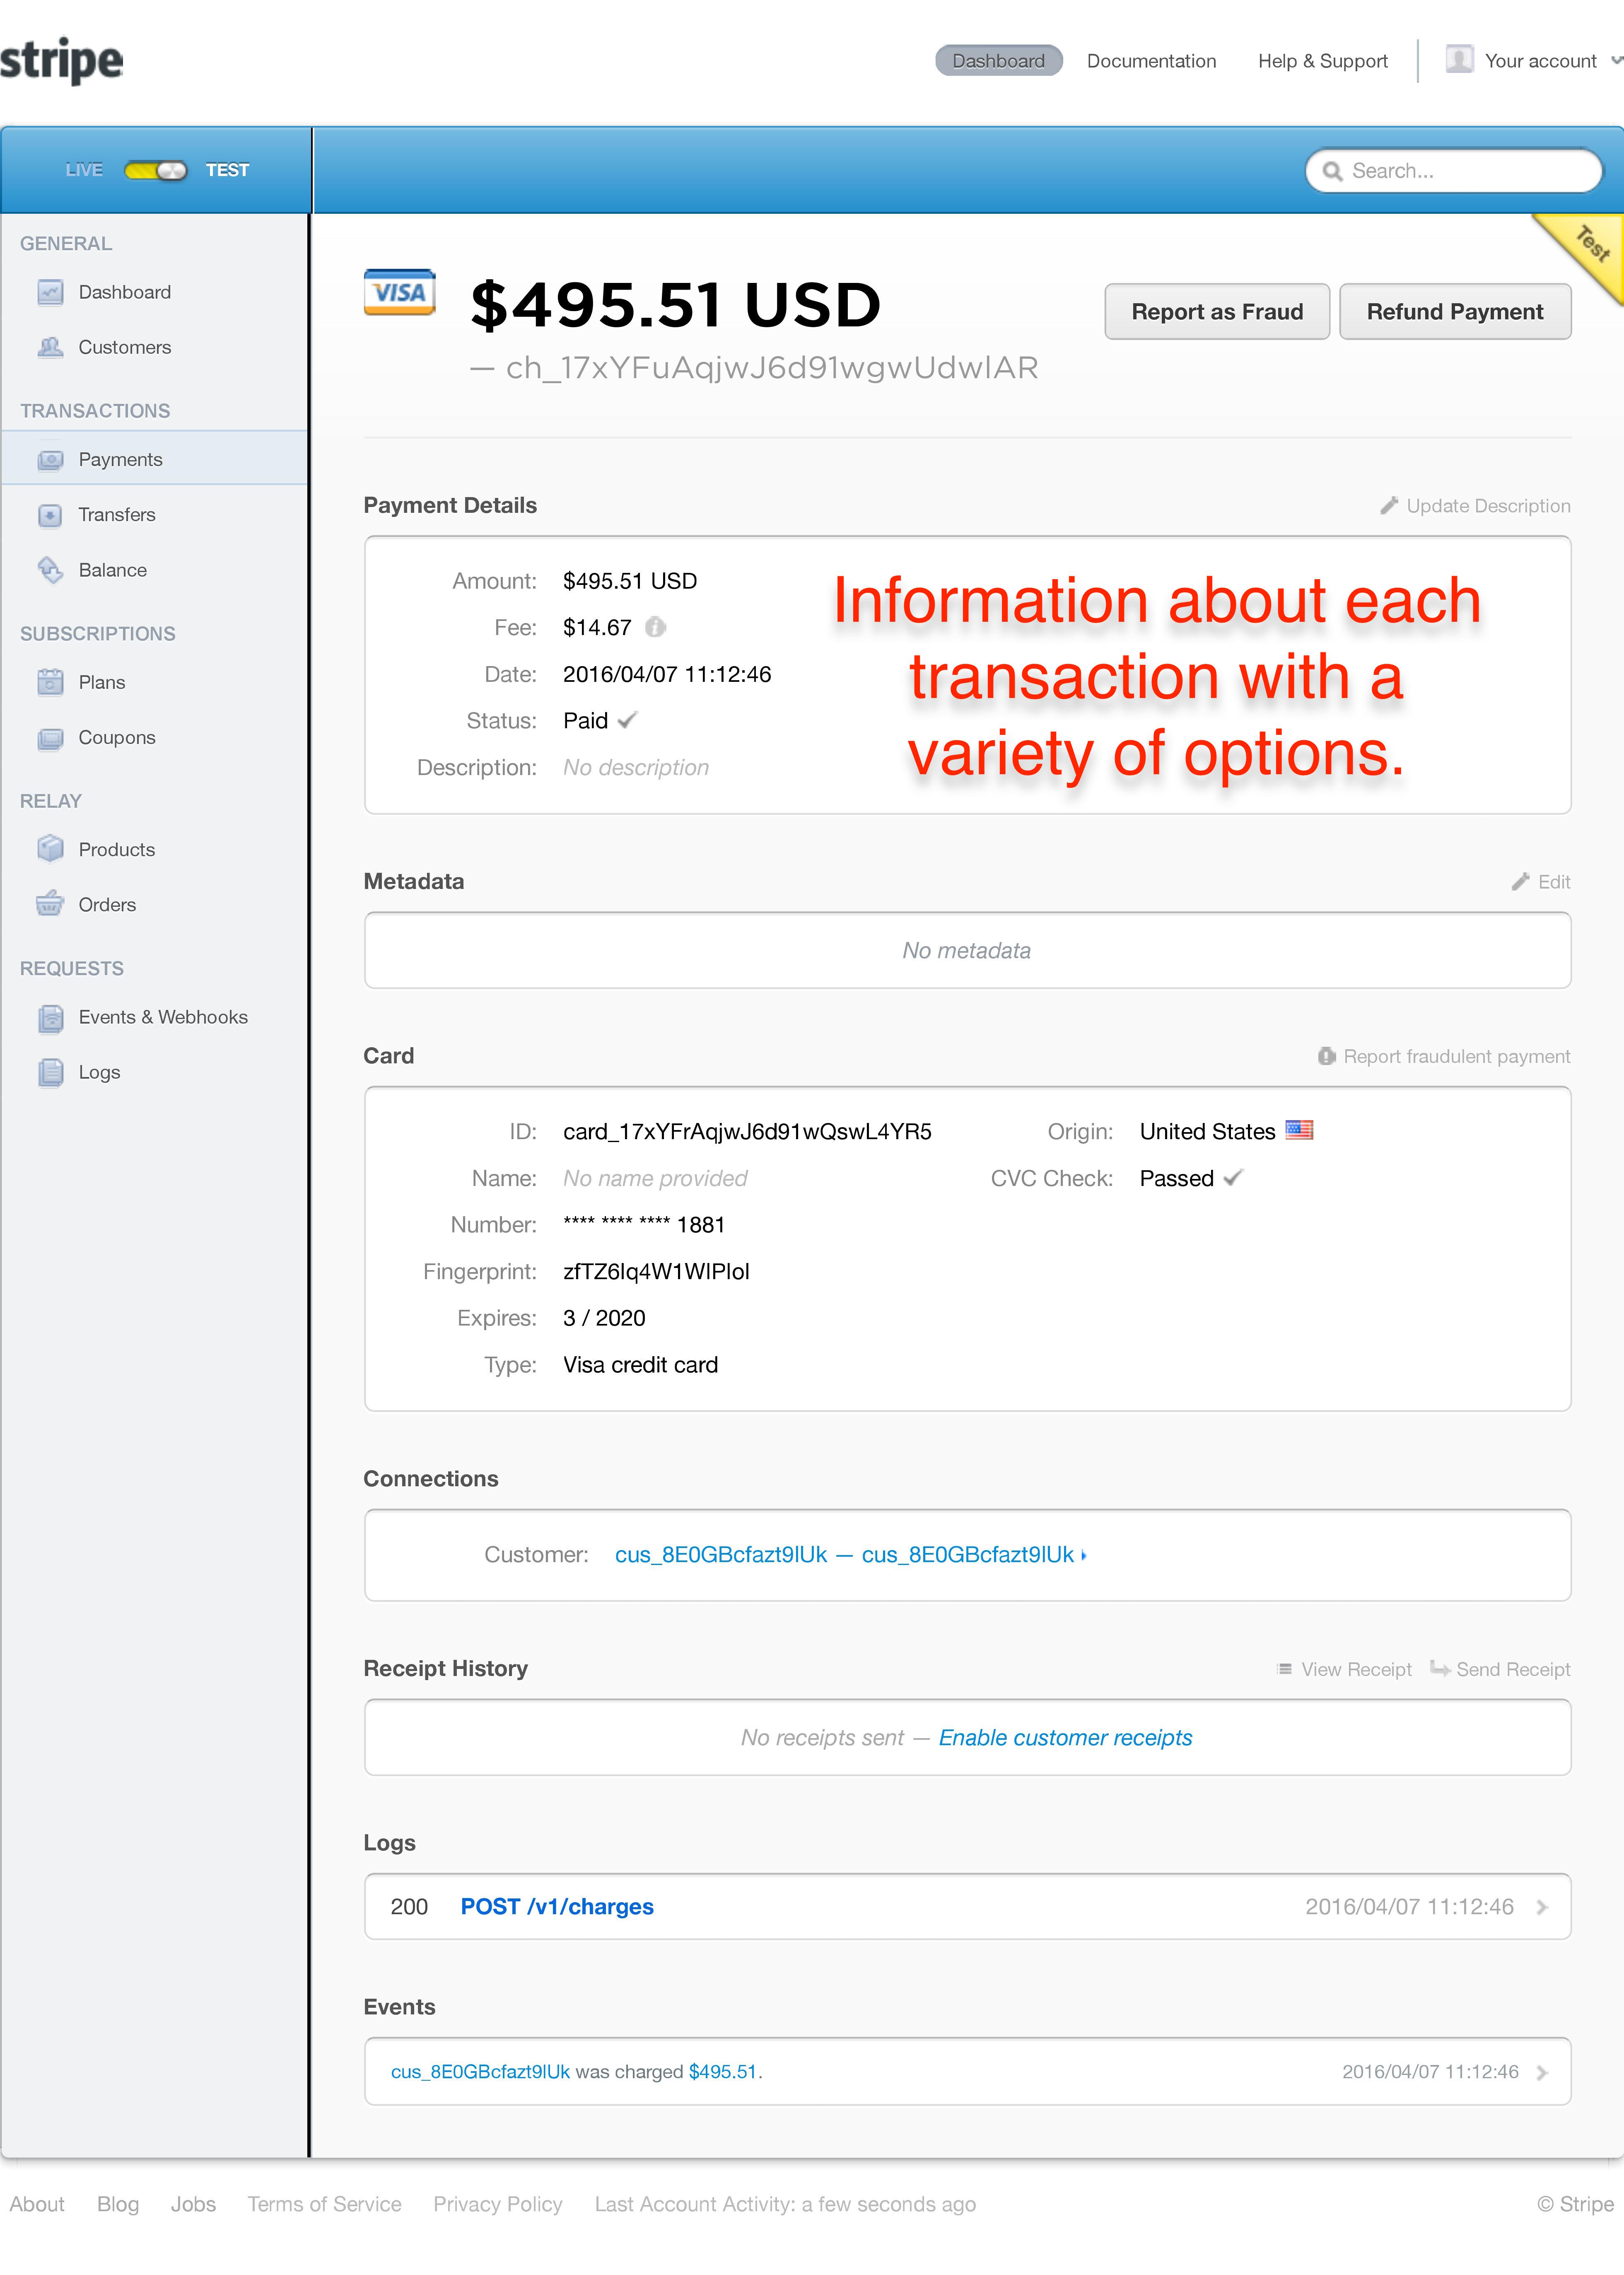
For the payment process we use Stripe as the payment gateway. For embeding the gateway in our node application, we add a route in the ./routes/main.js file inserting all the logic of the payment in the router.post('/payment').
Within this route, the stripeToken is extracted from the req.body, comprising the inserted sensitive payment data and the token is assigned to a customer (user) and then the payment data matches asynchronously the currently active user cart and its owner, the respective user and furhter updates all the necessary information in the database collection by querying the update MongoDB method:
Cart.update({ owner: user._id }, { $set: { items: [], total: 0 }}, function(err, updated){
          if(updated) {
            res.redirect('/profile');
          }
        });
Additionaly, we inserted in the ./views/main/cart.ejs view the html logic for the front-side, which can be found on the official website of stripe.


In order to configure our application, to use facebook authentication, we had to register the application on developers.facebook.com. We followed the steps specified on their official website:
https://developers.facebook.com/docs/apps/register
In ./config/secret.js we have added a facebook object which includes the following information:
- clientID
- clientSecret
- profileFields
- callbackURL
Inside the ./config/passport.js file we added a FacebookStrategy middleware. It defines the logic for the facebook authentication mechanism.
Notice that we adhere the middleware defined in the passport.js to the facebook route defined in the ./routes/user.js file. There, we call the authenticate() method of the passport library passing as the first argument the facebook object we created in secret.js.
The authentication mechanism facebook uses implies specifying two routes:
1.  router.get('/auth/facebook', passport.authenticate('facebook', {scope: 'email'}));
2.  router.get('/auth/facebook/callback', passport.authenticate('facebook', {
  successRedirect: '/profile',
  failureRedirect: '/login'
}))
The second one is similar to the redirect URI specified in the oAuth protocol which redirects the user to the corresponding views, based on whether it has been authenticated or not.


Npm is the node package manager and you will need to install the following modules using it:
"dependencies": {
    "async": "^1.5.2",
    "bcrypt-nodejs": "0.0.3",
    "body-parser": "^1.15.0",
    "connect-mongo": "^1.1.0",
    "cookie-parser": "^1.4.1",
    "ejs": "^2.4.1",
    "ejs-mate": "^2.3.0",
    "express": "^4.13.4",
    "express-flash": "0.0.2",
    "express-session": "^1.13.0",
    "faker": "^3.0.1",
    "mongoosastic": "^4.0.2",
    "mongoose": "^4.4.5",
    "morgan": "^1.7.0",
    "passport": "^0.3.2",
    "passport-local": "^1.0.0",
    "stripe": "^4.4.0"
  }
(recommended to run the following command: npm install from the project directory.)
This command will install all the dependencies from the file package.json.
A package.json file contains meta data about your app or module. Most importantly, it includes the list of dependencies to install from npm when running npm install . If you're familiar with Ruby, it's similar to a Gemfile.
├── api
├── config
├── models
├── node_modules
│   ├── async
│   ├── connect-mongo
│   ├── cookie
│   ├── cookie-parser
│   ├── cookie-signature
│   ├── ejs
│   ├── ejs-mate
│   ├── elasticsearch
│   ├── express
│   │   ├── lib
│   ├── express-flash
│   │   └── lib
│   ├── express-session
│   │   └── session
│   ├── faker
│   ├── mongodb
│   │   └── lib
│   ├── mongoosastic
│   │   ├── example
│   ├── mongoose
│   │   ├── examples
│   │   ├── lib
│   ├── morgan
│   │   └── node_modules
│   ├── passport
│   │   └── lib
├── public
│   ├── css
│   └── js
├── routes
└── views
    ├── accounts
    ├── admin
    ├── main
    └── partials