
Why spend time downloading pesky installers form the web, Just run this guy, grab a coffee and come back to a fully setup Mac for DevOps and Security testing
Approximate setup time is roughly 1-hour
The best bit about this, its idempotent so run it as many times as you like, it will know whats already installed and not install apps twice.
chflags nohidden ~/LibraryShow hidden files
This can also be done by pressing command + shift + ..
defaults write com.apple.finder AppleShowAllFiles YESdefaults write com.apple.finder ShowPathbar -bool truedefaults write com.apple.finder ShowStatusBar -bool truesudo spctl --master-disableI usually use this command after installing every application that I need - it keeps Apple applications on the first page and moves the rest to the next pages.
$ defaults write com.apple.screencapture location ~/Pictures/screenshots
$ killall SystemUIServerSetting a firmware password prevents your Mac from starting up from any device other than your startup disk. It may also be set to be required on each boot.
$ sudo firmwarepasswd -setpasswd/usr/bin/ruby -e "$(curl -fsSL https://raw.githubusercontent.com/Homebrew/install/master/install)"Homebrew now defaults to retrieving behavioral analytics tracking. Although anonymized, you may not want to participate in that. To disable the extra network traffic:
brew analytics offbrew bundle #In the same dirctory you downloaded the source code intoMake sure to replace name and email with your personal details.
git config --global user.name "yourusername"
git config --global user.email "*.******@***.***"ssh-keygen -t ed25519 -a 100cat ~/.ssh/id_rsa.pub | pbcopyGithub SSH key [https://github.com/settings/ssh]ssh -T git@github.comoh my ZSH
sh -c "$(curl -fsSL https://raw.github.com/robbyrussell/oh-my-zsh/master/tools/install.sh)"Lets change the theme now You can browse all the “Oh My ZSH” Themes here. To change the Theme, simply change the ZSH_THEME value in ~/.zshrc file from robbyrussell to Avit. Run the following command to update the config.
$ source ~/.zhrcLets add some backround config with Iterm
Open ITerm2 > Preferences > Profiles > Colors and change the background black color to use 20% gray$ cd ~/.oh-my-zsh
$ git clone https://github.com/powerline/fonts.git
$ cd fonts
./install.shchange theme to 'agnoster'
$ open ~/.zshrc
Set ZSH_THEME="agnoster" and save the fileYou can set any Powerline patched font you like. All the fonts end with “for Powerline”.
Open ITerm2 > Preferences > Profiles > Text > Change Font and set it to “Meslo LG DZ for Powerline” font.Download the iTerm2-color-schemes as a zip file and extract it
git clone https://github.com/mbadolato/iTerm2-Color-SchemesThe “Schemes” folder contains all the color scheme files — they end with .itermcolors
Open iTerm2 > Preferences > Profile > Colors > Color Presets > ImportIn the import window, navigate to the “Schemes” folder
Select all the files so you can import all the color schemes at once Simply select whichever color scheme you like.
Select theme "Argonaut"
You should have a terminal that looks like this:

Clone the zsh-syntax-highlighting plugin’s repo and copy it to the “Oh My ZSH” plugins directory.
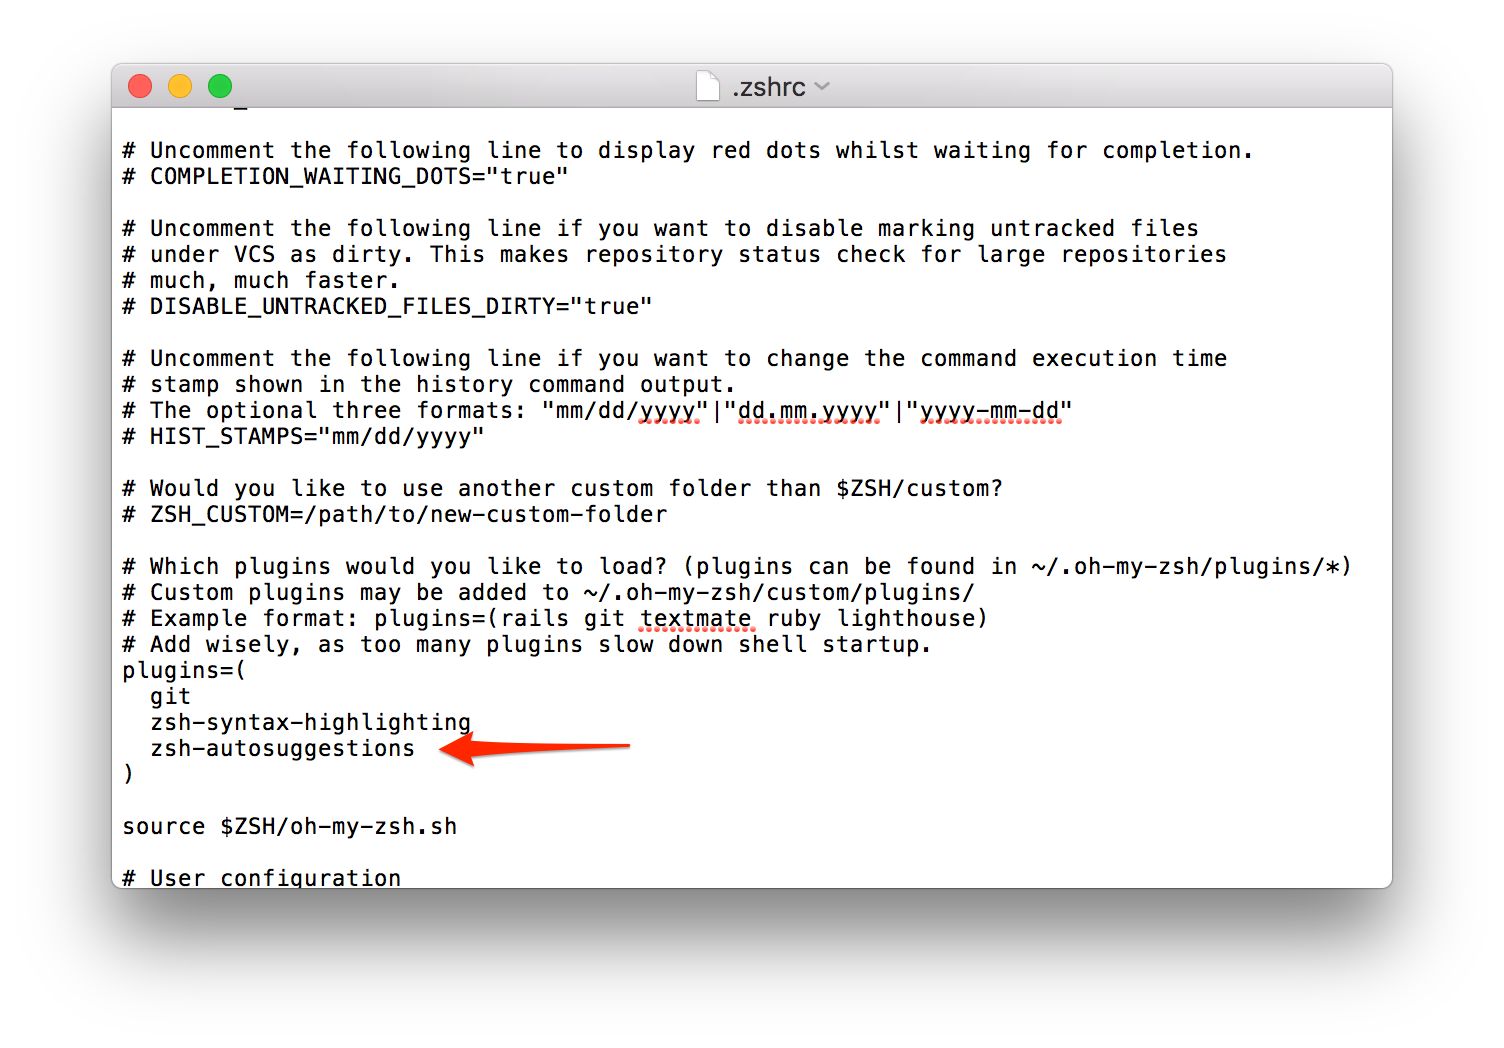
git clone https://github.com/zsh-users/zsh-syntax-highlighting.git ${ZSH_CUSTOM:-~/.oh-my-zsh/custom}/plugins/zsh-syntax-highlightingActivate the plugin in ~/.zshrc by adding `zsh-syntax-highlighting to the Plugins section as shown below.

This plugin auto suggests any of the previous commands. Pretty handy! To select the completion, simply press → key.
Install the plugin
git clone https://github.com/zsh-users/zsh-autosuggestions $ZSH_CUSTOM/plugins/zsh-autosuggestionsOpen ~/.zshrc and add zsh-autosuggestions
$ brew install cowsay
$ brew install fortune
$ sudo gem install lolcat
Then head into your .zshrc file and add the config to the bottom of the file
fortune | cowsay -f vader | lolcatWhy not use the best text editor with syntax highlighting for everything.
Simply take the below scripts, "touch" it into a "nano4upgrade.sh" and run it after a "chmod a+x"
Or just run it from within this repo
#!/usr/bin/env bash

# Install Nano (www.nano-editor.org) with syntax highlighting (MacOS)

VERSION="4.8"
NANO_SHORT="nano-$VERSION"
NANO_SRC="$NANO_SHORT.tar.gz"
NANO_URL="https://www.nano-editor.org/dist/v4"
NANO_EXTRA="https://github.com/scopatz/nanorc"

cd ~/
curl -Ok $NANO_URL/$NANO_SRC
tar -zxvf $NANO_SRC

mv $NANO_SHORT .nano && cd .nano/
./configure && make && sudo make install

git clone --depth=1 $NANO_EXTRA syntax_improved
cd ~/ && touch .nanorc

cat > .nanorc <<EOF
include ~/.nano/syntax/*.nanorc
include ~/.nano/syntax_improved/*.nanorc
EOF

rm -vf $NANO_SRC
printf "\nExit terminal and reopen to start using $NANO_SHORT\nTo uninstall it and revert to old:\ncd ~/.nano && sudo make clean uninstall && rm -rf ~/.nano\n"
exit| COMMAND | DESCRIPTION |
|---|---|
clone |
Clone a repository into a new directory |
init |
Create an empty Git repository or reinitialize an existing one |
add |
Add file contents to the index |
mv |
Move or rename a file, a directory, or a symlink |
reset |
Reset current HEAD to the specified state |
rm |
Remove files from the working tree and from the index |
log |
Show commit logs |
show |
Show various types of objects |
status |
Show the working tree status |
branch |
List, create, or delete branches |
checkout |
Switch branches or restore working tree files |
commit |
Record changes to the repository |
diff |
Show changes between commits, commit and working tree, etc |
merge |
Join two or more development histories together |
tag |
Create, list, delete or verify a tag object signed with GPG |
pull |
Fetch from and integrate with another repository or a local branch |
push |
Update remote refs along with associated objects |
