[FullStack] E-Commerce Shopping Platform developed using the modern technology stacks, MERN (MongoDB, Express, React, Node), MailChimp, Google Analytics, Braintree(PayPal) 🛍️


If you guys like my work, please do support my work by becoming a patron here:
https://www.patreon.com/ghostDragoon95
- Cloning
- Installation
- File Structure
- Language & Tools
- Integration
- Deployment
In your terminal of the destination folder, run the following command:
$ git clone https://github.com/SilvinPradhan/eCommWeb.git <eCommWeb>
- After cloning the project, navigate inside the project
    > cd eCommerceWeb
    > npm install [//]: # (Install Dependencies and Packages.)
    > cd .. <!--- navigate out of the backend folder --->
    > cd eComm-client <!--- navigate inside client project folder --->
    > npm install <!--- install package dependencies --->
- To setup the server, navigate inside the backend project folder, i.e, eCommerceWeb. Run the following commands:
- sudo touch .env // Create an environment variable file
- Add the following environment variables in
.envfile: [Image file here!] - Now, in the terminal of the backend project folder, run the following command:
$ npm run server - For the
DATABASEenvironment variable, you need to set up the Free Tier Cluster for MongoDB Atlas. Follow this site which is a walkthrough for the setup:
https://studio3t.com/knowledge-base/articles/mongodb-atlas-tutorial/ - Add a new terminal on the same Parent Directory (eCommWeb)
 > cd eComm-client
 > sudo touch .env
[Image file here!]
- Add the following lines to the
.envfile:
SKIP_PREFLIGHT_CHECK=true
REACT_APP_API_URL='http://localhost:8000/api'
- Now test if the React App is working:
$ npm run start
- Backend Directory Tree
eCommerceWeb/
├── controllers
│   ├── auth.js
│   ├── braintree.js
│   ├── category.js
│   ├── order.js
│   ├── product.js
│   └── user.js
├── helpers
│   └── dbErrorHandler.js
├── loading.js
├── models
│   ├── category.js
│   ├── order.js
│   ├── product.js
│   └── user.js
├── package-lock.json
├── package.json
├── routes
│   ├── auth.js
│   ├── braintree.js
│   ├── category.js
│   ├── order.js
│   ├── product.js
│   └── user.js
└── validator
    └── loading.js
- Frontend Directory Tree
ecomm-client/
├── README.md
├── package-lock.json
├── package.json
├── public
│   ├── favicon.ico
│   ├── index.html
│   ├── logo192.png
│   ├── logo512.png
│   ├── manifest.json
│   └── robots.txt
├── server.js
└── src
    ├── 404
    │   ├── PageNotFound.js
    │   └── PageNotFound.scss
    ├── App.js
    ├── admin
    │   ├── AddCategory.js
    │   ├── AddProduct.js
    │   ├── ManageProducts.js
    │   ├── Orders.js
    │   ├── UpdateProduct.js
    │   └── apiAdmin.js
    ├── auth
    │   ├── AdminRoute.js
    │   ├── PrivateRoute.js
    │   └── user.js
    ├── config.js
    ├── core
    │   ├── Header.js
    │   ├── Home.js
    │   ├── Layout.js
    │   ├── apiCore.js
    │   ├── cards
    │   │   ├── Card.js
    │   │   └── ShowImage.js
    │   ├── cart
    │   │   ├── Cart.js
    │   │   └── cartHandler.js
    │   ├── checkbox
    │   │   └── CheckBox.js
    │   ├── checkout
    │   │   └── Checkout.js
    │   ├── loading
    │   │   └── loading.js
    │   ├── newsletter
    │   │   ├── NewsletterForm.js
    │   │   └── NewsletterSubscribe.js
    │   ├── price
    │   │   └── FixedPrice.js
    │   ├── product
    │   │   └── Product.js
    │   ├── radiobox
    │   │   └── RadioBox.js
    │   ├── search
    │   │   └── Search.js
    │   └── shop
    │       └── Shop.js
    ├── loading.js
    ├── reportWebVitals.js
    ├── routes
    │   └── routes.js
    ├── setupTests.js
    ├── static
    │   └── images
    │       ├── cards
    │       │   └── homepage.png
    │       └── categoryBG
    │           └── bg.jpg
    ├── style.css
    ├── user
    │   ├── AdminDashboard.js
    │   ├── Profile.js
    │   ├── UserDashboard.js
    │   ├── apiUser.js
    │   ├── signin.js
    │   └── signup.js
    └── utils
        └── miscellaneous.js
- Node
- Express
- Mongoose
- React
- Webpack
- Google Analytics
Send newsletter to connect with your audience? Maybe your application has user signup functionality and you have a
great database of emails. In this case, there are ways to take advantage of that database and use this column to create
your contact list directly. And maybe your web application does not require sign up and you're not capturing those that
come to your website. It is vital to have an easy and quick access to form a contact list and stay connected with your
audience/customers. This is all possible with integrating Mailchimp which does all of the heavy lifting for you.
[Optional]
- Get to Mailchimp's site and sign up for a free account here.
- Go the terminal of the
frontenddirectory of your project, and run the following command:$ npm i react-mailchimp-form - In your Mailchimp navigate to your dashboard, and to your ‘Audience’ tab. You’ll need to make sure that you have your contact list initiated.
- Copy the HTML and extract the action from “Signup Forms > Embedded forms”.

Note: This ‘Signup Form’ can be navigated to from the Audience Tab, as well. While in ‘Embedded forms’ you’ll see the section in the right column ‘Copy/paste onto your site’. - Do not copy the whole block of code, but the following string in
<form action="COPY_MAILCHIMP_URL" />

- In the client side directory, navigate to
.envfile and paste the copied string (COPY_MAILCHIMP_URL) into a new environment variable, i.e, REACT_APP_MAILCHIMP_URL='COPY_MAILCHIMP_URL'.

- Now, navigate to your NewsletterSubscriptionForm jsx file and build a form. You need to test making sure that all of your signups are hitting your Audience Contact list in MailChimp.
- To COPY a custom Newsletter Subscription Form that I built, navigate to ->
src/core/newsletter/NewsletterSubscribe - Before pushing the code to the github repo, make sure TO MOVE YOUR ‘action=’ value to a .env file to hide your personal, secret mailchimp key.
What can we do with Google Analytics?
- You will be able to track your revenue,
- Track user flow/traffic to your site,
- Track your new user acquisition rate,
- Even track which age-group are more interested in your business,
- Also, you can gain insight into the region they live in.
- Create an account in Google Accounts: google.analytics.com
If you have already setup an Google Account, you just have to set up a new account and give it a name. - Create a
property
Property is a way for Google to track your website. We need to create a new property for our website.- Go to your dashboard and find
Admin->Create New Property - Fill up the required name and other details and provide the URL of your website.
[ Important ]
Be sure to click on the Advanced Settings and turn on the Create Universal
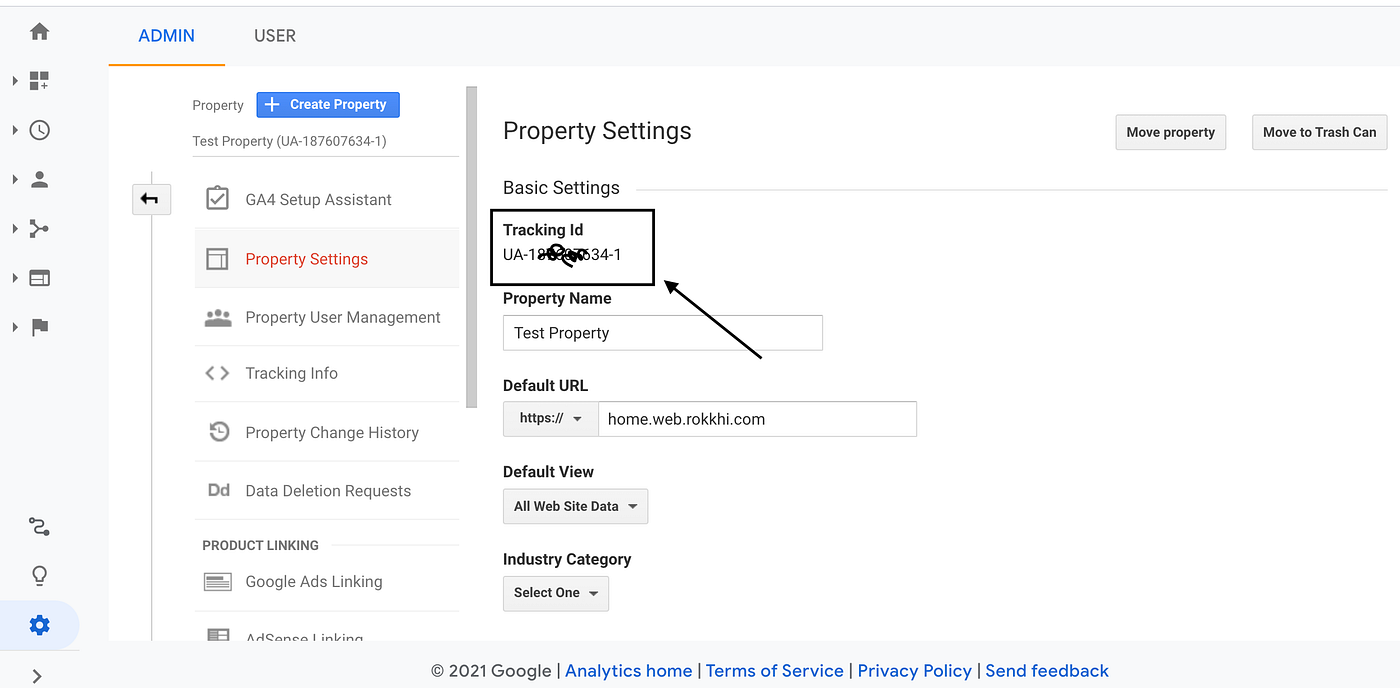
* Then Select a property and get the tracking id and save it somewhere.
- Go to your dashboard and find
- Now you are done setting up your project in Google Analytics. If you have a live website you will start getting some insights about the visitors already.
- [React] Install Dependencies:
- First, install react-ga package from npm. It’s the official npm package for React integration with Google analytics.
yarn add react-gaornpm i react-ga -S
- First, install react-ga package from npm. It’s the official npm package for React integration with Google analytics.
- Setup Google Analytics inside your React Project
- Inside
App.jsorindex.js, add the following code:
import ReactGA from 'react-ga'; const TRACKING_ID = "UA-12341234-1"; // YOUR_OWN_TRACKING_ID ReactGA.initialize(TRACKING_ID);
- Inside
- Integration with React Router
We can create a RouteChangeTracker component to listen to the changes in route and send data back to Google Analytics
import { withRouter } from 'react-router-dom'; import ReactGA from 'react-ga'; const RouteChangeTracker = ({ history }) => { history.listen((location, action) => { ReactGA.set({ page: location.pathname }); ReactGA.pageview(location.pathname); }); return <div></div>; }; export default withRouter(RouteChangeTracker); - Do not forget to add the RouteChangeTracker component inside your App.js file.

You can find the server documentation with the steps to setup and deploy the WebApp: Server Documentation