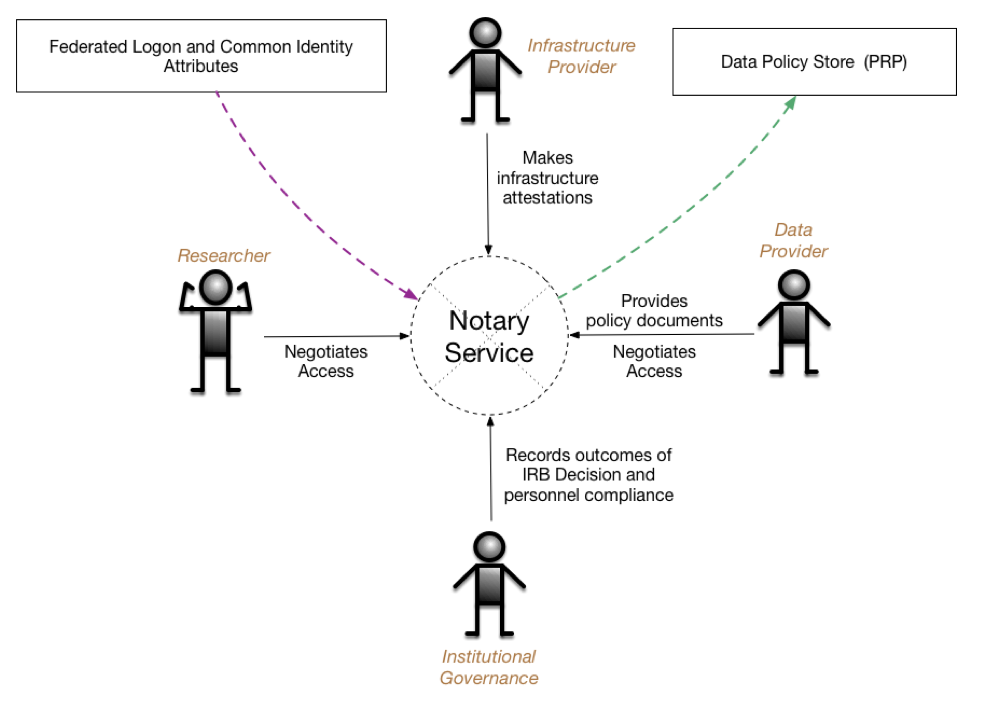
Notary Service (NS) consists of a web server interacting with different principals (Researchers, representatives of Institutional Governance, Infrastructure Providers and Data Providers) via their User Agent. It accepts policy descriptions and associated document forms from Data Providers (DPs) and then presents different views of those documents to other principals to allow them to make digitally signed statements (attestations) about the requirements spelled out in the documents. NS also provides a communications channel between DPs and other principals that allows for direct negotiation of access via threaded conversations linked to a particular context. The attestations are recorded using SAFE in the remote Data Policy Store. The attestations are then used by Data Provider agents guarding access to data to make decisions regarding granting access to the data by the principals.
Principals authenticate to NS using their institutional credentials via NS integration with CILogon. NS can rely on a combination of InCommon, CILogon claims and local configuration to assign roles to principals. Based on those roles the NS presents different views of the DUA process to principals allowing them to make attestations recorded as SAFE assertions mapped onto different steps of the DUA.
The DUA is specified as a series of DAGs (Directed Acyclic Graphs) describing the different phases and facets of the DUA. The nodes are individual attestations required by the DUA workflow, while the directed edges describe dependencies between nodes. The nodes in the DUA workflow graphs are tagged with the type of principal or the principal role that must make the respected attestation within the workflow. For example, the figure below demonstrates several separate DAGs - one describing the DUA workflow for research approval, comprised of two branches - one intended for researchers (PIs and individual project staff) and the other for the representatives of the institutional governance (e.g. IRB).

The second graph shows the DUA workflow for the infrastructure provider. As shown, individual project members may be required to provide attestations in both types of graphs. Examples of these situations may be: requiring project staff to provide data privacy pledges for the research approval and staff providing attestations of passing the required infrastructure training for the infrastructure approval.
Additionally, infrastructure providers may require acknowledgements from PIs or staff for their internal bookkeeping, as reflected in the third ‘Infrastructure Acknowledgement’ graph. SAFE statements generated from this graph are not expected to be used in data access approval, but may be used for other purposes. These types of acknowledgements are a common requirement by institutional infrastructure providers.
There are a small set of system requirements in order to run Notary Service code. If you're planning on doing additional development to this codebase, then additional requirements may be applicable.
-
To Run
- Docker
- Docker Compose
-
To Develop
- Docker
- Docker Compose
- Python 3 / Pip 3
- Virtualenv
- TL;DR - Just run it all in Docker and I don't care about specifics
- Scripts - Convenience scripts for setting up or tearing down a development environment
- Environment and Configuration - How to setup your development environment
- Virtualenv - Establish a Python virtual environment
- Build - Building the stack
- Run - Running the stack
- Docker - I want to do all of this in docker
- Lib - Additional libraries/packages for Notary Service
- References - Reference information about all the things
NOTE: Assumes you already have OIDC Client credentials, and LDAP access setup for a COmanage Registry.
cp env.template .env                                  # set variables accordingly
cp nginx/default.conf.template nginx/default.conf     # configure accordingly
source .env
UWSGI_UID=$(id -u) UWSGI_GID=$(id -g) docker-compose up -d
Once all of the containers have completed their startup scripts, you will find the running notary service at the specified URL.
Example: https://127.0.0.1:8443/

Wait! What if I don't know how to set variables accordingly or to configure accordingly?.. Then keep reading below.
Convenience scripts are provided in the scripts directory. The scripts are somewhat macOS specific due the primary development environment, but can be modified to run elsewhere.
-
macos-development-environment.sh - generates the directories and environment stubs for the user to populate with their own configuration parameters, and starts the database, neo4j, and nginx containers.
-
stop-and-remove-all.sh - as the name suggests, stops all running containers, removes them, and purges the system of user created container volume mounts.
Move on to the Environment and Configuration section.
Your project must be configured prior to running it for the first time. Example configuration files have been provided as templates to start from.
Do not check any of your configuration files into a repository as they will contain your projects secrets (use .gitignore to exclude any files containing secrets).
- .env from env.template - Environment variables for docker-compose.yml to use
- nginx/default.conf from nginx/default.conf.template - Example Nginx SSL configuration file to use for deployment.
A file named env.template has been provided as an example, and is used by the docker-compose.yml file.
cp env.template .env
Once copied, modify the default values for each to correspond to your desired deployment. The UID and GID based entries should correspond to the values of the user responsible for running the code as these will relate to shared volumes from the host to the running containers.
# docker-compose environment file
#
# When you set the same environment variable in multiple files,
# here’s the priority used by Compose to choose which value to use:
#
#  1. Compose file
#  2. Shell environment variables
#  3. Environment file
#  4. Dockerfile
#  5. Variable is not defined

# Django settings
export PYTHONPATH=$(pwd):$(pwd)/venv:$(pwd)/.venv
export DJANGO_SECRET_KEY='xxxxxxxxxxxxxxxxxxxxxxxxxxxxxxxxxxxxxxxxxxxxxxxxxx'
export DJANGO_DEBUG=True
export DJANGO_LOG_LEVEL='DEBUG'
export DJANGO_SESSION_COOKIE_AGE='3600'
export DJANGO_TIME_ZONE='America/New_York'
export OIDC_RENEW_ID_TOKEN_EXPIRY_SECONDS='900'

# NS Roles
export ROLE_IMPACT_USER='ImpactUser'
export ROLE_DP='DataProvider'
export ROLE_INP='InfrastructureProvider'
export ROLE_PI='PrincipalInvestigator'
export ROLE_IG='InstitutionalGovernance'
export ROLE_NSADMIN='NotaryServiceAdmin'
export ROLE_ENROLLMENT_APPROVAL='EnrollmentApproval'

# COmanage COU IDs / FLAGs
export COU_ID_ACTIVE_USER=100
export COU_ID_PROJECTS=101
export COU_ID_DATA_PROVIDERS=102
export COU_ID_INFRASTRUCTURE_PROVIDERS=103
export COU_ID_PRINCIPAL_INVESTIGATORS=104
export COU_ID_INSTITUTIONAL_GOVERNANCE=105
export COU_ID_NOTARY_SERVICE_ADMINS=106
export COU_ID_ENROLLMENT_APPROVAL=107
export COU_FLAG_PI_ADMIN='-ADMIN'
export COU_FLAG_PI_MEMBER='-PI'
export COU_FLAG_STAFF='-STAFF'

# Neo4J configuration
#export NEO4J_BOLT_URL=bolt://localhost:7687
export NEO4J_BOLT_URL=bolt://neo4j:7687
export NEO4J_DATA_PATH_DOCKER=/data
export NEO4J_DATA_PATH_HOST=./neo4j/data
export NEO4J_GID=1000
export NEO4J_HOST=neo4j
export NEO4J_IMPORTS_PATH_DOCKER=/imports
export NEO4J_IMPORTS_PATH_HOST=./neo4j/imports
export NEO4J_LOGS_PATH_DOCKER=/logs
export NEO4J_LOGS_PATH_HOST=./neo4j/logs
export NEO4J_PASS=password
export NEO4J_UID=1000
export NEO4J_USER=neo4j

# Nginx configuration
export NGINX_DEFAULT_CONF=./nginx/default.conf
export NGINX_SSL_CERTS_DIR=./ssl

# Notary Service
export NS_NAME=localhost
export NS_PRESIDIO_JWT_PUBLIC_KEY_PATH='./safe/keys/safe-principal.pub'
export NS_PRESIDIO_JWT_PRIVATE_KEY_PATH='./safe/keys/safe-principal.key'

# COmanage API - privileged API user generated in COmanage
export COMANAGE_API_URL='https://FQDN_OF_REGISTRY'
export COMANAGE_API_USER='co_123.api-user-name'
export COMANAGE_API_PASS='xxxx-xxxx-xxxx-xxxx'
export COMANAGE_API_CO_ID=123
export COMANAGE_API_CO_NAME='RegistryName'
export COMANAGE_API_SSH_KEY_AUTHENTICATOR_ID=123

# OIDC CILogon / COmanage - values provided when OIDC client is created
export OIDC_RP_CLIENT_ID=''
export OIDC_RP_CLIENT_SECRET=''
export OIDC_RP_CALLBACK='https://127.0.0.1:8443/oidc/callback/'
export OIDC_STORE_ACCESS_TOKEN=true
export OIDC_STORE_ID_TOKEN=true

# PostgreSQL database - default values should not be used in production
export POSTGRES_HOST=database
export PGDATA=/var/lib/postgresql/data
export POSTGRES_DB=postgres
export POSTGRES_PASSWORD=postgres
export POSTGRES_PORT=5432
export POSTGRES_USER=postgres

# SAFE server
export SAFE_SERVER=safe
export SAFE_SERVER_PORT=7777
export RIAK_IP=riak
export RIAK_PORT=8098
export SLANG_SCRIPT=impact/mvp-ns.slang
export AKKA_LOG_LEVEL=info
export SAFE_IMPORTS=./safe/imports
export SAFE_PRINCIPAL_KEYS=./safe/keys
export SAFE_PRINCIPAL_PUBKEY=./safe/keys/ns.pub

# uWSGI services in Django
export UWSGI_GID=1000
export UWSGI_UID=1000A file named nginx/default.conf.template has been provided as an exmaple.
cp nginx/default.conf.template nginx/default.conf
Once copied, entries for FQDN_OR_IP should be replaced with actual hostnames or IPs along with port information if not using default values. Also note that macOS will not use file based sockets, so TCP sockets should be used instead.
# the upstream component nginx needs to connect to
upstream django {
    server unix:///code/base.sock; # UNIX file socket
    # Defaulting to macOS equivalent of docker0 network for TCP socket
    #server host.docker.internal:8000; # TCP socket
}

server {
    listen 80;
    server_name FQDN_OR_IP;
    return 301 https://FQDN_OR_IP$request_uri;
}

server {
    listen   443 ssl default_server;
    # the domain name it will serve for
    server_name FQDN_OR_IP; # substitute your machine's IP address or FQDN

    # If they come here using HTTP, bounce them to the correct scheme
    error_page 497 https://$server_name$request_uri;
    # Or if you're on the default port 443, then this should work too
    # error_page 497 https://;

    ssl_certificate /etc/ssl/SSL.crt;
    ssl_certificate_key /etc/ssl/SSL.key;

    charset     utf-8;

    # max upload size
    client_max_body_size 75M;   # adjust to taste

    # Django media
    location /media  {
        alias /code/media;  # your Django project's media files - amend as required
    }

    location /static {
        alias /code/static; # your Django project's static files - amend as required
    }

    # Finally, send all non-media requests to the Django server.
    location / {
        proxy_set_header X-Forwarded-For $proxy_add_x_forwarded_for;
        proxy_set_header X-Forwarded-Proto https;
        proxy_set_header Host $http_host;
        proxy_redirect off;

        uwsgi_pass  django;
        include     /code/uwsgi_params; # the uwsgi_params file
    }
}- NOTE:
host.docker.internalis macOS specific, substitute as required by your operating system
Choose the compose definition that fits your deployment and copy it over the docker-compose.yml file (default is local-development)
compose/local-development.ymlcompose/production.ymlcompose/production-selinux.yml
Double check that all variable references found in .env, or their default values are suitable for your deployment.
If you're planning on doing local development with virutalenv, configure the database to be reachable from the local machine.
NOTE: Depending on your system (macOS) you may not be able to run the Nginx server using sockets mounted from the host. For more information refer to this Github issue: Support for sharing unix sockets. If this is the case, you'll either need to run your Nginx server over ports, or run everything in Docker. The following will describe how to run the Nginx server using TCP ports.
Update the uWSGI ini file
...
; use protocol uwsgi over TCP socket (use if UNIX file socket is not an option)
socket              = :8000
; add an http router/server on the specified address **port**
;http                = :8000
; map mountpoint to static directory (or file) **port**
;static-map          = /static/=static/
;static-map          = /media/=media/
; bind to the specified UNIX/TCP socket using uwsgi protocol (full path) **socket**
;uwsgi-socket        = ./example.sock
; ... with appropriate permissions - may be needed **socket**
;chmod-socket        = 666
...
Move on to the Virtualenv section.
By default this project is configured to run everything in Docker which may be non-optimal for development. In order to enable local development using Python 3 the user must make a few small changes prior to running the code.
If you're only wanting to run this in Docker, move on to the Docker section.
Create the virtual environment and install packages
virtualenv -p $(which python3) venv
source venv/bin/activate
pip install --upgrade pip
pip install -r requirements.txt
Move on to the Build section.
Once all configuration has been done, the user can build the necessary containers by issuing:
docker-compose build
Anytime a modification is made to the Django code, a new container should be built prior to launching the docker-compose definition.
Move on to the Run section.
Be sure to source the environment variables that were configured from the .env file.
source .env
Create the database directories if they do not exist
mkdir -p pg_data/data pg_data/logs
Start the pre-defined PostgreSQL database in Docker
docker-compose up -d database
Validate that the database container is running.
$ docker-compose ps
  Name                Command              State           Ports
-------------------------------------------------------------------------
database docker-entrypoint.sh postgres Up 0.0.0.0:5432->5432/tcpCreate the neo4j directories if they do not exist
mkdir -p neo4j/data neo4j/imports neo4j/logs
Start the pre-defined PostgreSQL database in Docker
docker-compose up -d neo4j
Validate that the neo4j container is running.
$ docker-compose ps
  Name                Command              State           Ports
-------------------------------------------------------------------------
database docker-entrypoint.sh postgres Up 0.0.0.0:5432->5432/tcpStart the Django service
-
Local virtualenv
- Launch the
run_uwsgi.shscript from your virtualenv, passing in your UID and GID values
UWSGI_UID=$(id -u) UWSGI_GID=$(id -g) ./run_uwsgi.shNOTE: The process output should remain observable in the terminal after running this command, use
ctrl-cto end the process, orctrl-zto suspend it. - Launch the
-
Docker only
- Launch
djangocontainer from docker-compose
docker-compose up -d djangoValidate that the service is running
$ docker-compose ps
  Name                Command              State                      Ports
----------------------------------------------------------------------------------------------
...
django     /code/docker-entrypoint.sh      Up      0.0.0.0:8000->8000/tcp
...
- Launch
Start the nginx service
$ docker-compose up -d nginx
Validate that the service is running on the expected port(s)
$ docker-compose ps
  Name                Command              State                      Ports
----------------------------------------------------------------------------------------------
...
nginx      nginx -g daemon off;            Up      0.0.0.0:8443->443/tcp, 0.0.0.0:8080->80/tcp
...
At this point the notary-service stack should be running and can be verified at your defined URL: http(s)://HOSTNAME:PORT
Neo4j/APOC graph database for managing Notary Service Workflows. Build information at https://github.com/RENCI-NRIG/impact-docker-images/tree/master/neo4j
- Django docs: https://docs.djangoproject.com/en/2.0/
- uWSGI options: http://uwsgi-docs.readthedocs.io/en/latest/Options.html
- Nginx docs: https://nginx.org/en/docs/
- Docker docs: https://docs.docker.com
- Docker Compose docs: https://docs.docker.com/compose/