


Easily create beautiful preprints in Typst
#import "lapreprint.typ": template

#show: template.with(
  title: "A beautiful preprint template"
)With simple options you can enable/disable:
- color schemes of blue, red, purple
- author, ORCID, and affiliation support
- branding and logo support
- left margin with custom headings
- date accepted, published & submitted
- customizable font choices
- running title, affiliation
- multiple abstracts, e.g. plain language summary or english/french!
- keywords, page count, nice headings
- easily customize APA or IEEE citation style
- Optional: full width after first page
The preprint template uses Typst (not LaTeX1) for typesetting, see typst docs.
Copy lapreprint.typ to your own folder that you are working in, you only need the single lapreprint.typ file:
#import "lapreprint.typ": templateTake a look at the examples in the GitHub repository, for example, this file, the basics are to use the template with a #show command:
#show: template.with(
  title: "A beautiful preprint template"
  // ... all sorts of other options that are explained below!
)The theme of the document can be set to a specific color, which changes the headers and links. The default theme is blue, however, the following examples use:
theme: red.darken(50%),You can also supply a logo, which is either an image file location or content, allowing you to add additional information about the journal or lab-group to the top-right of the document. You can also set the paper-size, heading-numbering and font-face. The default font-face used is Noto Sans, which you may need to download.
logo: "my-logo.png",
theme: purple.darken(20%),
paper-size: "us-letter",
heading-numbering: "1.a.i",
font-face: "Noto Sans",
You can have both a title and a subtitle:
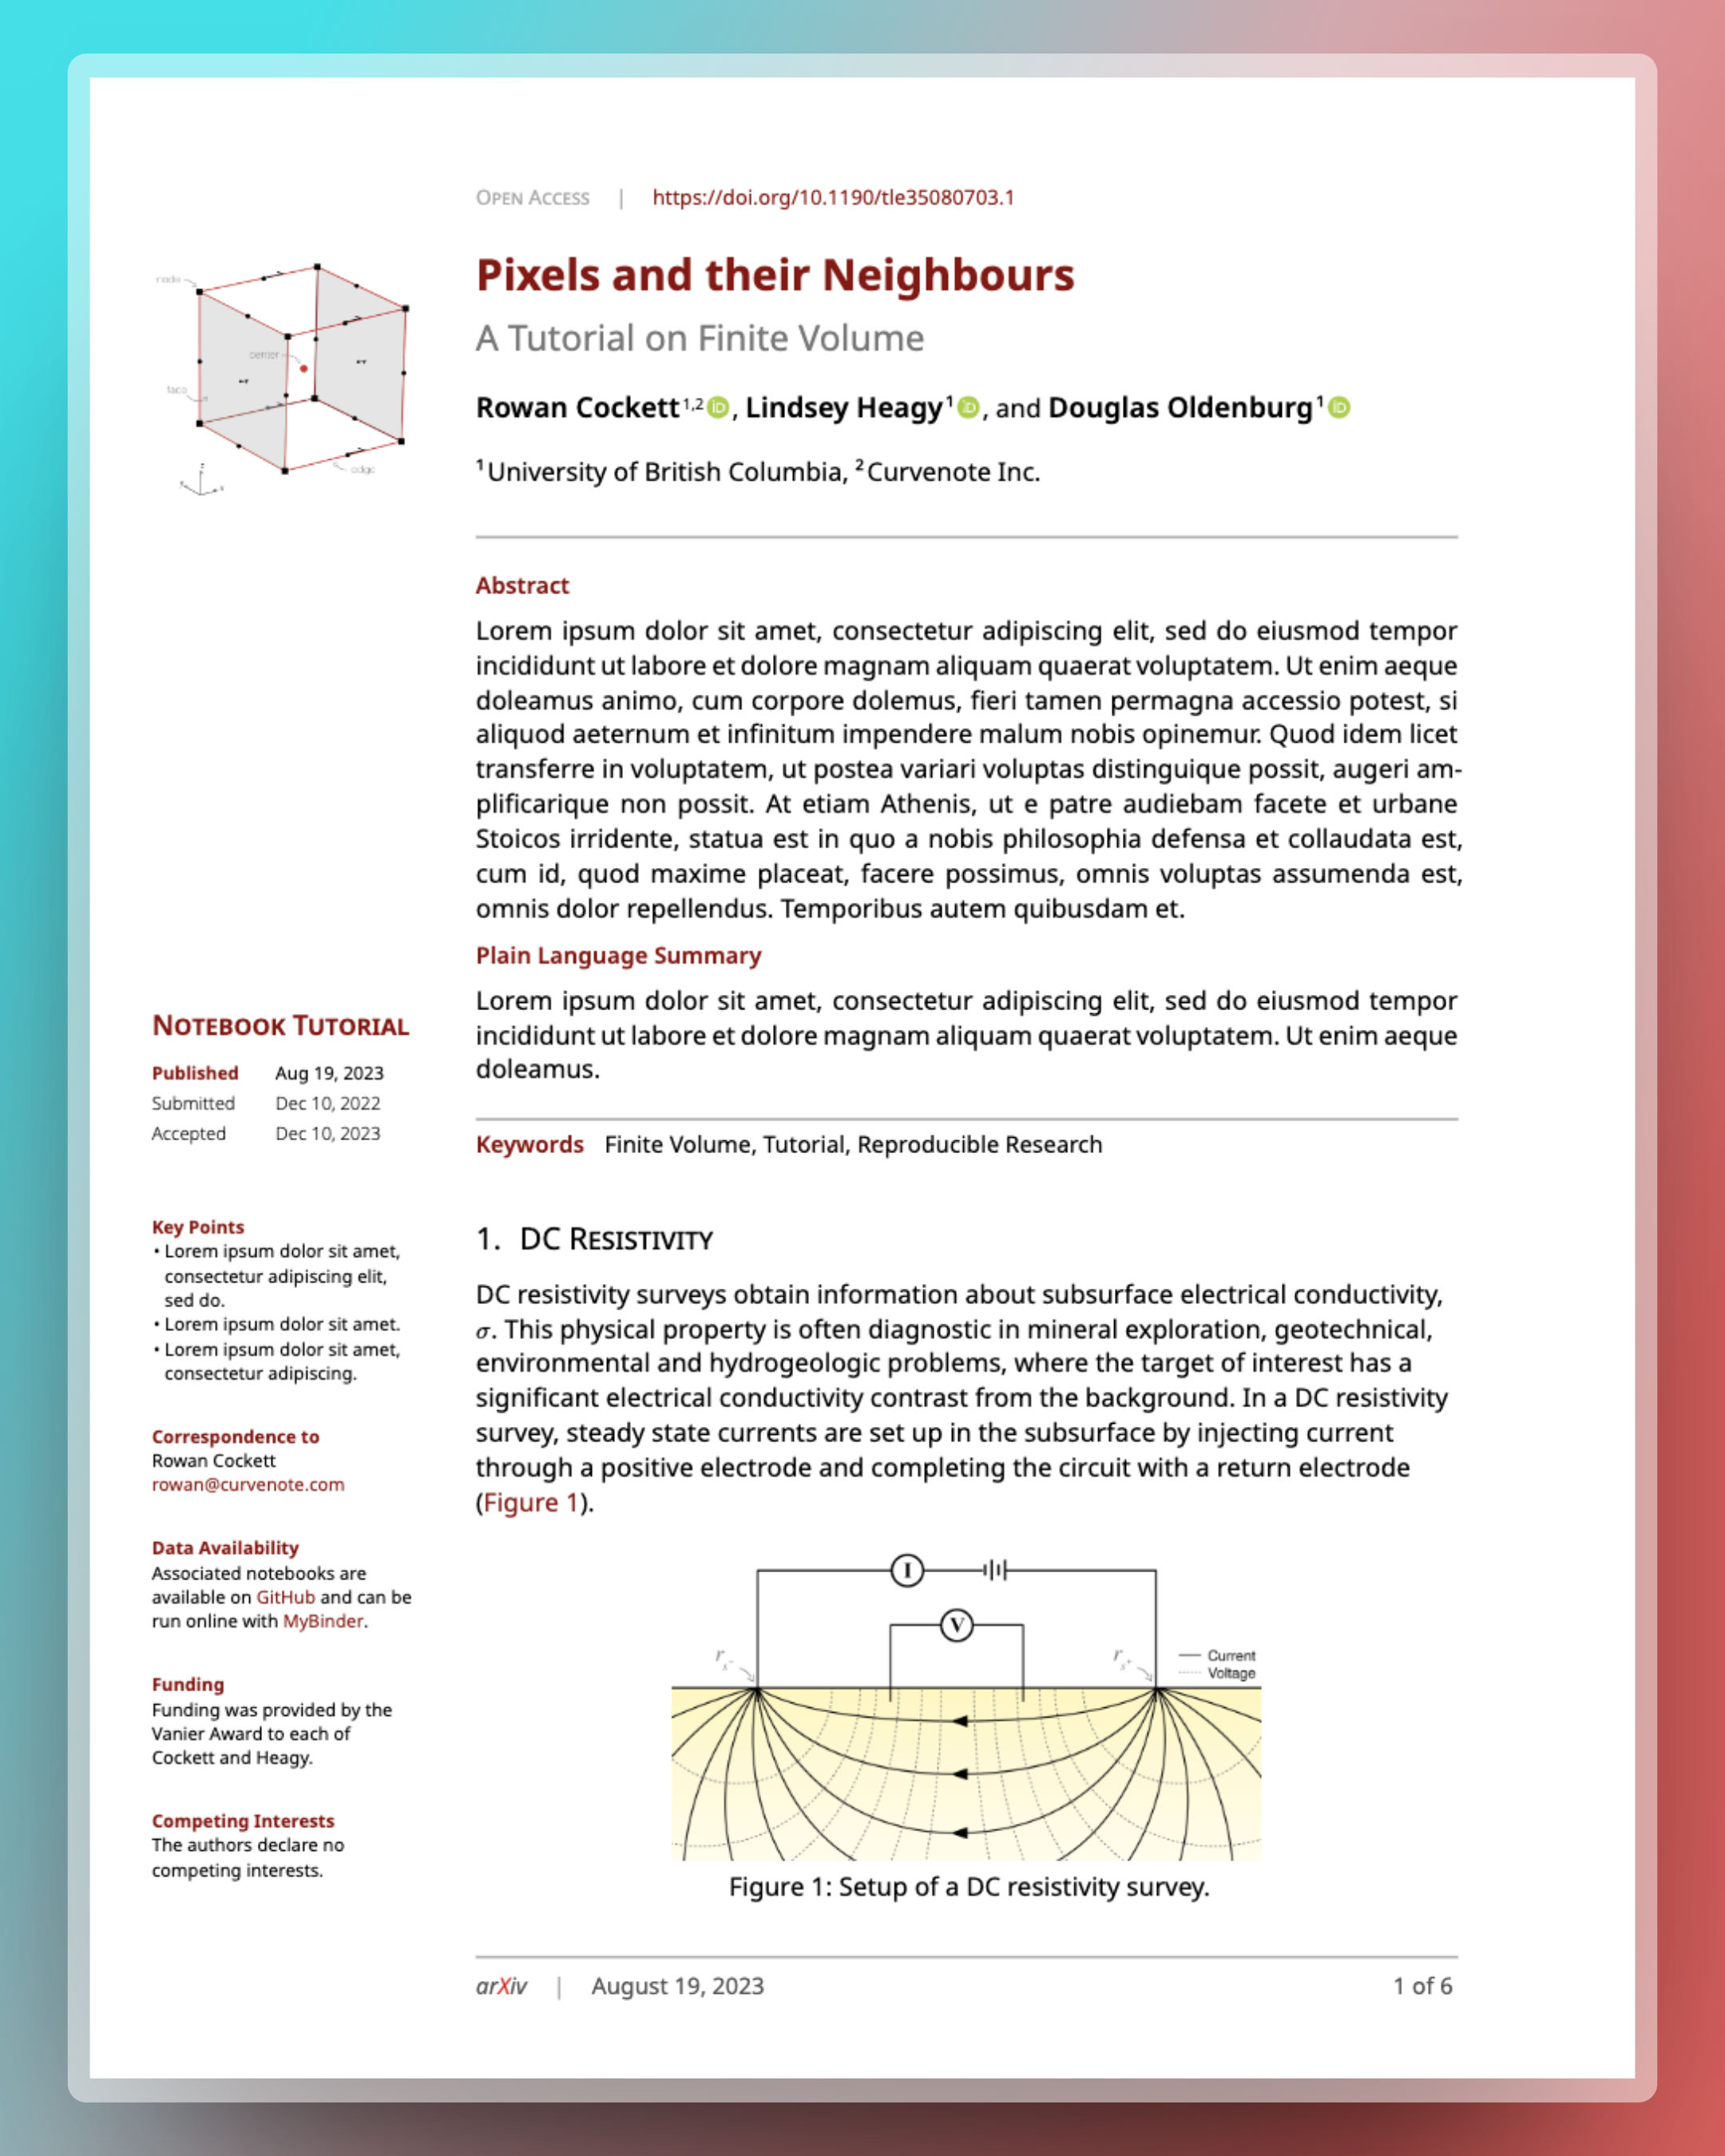
title: "Pixels and their Neighbours",
subtitle: "A Tutorial on Finite Volume",
Will become:

You can add both author and affiliations lists, each author should have a name, and can optionally add orcid, email, and affiliations. The affiliations are just content that is put in superscript, e.g. "1,2", have corresponding identifiers in the top level affiliations list, which requires both an id and a name. If you wish to include any additional information in the affiliation (e.g. an address, department, etc.), it is content and can have whatever you want in it.
authors: (
  (
    name: "Rowan Cockett",
    orcid: "0000-0002-7859-8394",
    email: "rowan@curvenote.com",
    affiliations: "1,2"
  ),
  // Add other authors here...
),
affiliations: (
   (id: "1", name: "University of British Columbia"),
   (id: "2", name: "Curvenote Inc."),
  ),
Note that the orcid and email icons are actually aligned to the text. Details, details!
For other information that you wish to affiliate with a specific author, you can use the affiliations field with any identifier you like (e.g. †) and then use the margin content or affiliations fields on the preprint to explain what it means.
You can include one or more abstracts as well as keywords. For a simple abstract the default title used is "Abstract" and you can include it with:
abstract: lorem(100),
keywords: ("Finite Volume", "Tutorial", "Reproducible Research"),
To include one or more specific abstracts, for example, different languages or a "Plain Language Summary", provide a list, with title and content in a dictionary:
abstract: (
  (title: "Abstract", content: lorem(100)),
  (title: "Plain Language Summary", content: lorem(25)),
),
The content on the first page is customizable. The first content is the kind, for example, "Original Research", "Review Article", "Retrospective" etc. And then the date, which is by default the date you compiled the document.
kind: "Notebook Tutorial",
date: datetime(year: 2023, month: 08, day: 21),
You can also set date to be a dictionary or list of dictionaries with title and date as the two required keys. The first date will be bolded as well as used in the document metadata and auto short-citation.
kind: "Notebook Tutorial",
date: (
  (title: "Published", date: datetime(year: 2023, month: 08, day: 21)),
  (title: "Accepted", date: datetime(year: 2022, month: 12, day: 10)),
  (title: "Submitted", date: datetime(year: 2022, month: 12, day: 10)),
),
The rest of the margin content can be set with margin property, which takes a title and content, content is required, however the title is optional.
margin: (
  (
    title: "Correspondence to",
    content: [
      Rowan Cockett\
      #link("mailto:rowan@curvenote.com")[rowan\@curvenote.com]
    ],
  ),
  // ... other properties
)
You can use the margin property for things like funding, data availability statements, explicit correspondence requests, key points, conflict of interest statements, etc.

The first page has a left hand margin of 25%, if you do nothing this will continue for your whole document. To override this, you can reset the margin after the first page by placing #set page(margin: auto) in a place where you want the page break between the first and second pages2.
If you opt for resetting to a full-width margin, you will want to not supply a bibliography-file to the template, and instead do this in your content, this is because the template will revert to the first-page margin as well as inserting a page break3. See the section on bibliography below.
You can control the headers and footer by providing the following information:
open-access: true,
doi: "10.1190/tle35080703.1",
venue: [ar#text(fill: red.darken(20%))[X]iv],
short-title: "Finite Volume Tutorial",
short-citation: auto,
date: datetime.today()
The first page will show an open-access statement and the doi if available. For DOIs, only include the actual identifier, not the URL portions:

Subsequent pages will show the short-title and short-citation. If the citation is auto (the default) it will be created in APA formatting using the paper authors.

The footers show the venue (e.g. the journal or preprint repository) the date (which is by default today()) as well as the page count.

The bibliography is only included in the theme if you supply the bibliography-file and an optional bibliography-style. The default bibliography-style is "apa", you can override this if you like, for example, to "ieee".
If you have opted for full-page margins or have an appendix, you may want to place the bibliography yourself as including in the template will default back to the same margin as the first page. You can also handle the bibliography yourself with:
#{
  show bibliography: set text(8pt)
  bibliography("main.bib", title: text(10pt, "References"), style: "apa")
}The Typst LaPreprint template (and this Readme!) is inspired by @roaldarbol LaTeX template, which is in the style of eLife and PLoS. Portions of the template were based on the example IEEE template in Typst.
Footnotes
-
If you are looking for LaPreprint for LaTeX, please see: https://github.com/roaldarbol/LaPreprint ↩
-
If you know a better way of doing this to automate it in the template, please open an issue or pull-request!! ↩
-
This seems like a bug to me in typst, but maybe is by design? ↩