


A simple E-commerce web application created using React during a web developer Bootcamp by four awesome students that may already be full-fledged developers.
View Demo
·
Contact
The main frameworks and technologies used to build our Project are the following:
- React (with Hooks and Context)
- React Router
- Styled Components
By exploiting the power of React Hooks, we were able to use functional components in most cases. For instance, when rendering UI or handling state and logic.
Using Hooks has many advantages :
- Improved code reuse.
- Better code composition.
- Better defaults.
- Sharing non-visual logic with the use of custom hooks.
- Flexibility when moving up and down the components tree.
In our project we mainly used the following Hooks: useState, useEffect, useRef, and useContext.
In our project, we decided to use React Context because it allows us to share information with any component by storing it in a central location.
With this approach, it’s quite easy to provide data to any component in the React component tree, regardless of how deeply nested they may be.
To create a new Context, we used the React createContext() function.
To access the context value, we used useContext() React hook.
We used the following APIs in our web application:
| API | ? |
|---|---|
| Mapbox API | We used the Mapbox Maps Service to display a map with the location of the stores that sell on the web app. |
| React Modal Library | This is a modal dialog component for React.JS that we used in different places in our web app. |
| Node.js UUID Library | This library is used to create short non-sequential url-friendly unique ids |
| Stripe API | This API provides a payments infrastructure for the internet. We used it on the payment page. |
| React Stripe Checkout Component | Stripe is a cloud-based service that enables businesses and individuals to receive payments over the internet and offers both client-side libraries (JavaScript and native mobile) and server-side libraries (Java, Ruby, Node.js, etc.). |
| Facebook Login | Facebook Login enables people to have private & secure experiences, from basic account creation to social networking, all with the click of a button--it is uniquely positioned to offer a seamless experience across platforms, devices, and operating systems. |
| Google Sign-In | Google Sign-In enables users to sign into apps and authorize apps to use Google services. |
| Finding API (eBay) | Used to retrieve a list of items from a given category to display in the shops. |
| Shopping API (eBay) | Used to retrieve information about a single item to display in the shops. |
It would have been easier to make a fake payment form with HTML, or even copy and paste one of those cool animated payment forms you can find in CodePen but we wanted to learn how to do it for real as if it was an actual job and not just a Bootcamp exercise.
Out of the different solutions at our disposal, we chose the Stripe API because it’s well documented, which makes it easy to integrate into projects.
We are using it in Testing mode for this web application but it's also possible to make it receive real payments.
We first tried to use one of those free and public APIs to get images of products, but we quickly discovered that they were very limited. You could only do very few API calls a day, you would only get a dozen items at most which also weren't particularly attractive.
After searching around, we stumbled upon the eBay APIs which seemed to what we needed, at least on paper. We decided to give it a go but, just as with many other APIs, we needed our own key.
We then sent a request to the eBay Developer’s Program and three days later we got a positive answer containing our very own access key 😄 . With it, we can make up to 5,000 API calls a day, more than enough for our purposes 😄.
We tried first the Finding API to retrieve a list of items from a given category to display in the shops. However, when it was time to display the images, we found out that the ones provided by this API were very small. So, to get the full resolution images we used Shopping API, making calls for each item to be displayed.
We also decided to make the API call from inside of a Context because of the following two reasons:
- To reduce the number of API calls produced by a single user.
- To improve the performance (the call will be made as soon as the landing page on the website is loaded).
What follows is a standard received when using the Finding API with a specific Category Id :
{"findItemsByCategoryResponse":[{"ack":["Success"],"version":["1.13.0"],"timestamp":["2021-01-05T16:48:02.158Z"],"searchResult":[{"@count":"1","item":[{"itemId":["124475001012"],"title":["Felco F-2 Pruner High Performance Pruning Shears"],"globalId":["EBAY-US"],"primaryCategory":[{"categoryId":["139871"],"categoryName":["Pruning Shears & Snips"]}],"galleryURL":["https:\/\/thumbs1.ebaystatic.com\/m\/mwnwIEW33HzUFiq3iwbG4jA\/140.jpg"],"viewItemURL":["https:\/\/www.ebay.com\/itm\/Felco-F-2-Pruner-High-Performance-Pruning-Shears-\/124475001012"],"paymentMethod":["PayPal"],"autoPay":["false"],"postalCode":["080**"],"location":["Burlington,NJ,USA"],"country":["US"],"shippingInfo":[{"shippingServiceCost":[{"@currencyId":"USD","__value__":"0.0"}],"shippingType":["Free"],"shipToLocations":["Worldwide"],"expeditedShipping":["false"],"oneDayShippingAvailable":["false"],"handlingTime":["3"]}],"sellingStatus":[{"currentPrice":[{"@currencyId":"USD","__value__":"36.99"}],"convertedCurrentPrice":[{"@currencyId":"USD","__value__":"36.99"}],"sellingState":["Active"],"timeLeft":["P1DT18H39M25S"]}],"listingInfo":[{"bestOfferEnabled":["true"],"buyItNowAvailable":["false"],"startTime":["2020-12-08T23:27:30.000Z"],"endTime":["2021-01-07T11:27:27.000Z"],"listingType":["FixedPrice"],"gift":["false"],"watchCount":["14"]}],"returnsAccepted":["true"],"condition":[{"conditionId":["1000"],"conditionDisplayName":["New"]}],"isMultiVariationListing":["false"],"topRatedListing":["false"]}]}],"paginationOutput":[{"pageNumber":["1"],"entriesPerPage":["1"],"totalPages":["123191"],"totalEntries":["123191"]}],"itemSearchURL":["https:\/\/www.ebay.com\/sch\/181033\/i.html?_ddo=1&_ipg=1&_pgn=1"]}]}
Once we get that response, we map through it to get all the data for each item, and then we store only what we need in our Context.
What follows is a sample response of the Shopping API :
{"Timestamp":"2021-01-07T08:38:36.468Z","Ack":"Success","Build":"E1157_CORE_APILW_19146596_R1","Version":"1157","Item":{"ItemID":"114481438901","EndTime":"2021-01-25T04:20:46.000Z","ViewItemURLForNaturalSearch":"https://www.ebay.com/itm/Pickaroon-Hookaroon-Great-Tool-Moving-Rolling-Logs-Firewood-3-Handle-Sizes-/114481438901?var=","ListingType":"FixedPriceItem","Location":"Stillwater, Minnesota","PictureURL":["https://i.ebayimg.com/00/s/NjAwWDgwMA==/z/8MoAAOSwh-JeHqTU/$_57.JPG?set_id=8800005007"],"PrimaryCategoryID":"151620","PrimaryCategoryName":"Home & Garden:Yard, Garden & Outdoor Living:Garden Hand Tools & Equipment:Axes & Hatchets","BidCount":0,"ConvertedCurrentPrice":{"Value":39.0,"CurrencyID":"USD"},"ListingStatus":"Active","TimeLeft":"P17DT19H42M10S","Title":"Pickaroon Hookaroon Great Tool For Moving/Rolling Logs & Firewood 3 Handle Sizes","Country":"US","AutoPay":false,"ConditionID":1000,"ConditionDisplayName":"New","GlobalShipping":true}}
To make our project scalable and maintainable, we opted to keep everything related to the style and text inside two files.
All texts and related information is stored inside a file called textData.js. This file contains the text strings that are injected into the code so that they are shown to the final user when the page is loaded.
theme.js, contains everything related to the style (colors, sizes, fonts, etc.).
We decided to take this approach to be able to maintain and update the project in a simpler, easier, and faster way. For most changes that we may need to do in the future, we only need access and edit these two files instead of looking through the huge react architecture to find the correct positioning of the one line of code that needs to be changed.
It took a bit of time to structure these files, but we believe it was worth it and it was a great learning opportunity.
-
The following object can be found inside
textData.jsstarting on line 63, and contains the valueDetailsfor the keydetails:single: { continue: "Continue Shopping", add: "Add to cart", details: "Details", },
In the same manner, you can find another object in
theme.jsstarting on line 3 with a keyprimaryand value"#33A0FF":colors: { primary: "#33A0FF", secondary: "#33A0FF40", light: "#FFFFFF", dark: "#000000", dark2: "#0000007A", grey: "#F0F0F0", red: "#FF0000", },
-
We import both files in the
SingleShopCard.jscomponent on line 3 and 4:import { textData } from "../../../../data/textData"; import { theme } from "../../../../data/theme";
-
Still on
SingleShopCard.js, starting on line 46, we call on aButtoncomponent that is set up to receive props for the text to be displayed and its color, amongst other things.<Button id={id} action={(e) => onClick(e)} size="S" color="primary" text={textData.shop.single.details} />
-
You can clearly see how the props
color="primary"andtext={textData.shop.single.details}come fromtextData.jsandtheme.js -
Now, if we ever want to change the color or the text displayed in this button, we only need to do a small change in a couple of lines of code. The change will be reflected in all instances of that button.
- Clone the repo:
git clone https://github.com/Gabriellji/e-commerce-app.git
- Contact us for guidance on how to get your own API keys.
- Install NPM packages:
npm install
- Enter your API keys in
.env - Run the app in the development mode with
npm start - Open http://localhost:3000 to view it in the browser.
The page will reload if you make edits.
You will also see any lint errors in the console.
We are Yauheniya, Jacopo, Mancini and Carlos, four students of Wild Code School. At the moment these lines are being written, we are attending a "Web developer" Bootcamp that is 5 months long and is teaching us all the technical know-how and knowledge to develop interactive websites using HTML, CSS, JavaScript, so we can take a React and Node JS development project to completion.
After learning the fundamentals of React, we were asked to team up and develop a simple web application with a few constraints. We had to use React for the user interface, use data that would be fetched from an API of our choosing and we had close to 48 hours of effective time, distributed in two months of calendar time. Other than that, we were given free rein to do whatever kind of app that we wanted in whatever style we wanted.
Despite coming from different backgrounds and from all over the world, we became friends very quickly, so we decided to form a team and work together on this project. After brainstorming and discussing, we ended up deciding to do a simple E-commerce web application following the current trends caused by the onset of the COVID-19 pandemic. We dreamed up a whole narrative about us being a Scrum Team working for a fictional company called “Norris Inc.”, and how we were asked to create the web app following a line of reasoning explained in the “Unmet needs” sections.
The project went very well, we were able to work together with little to no conflict and we succeeded in creating the web app that we wanted. We also learned a lot, both in terms of coding know-how and about working on a web development project. We started using Scrum for the project management and we even completed two short sprints but then we decided that it wasn't a good fit for us, as a team of students, and for such a time frame. So, even if we all liked very much to work with Scrum, we decided to switch to Kanban for the final phase of the project. We don't expect to always be switching the project management approach but, in this case, we felt that it was justified and it's also quite normal for students to want to experiment with new things.
All in all, it was a very fun project, we learned a lot from it, and we will all treasure the moments spent together working as a team. We hope that you will like it and if you have any questions, comments or you want to reach us, you can do so thru our...
- Use Scrum as best as possible to manage the project.
- Must use React.
- It has to be some kind of web application that uses data coming from an API.
- Time-boxed: 2 months of calendar time but just ~48 effective hours (We may have worked for a bit more).
- Only 4 students as developers, one acting as a Scrum Master, and another one as a Product Owner.
- No specific boundaries other than the constraints stated above.
We are pretending to be a Scrum team working under a fictional company called “Norris Inc.” that sells workwear through a “direct-to-consumer” business model through an online E-commerce platform. The clothes are made by a third party to our specifications.
The company is located in a small but very populated European city (London) that has a lot of offices and businesses. In this city, there are a lot of environmental regulations that make having a big physical store unfeasible and unpractical. The better option is to ship directly to the consumer but, again, because of regulations and narrow streets it is not possible nor practical to use big trucks.
As a response, Norris Inc. has its own logistic and shipping system that utilizes small warehouses all around the city and a big network of delivery cyclists. Norris Inc. has won all the environmental and business design awards because of this.
The COVID-19 pandemic has a lot of people confined in their homes. This has been going on for some time now and will not change in the foreseeable future because people in the city don’t trust Putin’s vaccine and also have taken a liking to stay at home with their cats, Netflix, wine, food, and pajamas. This is exactly what has disrupted our business model. Simply put, our customers no longer need work clothes to wear around the office because they are working from home in their cat hair covered pajamas.
The folks in the marketing department saw that we now have an underutilized logistic and shipping system and also that a lot of small shop owners around the city are trying to sell their products to customers that no longer go to their physical stores because they are not leaving their houses as much. These shops owner’s unmet need is our opportunity, Norris Inc. can provide the shipping service and charge for that.
But then there is a second unmet need, turns out that most of these local stores around town have always sold from physical locations and have never needed (or wanted) to sell online until now. The pandemic is forcing everyone to adapt to this new world where nobody leaves the house. So, here again, the marketing Department saw an opportunity. Since Norris Inc. already knows how to sell online, because that is what we do, we can also help the stores around the city to do it. This means that we have to provide an E-commerce platform for these shops and we can also charge for this.
A third unmet need is that a lot of these small shops around the city pride themselves in offering top-notch customer service and a lot of after-sale service. They do it because they have cultivated a very long relationship with their clients. There are a lot of cases where a clientele has been shopping for the same products in the same shop for years and years. So, if we want to host these shops under our E-commerce platform, we must also provide a way for the customer service and after-sale service to happen. We have been told that meeting this “need” is paramount to the success of the project.
- Learn to work in a team.
- Learn about Scrum methodology or at least the Agile approach.
- Learn to use React.
- Make a simple but beautiful E-commerce web application.
- Have fun.
- 60 years old (old timer, old school).
- Born in the pre-internet era (boomer?).
- Does not know how to use technology that well so he/she has the habit of asking family members for help and calling customer service for assistance and guidance.
- Knows about eBay, Amazon, Etsy, and other E-commerce websites from newspaper articles and other family members and friends but does not use them or care about them particularly. He/she finds them too difficult to use, too crowded (information overload), and not user friendly especially because those sites don't have a number where you can call to get personalized assistance.
- Uses social media, particularly Facebook.
- He or she is a retiree so lots of disposable income (translation: not particularly looking for good deals but for quality products and specific products that he/she likes for whatever reason).
- Has a credit card but also likes to pay cash and to give tips.
- Struggles to use a smartphone.
- Has a smartphone but maybe with a small screen or it's an old model.
- Also has a desktop/laptop PC but it's an old one with a small screen that is used primarily for Facebook and emails.
- Lives in the outskirts, probably in a posh city area with very good pedestrian infrastructure and local shops so he/she is used to a ~15 min leisurely walk to the local shops.
- Has been going to the same shops for 20 years so he/she still wants to keep buying from them
- Currently cannot leave the house because of quarantine.
- Still wants to shop in the usual places but doesn't know how to do it through the internet.
- Small local store, been there since forever.
- Family owned store.
- “Brick and mortar”.
- Does not sell food or other perishable items.
- Sells technology, clothes, toys, small electronics, small household appliances, etc.
- Because of the pandemic they can't sell in person, so to keep the business they want to sell online but they don't know how to do it.
- Provides a lot of after-sale service and customer service.
- Has an established clientele.
- Does not have warehouses or shipping services so there is trepidation about selling online.
Since we were given very broad guidelines, we had to spend some time deciding what we want to do and how. During our initial brainstorming meeting, we kept circling back to an E-commerce application that would be used to sell something: flights? trips? clothes? pet food, supplies, and services? This was done in a conference call using a Google Jamboard for quickly jotting down ideas.
On a second meeting, we decided to try and figure out what would be our motivation, or justification for the project, which meant that we had to also figure out who we are in this scenario. This is where things started to get interesting and the idea kind of revealed itself to us (not unlike in a Scrum managed project, mind you). Then, we did a Joint Application Development (JAD) session to clearly define the need for the project (benefits, opportunities, problems, risks, etc.) and the scope (constraints, assumptions, success factors, etc.). We used the same tools as last time.
Finally, just to “iron out the details”, we met again and made some critical decisions about the personas that the project would be targeting, laid out epics and user stories, and prioritized them using the MoSCow methodology. For this, we switched to Google Slides and Mira. All of this sounds like a lot of work but it took place in only two days and it allowed us to work with very clear objectives and purposes.
When it was time to begin working, we realized that we were not completely comfortable with Scrum so after talking about it we decided to run what we called a “mock sprint” with one team member acting as a "Scrum Master" and another one as a "Product Owner".
This "mock sprint" basically was a Sprint with a very small set of user stories that could be done in a couple of days. We started working without expecting very much of the result but trying to pay attention to the impediments and other kinds of issues. This ended up being a very smart decision because it allowed us to see some fundamental issues with our project idea and correct our workflow and behavior to better match the agile principles.
With the lessons learned from the “mock sprint” (laid out in a retrospective meeting), we quickly did a sprint planning session, poker planning, etc. and we started to work with complete confidence in our idea. This worked so well that the only real impediment we had from that point forward was scrum itself. The cost of adhering to the ceremonies, user story format, etc. started to be bigger than the benefits we were getting. In the context of the Bootcamp, this project is supposed to be a learning tool before getting to more serious projects. That’s why the allotted time was very short.
At the end of that second sprint, we decided to experiment with a leaner and faster project management approach. In truth, we were hesitant to do such a drastic change in the middle of the project, but we also believed that, as students, we are supposed to try and experiment so we can learn from different sources. Also, it could be argued that we were organically following Agile principles: welcoming change, simplicity, result-oriented, etc. Again, this decision proved to be a smart one because we started to work a lot faster.
We used Jira as our main tool to assist in the project management and Confluence to store and access all the documentation being produced (master project document, meeting notes, design guidelines, etc.) and Slack together with Google Meet as our platform for communication.
These are the epics that we defined for our project. Because of time constraints and the actual scope of the exercise, we weren't able to do all of them but we believe it's interesting to see the full extent of our idea.
- As a buyer, I want to be able to pay for the products I selected so I can buy them
- As a seller, I want to access information about the payments I have received from my customers so I can use them for various purposes (accounting, marketing, inventory, etc.).
- As a buyer, I want to be able to get customer service and after-sale service through the website, so I keep shopping in the same places I did before the pandemic.
- As a seller, I want to access information about the buyers so I can give them after-sale service.
- As a buyer, I want to be able to write reviews about the shops and their after-sales service so other potential shoppers can know what are the best stores.
- As a buyer, I want to be able to log into the webpage so I can have a more personalized experience.
- As a seller, I want to be able to log into the webpage so I can update and maintain my store and access useful information.
- As a seller, I want to implement marketing strategies in my shop so I can sell more products and earn more money.
Norris Inc. customers are mainly old people, as per what we decided in our brainstorming sessions and JAD sessions.
This forced us to adhere to the following guidelines for the front-end part of the web application:
- Clean, minimal, and lightweight design.
- Easy-to-use.
- Clean and straight-forward UX, every action from users will have an immediate and easy-to-understand response.
Starting from the firsts mock-ups, our team observed a trend: every element (button, block of text, etc.), probably because of its inherent simplicity, was always repeated multiple times. The natural corollary to this finding was that the atomic design approach was our best option going forward.
Then, a lot of questions were raised: “Which combination of colors do we want to use?”, “What font(s)?”, "How big should the buttons be?", etc. Because we don't have a UX/UI professional in our team, the easiest way for us to answer this is to try, experiment and see what works, what looks appealing. As it happens, the atomic design approach allows you to have more flexibility and lets you change things very quickly, with minimal coding cost and throughout all stages of production.
Even better, because of this approach, everything is designed and coded for scalability, maintainability, and changeability.
Main elements defined with the atomic design approach in the wireframing stage (software used: Figma):

theme.js file (with Styled Components for CSS handling for React Components) with all variables defined:

Pros of step 1:
- Code is clean, scalable, and easy to understand.
- Creating and styling an element is easy and fast.
- Code is maintainable, if we receive a request to change something we can perform a change in seconds (ex.: “Change primary color to #447FF2”; “Change font-size to 10px instead of 8px”).
Con’s:
- Following the atomic design approach and setting everything up takes more work compared to standard styling.
UI’s & UX’s note:
- We used only one main color for enhanced UX, all elements will be made with combinations of one color plus white or black, and an opacity value.
- One single font.
- Standard typography space with a font size of 8 pixels.
- In desktop view, user and app interactions will be made with modals instead of moving to another page.
- 3 viewports with media breaks at 450px and 768px.
- Animation transitions set to ¼ of seconds for all interactive elements.
Atoms are the bread-and-butter of our projects. Every component is made from scratch because we opted not to use premade UI (like “MaterialUI”).
We started with SaSS for CSS styling but, after a couple of days, we switched to Styled Components.
Why Styled Components?
Styled Components allow us to pass props to every single “atom” and style them with normal javascript which also means that adding logic to it becomes trivial. As such, the only limits are our imaginations.
As students, not yet professionals, we were amazed by this library and its possibilities. Also, the Styled Components approach fits nicely with our main goal.
An "atom" from our project:

This button can receive props for style (like: size, type, width), but also for actions and the onClick trigger.
Atoms called with passing and passed props:

Pros of step 2:
- Code consistency, every atom has the same structure and can be called with the same workflow.
Cons:
- Atom components look scary at first view because they are very long blocks of code.
UI’s & UX’s note:
- Components like buttons and links have a hover effect with little animations for better UX. Many atoms have border-radius for soft and clean visualization.
Time for some atoms recipes! 🍱 😋
This is the moment where the atomic design approach and Styled Components shine: mounting the molecules was fast and easy with all the work we made in previous steps. In both the wireframing and coding stages, this step was the easiest.
In both the wireframing and coding stages, this step was the easiest.
A molecule at the wireframe stage:

The same molecule, coded and displayed by a browser:

Pros of step 3:
- Very fast workflow for creating a molecule.
- Code consistency thanks to atoms.
- Easy to maintain, particularly when there are multiple team members.
Cons:
- None, this is where atomic design shines 😎.
UI’s & UX’s note:
- Components like cards have a hover effect with little animations for better UX.
- Many molecules have border-radius for soft and clean visualization.
- Navbars change from mobile and tablet to desktop view.
😅 Last step for our project. The pages are made by molecules and atoms:
Home page, composed of 3 molecules:

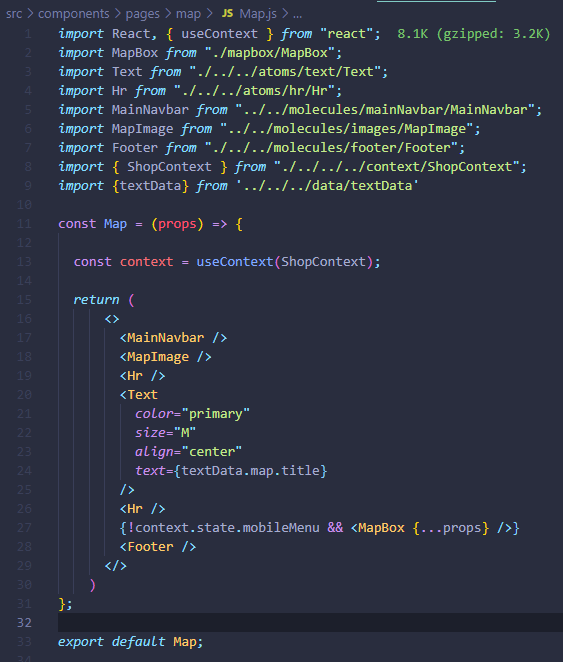
Map page, composed of molecules and atoms:
Pros of step 4:
- Easy to make, maintainable pages.
- Clean code (home page is 13 lines long).
Cons:
- Same as in step 3: no cons 😎.
The atomic design approach and Styled Components were not easy to use at first, scary-looking even. However, as students, it's our duty to learn and practice a lot of different things, without fear of the unknown.
This approach gave us the possibility to write clean and professional code and was an awesome learning opportunity.
In our project, we decided to follow these guidelines for Git and GitHub.
- Small and frequent commits, to be able to find any problem facilitate the handling of any problem that may arise.
- Commits with a significant name about the feature it’s implementing.
- Branches with a significant name about the feature that is being worked on.
- Pull requests done often (with working branches of course), to make sure that everyone in the team is working on the same version.
- Pull requests have to be reviewed and approved by at least one person before being merged into the main branch.
See the LICENSE file for license rights and limitations (MIT).