Vehicle Detection Project
The goals / steps of this project are the following:
- Perform a Histogram of Oriented Gradients (HOG) feature extraction on a labeled training set of images and train a classifier Linear SVM classifier
- Optionally, you can also apply a color transform and append binned color features, as well as histograms of color, to your HOG feature vector.
- Note: for those first two steps don't forget to normalize your features and randomize a selection for training and testing.
- Implement a sliding-window technique and use your trained classifier to search for vehicles in images.
- Run your pipeline on a video stream (start with the test_video.mp4 and later implement on full project_video.mp4) and create a heat map of recurring detections frame by frame to reject outliers and follow detected vehicles.
- Estimate a bounding box for vehicles detected.
Rubric Points
The code for this step is contained in the file ExtractFeatures.py with the class ExtractFeatures. The class contains six methods for handling the extracting features process. In the following I describe some of the key methods.
- Constructor in which the parameter for the extraction process are defined
    def __init__(self, color_space='YCrCb', spatial_size=(32, 32), hist_bins=32, orient=9,
                     pix_per_cell=8, cell_per_block=2, hog_channel='ALL', spatial_feat=True, hist_feat=True,
                     hog_feat=True, vis=False, feature_vec=True):

        self.color_space = color_space
        self.spatial_size = spatial_size
        self.hist_bins  = hist_bins
        self.orient  = orient
        self.pix_per_cell  = pix_per_cell
        self.cell_per_block  = cell_per_block
        self.hog_channel  = hog_channel
        self.spatial_feat  = spatial_feat
        self.hist_feat  = hist_feat
        self.hog_feat  = hog_feat
        self.vis = vis
self.feature_vec = feature_vec- The
extract_featuresmethod controls which features are extracted and returns the feature vector for the given image
    def extract_features(self, image):
        file_features = []

        if self.spatial_feat == True:
            spatial_features = self.bin_spatial(image, self.spatial_size)
            file_features.append(spatial_features)
        if self.hist_feat == True:
            hist_features = self.color_hist(image, nbins=self.hist_bins)
            file_features.append(hist_features)
        if self.hog_feat == True:
            # Call get_hog_features() with vis=False, feature_vec=True
            if self.hog_channel == 'ALL':
                hog_features = []
                for channel in range(image.shape[2]):
                    hog_channel_features = self.get_hog_features(image[:,:,channel], self.orient, self.pix_per_cell, self.cell_per_block, vis=self.vis, feature_vec=self.feature_vec)
                    hog_features.append(hog_channel_features)
                hog_features = np.ravel(hog_features)
            else:
                hog_features = self.get_hog_features(image[:,:,self.hog_channel], self.orient, self.pix_per_cell, self.cell_per_block, vis=self.vis, feature_vec=self.feature_vec)
            # Append the new feature vector to the features list
            file_features.append(hog_features)
return np.concatenate(file_features) #.reshape(1, -1)- The methods
get_hog_features,bin_spatialandcolor_histare performing the concrete feature extraction
    # Define a function to return HOG features and visualization
    def get_hog_features(self, img, orient, pix_per_cell, cell_per_block, vis=False, feature_vec=True):
        if vis == True:
            # Use skimage.hog() to get both features and a visualization
            fd, hog_image = hog(img, orientations=orient, pixels_per_cell=(pix_per_cell,pix_per_cell),
                        cells_per_block=(cell_per_block,cell_per_block), visualise=vis, feature_vector=feature_vec)
            features = fd
            hog_image = hog_image
            return features, hog_image
        else:
            # Use skimage.hog() to get features only
            return hog(img, orientations=orient, pixels_per_cell=(pix_per_cell,pix_per_cell), cells_per_block=(cell_per_block,cell_per_block), visualise=vis, feature_vector=feature_vec)

    # Define a function to compute binned color features
    def bin_spatial(self, img, size=(32, 32)):
        features = cv2.resize(img, size).ravel()
        return features

    # Define a function to compute color histogram features
    def color_hist(self, img, nbins=32, bins_range=(0, 256)):
        # Compute the histogram of the color channels separately
        channel1_hist = np.histogram(img[:,:,0], bins=nbins, range=bins_range)
        channel2_hist = np.histogram(img[:,:,1], bins=nbins, range=bins_range)
        channel3_hist = np.histogram(img[:,:,2], bins=nbins, range=bins_range)
        # Concatenate the histograms into a single feature vector
        hist_features = np.concatenate((channel1_hist[0], channel2_hist[0], channel3_hist[0]))
        # Return the individual histograms, bin_centers and feature vector
        return hist_features
In the following table I visualized some example images with the corresponding hog features. The parameters are: orient = 9 pix_per_cell = 8 cell_per_block = 2.
| Non Car Images | Car Images |
|---|---|
 |
 |
 |
 |
In the file SvmClassifier.py I handle the training and prediction with a Supported Vector Machine. At the Constructor I initialize a StandardScaler. The scaler transformation method is used for each passed feature vector. For the training stage I used a StratifiedShuffleSplit with ten splits. So the SVM with the best score is stored and will be used for prediction. The SVM is trained with the probability flag true so it is possible to get probabilities for each prediction.
class SvmClassifier(object):
    """description of class"""

    def __init__(self):

        self.x_scaler = StandardScaler()
        self.svm = None

    def train(self, X, y, n_splits = 10, test_size = 0.5, random_state=0):

        self.x_scaler.fit(X)
        scaled_X = self.x_scaler.transform(X)

        acc = 0
        sss = StratifiedShuffleSplit(n_splits=n_splits, test_size=test_size, random_state=random_state)
        for train_index, test_index in sss.split(scaled_X, y):
            X_train, X_test = scaled_X[train_index], scaled_X[test_index]
            y_train, y_test = y[train_index], y[test_index]

            temp_svm = SVC(probability=True)
            temp_svm.fit(X_train, y_train)

            score = round(temp_svm.score(X_test, y_test), 4)
            print('Test Accuracy of SVC = ', score)
            if score > acc:
                acc = score
                self.svm = temp_svm

    def predict(self, X):

        scaled_X = self.x_scaler.transform(X)
        return self.svm.predict(scaled_X)

    def predict_probability(self, X):

        scaled_X = self.x_scaler.transform(X)
return self.svm.predict_proba(scaled_X)First I extracted the features for each image in the cars and not cars folder and trained an probabilistic support vector machine with the above described methods. In the file train_svm.py which is described below are the classes ExtractFeatures and SvmClassifier called.
images = glob.glob('test_images/vehicles_smallset/*/*.jpeg', recursive=True)
cars = []
notcars = []

for image in images:
    if 'image' in image.split("\\")[-1] or 'extra' in image.split("\\")[-1]:
        notcars.append(image)
    else:
        cars.append(image)

# Feature extraction
extractFeatures = ExtractFeatures()
car_features = extractFeatures.extract_features_from_paths(cars)
not_car_features = extractFeatures.extract_features_from_paths(notcars)

#X = np.vstack((car_features, not_car_features)).astype(np.float64)
X = np.vstack((car_features, not_car_features)).astype(np.float64)
y = np.hstack((np.ones(len(car_features)), np.zeros(len(not_car_features))))

# train classifier
svm = SvmClassifier()
svm.train(X,y)
To find the best parameter I performed a grid search.
for colorspace in ['RGB', 'HSV', 'LUV', 'HLS', 'YUV', 'YCrCb']:
    for pix_per_cell in [8, 16]:
        for cell_per_block in [1, 2, 3]:
            for hog_channel in [0, 1, 2,'ALL']:
                for use_hog_feat in [True, False]:
                   for use_hist_feat in [True, False]:
                      for use_spatial_feat in [True, False]:
This very time consuming process resulted in an accuracy of 99.91% with the parameter color_space='YCrCb', spatial_size=(32, 32), hist_bins=32, orient=9, pix_per_cell=8, cell_per_block=2, hog_channel='ALL', spatial_feat=True, hist_feat=True, hog_feat=True

Finally I saved the class used for feature extraction and classification to a pickle file. For later classification I load this combination to make sure I use the same parameter as I used for the training stage.
extracted_features_and_svm = {"svm":svm, "extractFeatures":extractFeatures}

with open('extracted_features_and_svm.pk', 'wb') as pickle_file:
pickle.dump(extracted_features_and_svm, pickle_file)The code for the image pyramid and the sliding window is located a the file ExtractCars.py
    def sliding_window(self, image, stepSize, windowSize):
        # slide a window across the image
        for y in range(0, image.shape[0], stepSize):
            for x in range(0, image.shape[1], stepSize):
                # yield the current window
                yield (x, y, image[y:y + windowSize[1], x:x + windowSize[0]])

    def pyramid(self, image, scale_steps=[1,2]): # 1.5,2,2.5

        for scale in scale_steps:
            imshape = image.shape
            image = cv2.resize(image, (int(imshape[1] / scale), int(imshape[0] / scale)))
            # yield the next image in the pyramid
            yield image, scale
I cropped the search area to y position 350 to 650 to reduce the search window and increase the processing speed. The window size is 64 which is defined by the size of the training images. The step size is 18 which is a very small value. However, with larger step sizes I had problems finding cars on the right corner of the image. To find cars a different scales I used a image pyramid which scales the image by the factor two in the second iteration.

The file ExtractCars.pywith the contained class ExtractCars is initialized with a search area (400,600), a window size (64,64), the class for the feature extraction and the class that contains the trained classifier. The method extract_cars performs the classification pipeline.
- Cropping the image to the passed search area
sub_image = img[self.search_area[0]:self.search_area[1], :, :]- Scale the image according to the pyramid and slide the search window accross the iamge
for layer, scale in self.pyramid(sub_image):
for (x, y, window) in self.sliding_window(layer, stepSize=stepSize, windowSize=(self.windowSize[0], self.windowSize[1])):- Extract features for the image patch
features = self.feature_extractor.extract_features(window) - Perform the prediction for the image patch with the probabilistic SVM
prediction = self.classifier.predict_probability(features.reshape(1, -1))- Update the heatmap with the prediction result probability at the area of the current window.
heatmap[int(y*scale):int((y + self.windowSize[1])*scale),int(x*scale):int((x + self.windowSize[0])*scale)] += prediction[0][1]| Heatmap |
|---|
 |
 |
- Post Processing and filtering The heatmap is thresholded with a value of three to reduce false positives and dilated the result to remove small gaps between the hot areas. Finally I extract the contours to draw the bounding rectangle.
        kernel = np.ones((5,5),np.uint8)
        _, thresh_image = cv2.threshold(heatmap.astype(np.uint8),3,255,cv2.THRESH_BINARY)
        thresh_image = cv2.dilate(thresh_image,kernel,iterations=5)
        im2, contours, hierarchy = cv2.findContours(thresh_image,cv2.RETR_LIST,cv2.CHAIN_APPROX_SIMPLE)
        for c in contours:
            (x, y, w, h) = cv2.boundingRect(c)
cv2.rectangle(sub_image_ori, (x, y), (x + w, y + h), (0, 255, 0), 2)The pipeline described above worked well but had a major drawback. It was to slow for effective use with around 5 to 10 seconds per frame.
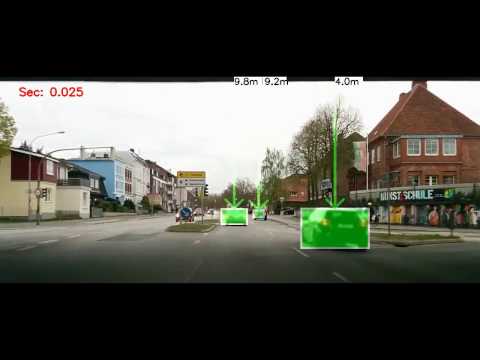
Because I knew the performance draw back in advance I did not spend too much time on performance and speed optimisation. Instead, I used basically YOLO a real time object detection system for which I found a working Keras portation. I used this portation as a starting point and extended the implementation with an additional feature to estimate the object distance from the camera. Therefore, I trained an additional network network with a final dense layer which predicts the real object height. The used network architecture is basically the same as for the CarND-Behavioral-Cloning project but instead of a steering angle I used the car's height as y and pictures downloaded from google. This code is not part of my submission due to license restrictions.
| Layer (type) | Output Shape |
|---|---|
| conv2d_1 (Conv2D) | (None, 17, 80, 16) |
| elu_1 (ELU) | (None, 17, 80, 16) |
| conv2d_2 (Conv2D) | (None, 9, 40, 32) |
| elu_2 (ELU) | (None, 9, 40, 32) |
| conv2d_3 (Conv2D) | (None, 5, 20, 64) |
| flatten_1 (Flatten) | (None, 6400) |
| dropout_1 (Dropout) | (None, 6400) |
| elu_3 (ELU) | (None, 6400) |
| dense_1 (Dense) | (None, 512) |
| elu_4 (ELU) | (None, 512) |
| dense_2 (Dense) | (None, 1) |
The distance can be calculated with the predicted height by the following formula which is described at thispage.
distance = (predicted_real_car_height * 29.4 / np.abs(object_height_in_pixel)) * 10The following video was taken with my Nexus 5 placed on the dashboard of my car. The implementation was run on my local GTX 1070.