A project made in Rasa with the necessary configurations for the construction of a large chatbot project.
This project was based on Tais.
Various technologies are used in boilerplate that interact with each other to obtain a better result. See the implemented architecture:
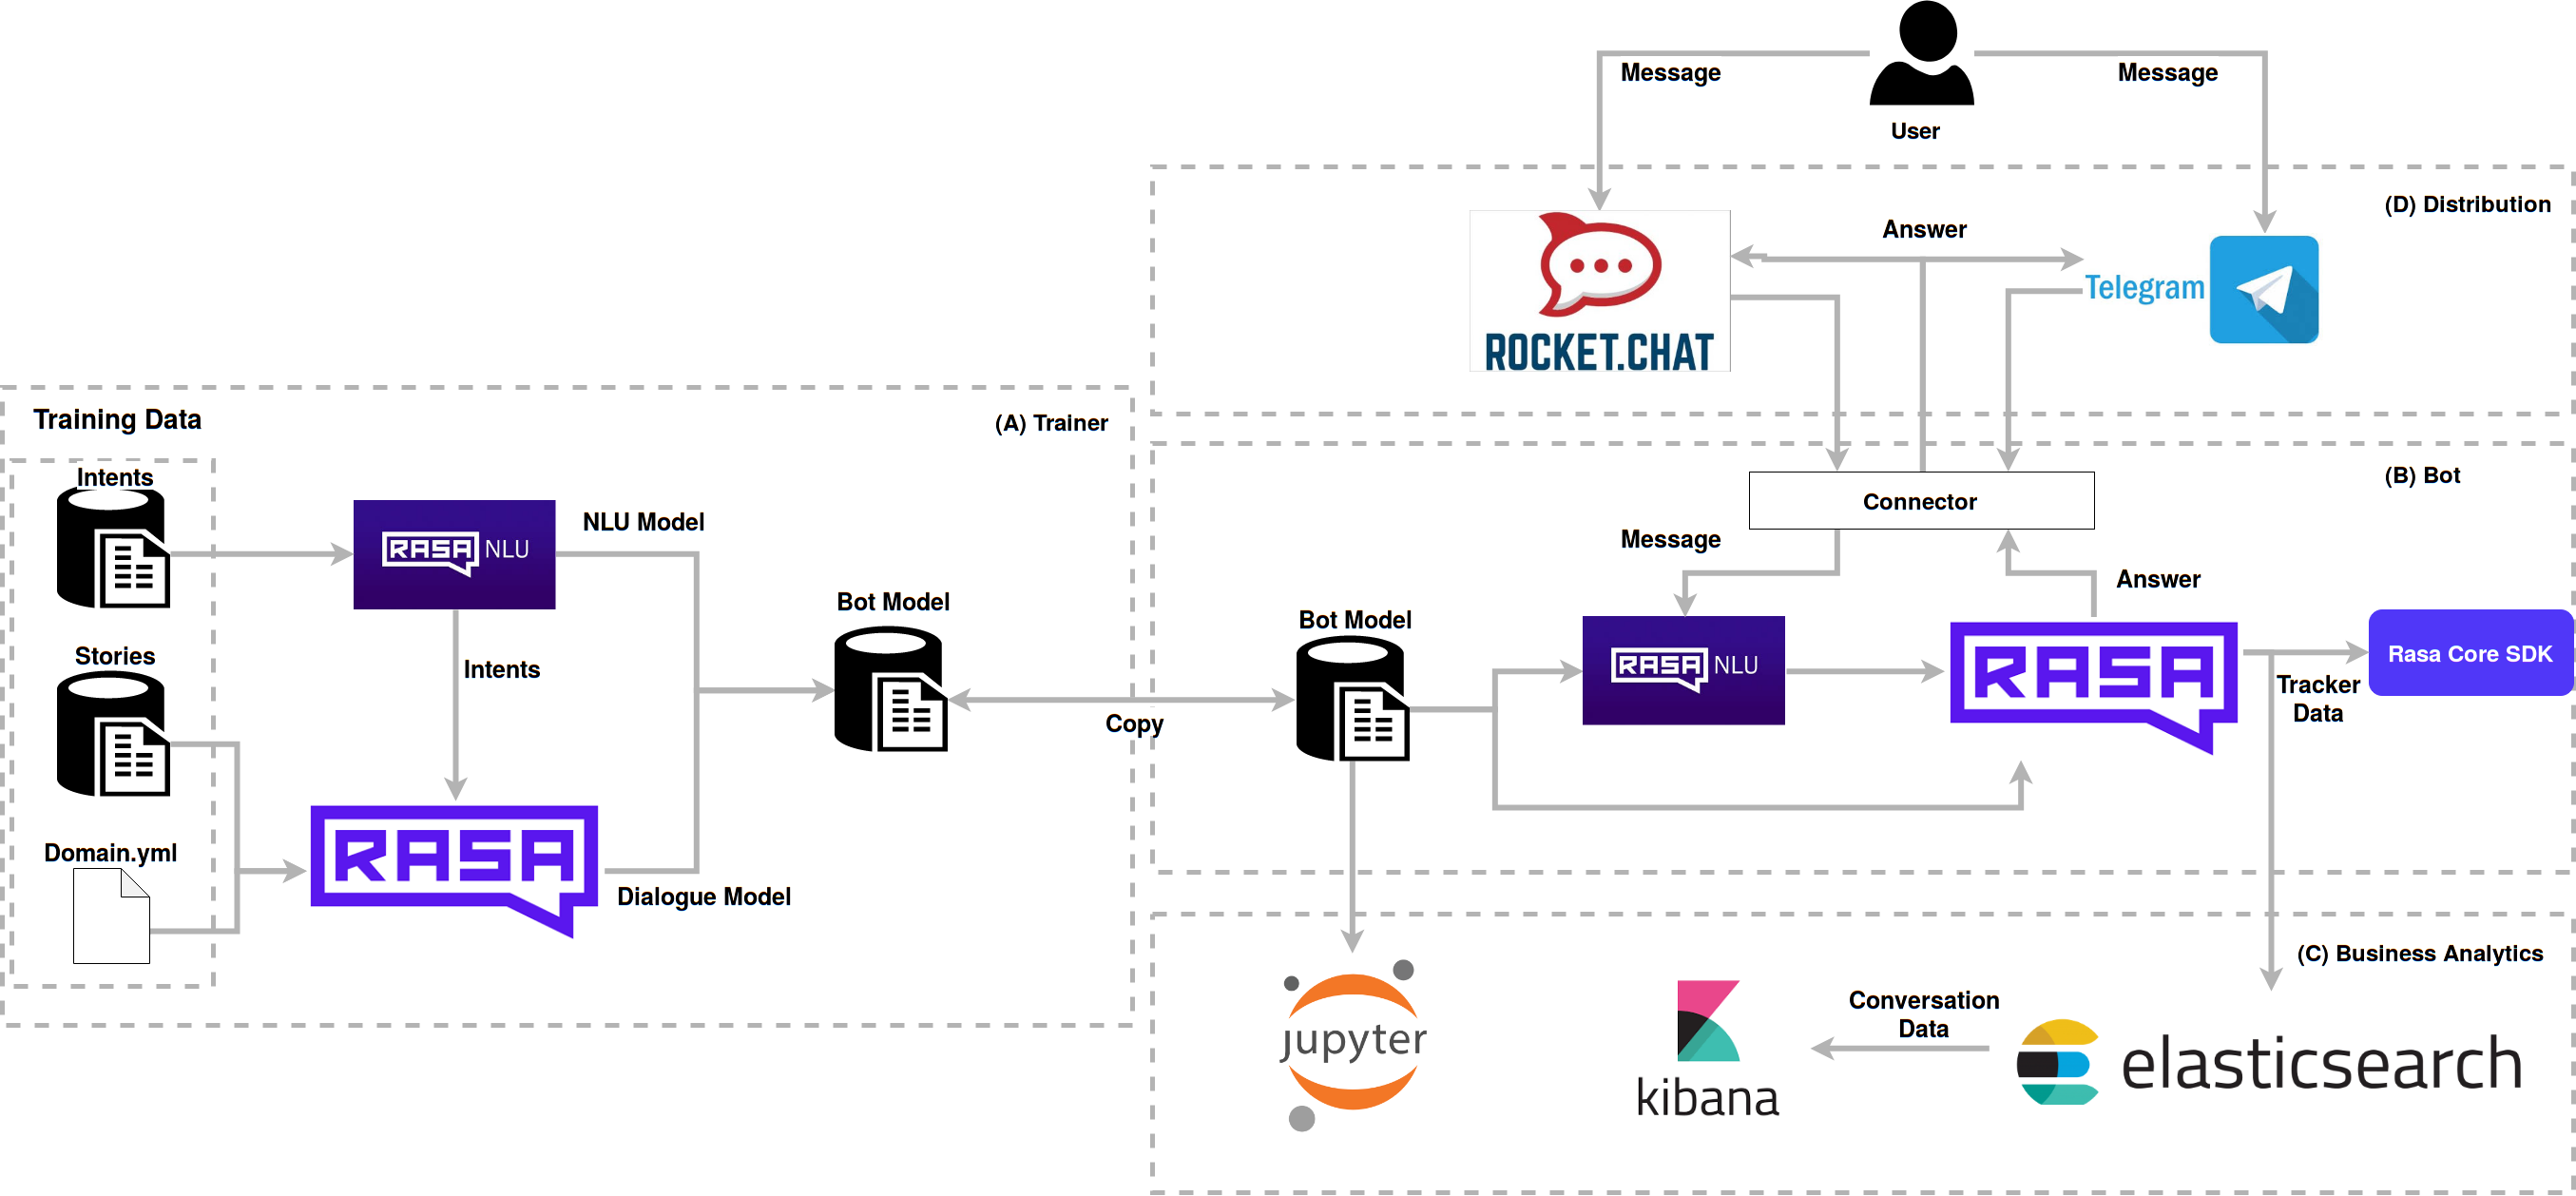
The user interacts with Boilerplate via RocketChat or Telegram, which sends the messages to the Rasa NLU via connectors, where it identifies the intent, and responds to the Rasa Core, according to stories and actions. The models used for the conversation were generated by the trainer module and then transferred to the bot, these models can be versioned and evolved between bots. Notebooks evaluate the operation according to the format of intents and stories. Elasticsearch collects data from the conversation and stores it for the analysis done by kibana, which generates charts for evaluation of user conversations and boilerplate.
This script has been configured to build the generic images needed to run this environment. If your project uses this boilerplate and goes to perform continuous or similar integration, it is interesting create a repository for the images and replace the names of the "bot", "coach" and "requirements" their respective new images, for example "/bot" in a public repository.
sudo docker-compose up -d rocketchat
# wait 3 minutes for the rocketchat to finish rising
sudo docker-compose up bot
For the virtual assistant to start the conversation you must create a trigger.
To do this, enter the rocketchat as admin, and go to the Livechat panel at
In the Triggers section, click New Trigger. Fill in the Trigger as follows:
Enabled: Yes
Name: Start Talk
Description: Start Talk
Condition: Visitor time on site
    Value: 3
Action: Send Message
 Value: Impersonate next agent from queue
 Value: Olá!
The http://localhost:8080/ value should be the Bot access URL.
To run the bot on a website you need to enter the following Javascript in your page
<!-- Start of Rocket.Chat Livechat Script -->
<script type="text/javascript">
// !!! Mudar para o seu host AQUI !!!
host = 'http://localhost:3000';
// !!! ^^^^^^^^^^^^^^^^^^^^^^^^^^ !!!
(function(w, d, s, u) {
    w.RocketChat = function(c) { w.RocketChat._.push(c) }; w.RocketChat._ = []; w.RocketChat.url = u;
    var h = d.getElementsByTagName(s)[0], j = d.createElement(s);
    j.async = true; j.src = host + '/packages/rocketchat_livechat/assets/rocketchat-livechat.min.js?_=201702160944';
    h.parentNode.insertBefore(j, h);
})(window, document, 'script', host + '/livechat');
</script>
<!-- End of Rocket.Chat Livechat Script -->Attention: You need to change the host variable within the above code to the url of the site where you will be
your Rocket.Chat.
To carry out this process, it is recommended to create a Telegram Bot to get all the necessary information.
To run the stack of the bot by the Telegram together with the attached services, it is necessary to comment the part related to Rocket.Chat and uncomment the service related to the telegram bot.
After that, you need to use ngrok to expose a certain port to be used by the Telegram.
When downloading, just run it using the following command:
./ngrok http {used port}
Attention: The Telegram connector is using port 5001 by default. If you want to change, just change the port used by the in the Makefile.
When running, a link will be generated where it will be used to retrieve all information obtained by Bot's webhook by the Telegram, similar to this link:
Example:
https://283e291f.ngrok.io
Configure all necessary information in the docker-compose to integrate the created telegram bot:
- TELEGRAM_ACCESS_TOKEN={token from BotFather}
- VERIFY={bot username}
- WEBHOOK_URL={ngrok link}/webhooks/telegram/webhook
To execute only the bot service for the telegram, use the following command:
If you have not yet trained your bot run the following command first:
make trainAttention: the command "make train" run a container dock, in case I need sudo on your computer To run the docking window, use the "sudo make train".
Then run the bot on the telegram:
sudo docker-compose up telegram_botmake train
sudo docker-compose run --rm bot make run-consolemake train
sudo docker-compose run --rm coach make train-online
sudo docker-compose run --rm -v $PWD/analytics:/analytics bot python /analytics/setup_elastic.py
sudo docker-compose up -d elasticsearch
Remember to set the following environment variables in the docker-compose file.
ENVIRONMENT_NAME=localhost
BOT_VERSION=last-commit-hash
sudo docker-compose up -d kibana
You can access kibana at locahost:5601
Lift the 'notebooks' container
docker-compose up -d notebooksAccess the notebook at localhost:8888
sudo docker-compose up -d rocketchat

sudo docker-compose up -d kibana
sudo docker-compose run --rm -v $PWD/analytics:/analytics bot python/analytics/setup_elastic.py

sudo docker-compose up -d botPart of the technical documentation for the Tais framework is
repository wiki. If you can not find your answer, open an issue
with a duvida tag that we will try to respond to as quickly as possible.
If you have any questions regarding Rasa, please see the telegramm group Telegram Rasa Stack Brasil, we're there to help too.
See more contact information on our website: https://lappis.rocks
The entire boilerplate framework is developed under license GPL3
See a list of license dependencies here