Skip to content
New issue

Have a question about this project? Sign up for a free GitHub account to open an issue and contact its maintainers and the community.

By clicking “Sign up for GitHub”, you agree to our terms of service and privacy statement. We’ll occasionally send you account related emails.

Already on GitHub? Sign in to your account

How to set up a Jenkins master node from scratch. #6

Open
hcho3 opened this issue Nov 23, 2019 · 7 comments
Open

How to set up a Jenkins master node from scratch. #6

hcho3 opened this issue Nov 23, 2019 · 7 comments

Comments

@hcho3
Copy link
Owner

hcho3 commented Nov 23, 2019

Eventually, I want to set up a script to set up a Jenkins master node automatically. Probably I'll want to set up a Dockerfile along with an entry script. But first I should document all steps.

The following sections describe all steps I took to set up a new Jenkins master node from scratch.

Launch an EC2 instance to host the Jenkins master

  1. Pick a cloud region and launch a new t3.large instance. Currently, we use us-west-2 (Oregon). This instance will house the Jenkins master.
  2. Choose Ubuntu 18.04 LTS as the OS. Assign a large storage (60 GB).
  3. Add the master to the following security groups: jenkins-master (opens 80/443 ports to the world); jenkins-ssh (opens port 22 to the world); and XGBoost-CI-Fleet (opens all ports to other EC2 instances in the same security group).
  4. Associate a public IP with the master instance. This will ensure that the instance will be reachable with a consistent IP. The domain name (xgboost-ci.net) is then associated with this IP address.
  5. Now establish a SSH connection with the master instance. (If the instance is not reachable, check Step 3.) Provided Step 4 is performed properly, I should be able to run ssh -i <private key> ubuntu@xgboost-ci.net. Note: we'll always use the ubuntu user when logging into the master node.
  6. (Optional) To allow SSH access from other person(s) to the master instance, add their public key to .ssh/authorized_key file. See this link for more details.

Install system packages and set up Nginx + Jenkins

  1. First perform system update by running sudo apt-get update && sudo apt-get upgrade. Then reboot the machine (sudo reboot). Wait a while and re-establish the SSH connection.
  2. Install Python and Git: sudo apt-get install python3 python3-pip git. Install AWS CLI by running pip3 install awscli.
  3. Install Docker by following the document Get Docker CE for Ubuntu. Make sure to also follow Linux post-install step, to enable the ubuntu user to use Docker.
  4. Install Nginx by performing the following in order:
    i. Run sudo ufw allow OpenSSH and then sudo ufw enable.
    ii. Then follow the instructions in How To Install Nginx on Ubuntu 18.04. Follow "Step 5 – Setting Up Server Blocks" as well.
  5. Install Java, since Jenkins is written in Java for the most part. sudo apt-get install openjdk-8-jdk-headless.
  6. Install Jenkins by following instructions found in How To Install Jenkins on Ubuntu 18.04. Note that for this step, I add port 8080 temporarily to the security group jenkins-master. I will remove it once the reverse proxy is set up. Once you can access the web page http://xgboost-ci.net:8080 and follow the Jenkins setup wizard.
  7. Obtain and install SSL certificate from Let's Encrypt: How To Secure Nginx with Let's Encrypt on Ubuntu 18.04
  8. Set up reverse proxy, so that we can access the Jenkins webpage using port 443 (HTTPS). Follow How To Configure Jenkins with SSL Using an Nginx Reverse Proxy on Ubuntu 18.04.
  9. If everything went well, I should be able access Jenkins at https://xgboost-ci.net.
  10. Close port 8080, so that port 8080 is now only reachable from the reverse proxy. The reverse proxy redirects all traffic from port 443 (HTTPS) to port 8080.
    i. Connect to master instance via SSH and run sudo ufw delete allow 8080.
    ii. Go to the EC2 console and edit the security group jenkins-master to remove 8080 from the list of open ports.

Configure Jenkins

  1. Access the web interface for the Jenkins master at https://xgboost-ci.net. Then navigate to the menu Manage Jenkins > Manage Plugins. Install the following plugins:
  • GitHub Authentication
  • Blue Ocean
  • Authorize Project
  • Pipeline: AWS Steps
  • Artifact Manager on S3
  • GitHub Commit Skip SCM Behaviour
  • Job and Stage monitoring
  1. Set up Github authentication, so that users can log in using GitHub credentials. Navigate to Manage Jenkins > Configure Global Security. Under Access Control > Security Realm, select Github Authentication Plugin. The form titled "Global GitHub OAuth Settings" should now be visible. The form asks for Client ID and Client Secret, which should be obtained from OAuth Apps. After filling in Client ID and Client Secret, click the Save button. To activate GitHub auth, log out and log back in.
  2. In the same page titled Configure Global Security, navigate to Access Control > Security Realm, and select Github Authentication Plugin again. This time, we need to make a change in Access Control > Authorization. The default has been "Logged-in users can do anything"; change it to "Matrix-based security". You should then get a table full of checkboxes:

Screen Shot 2019-11-23 at 9 51 36 AM

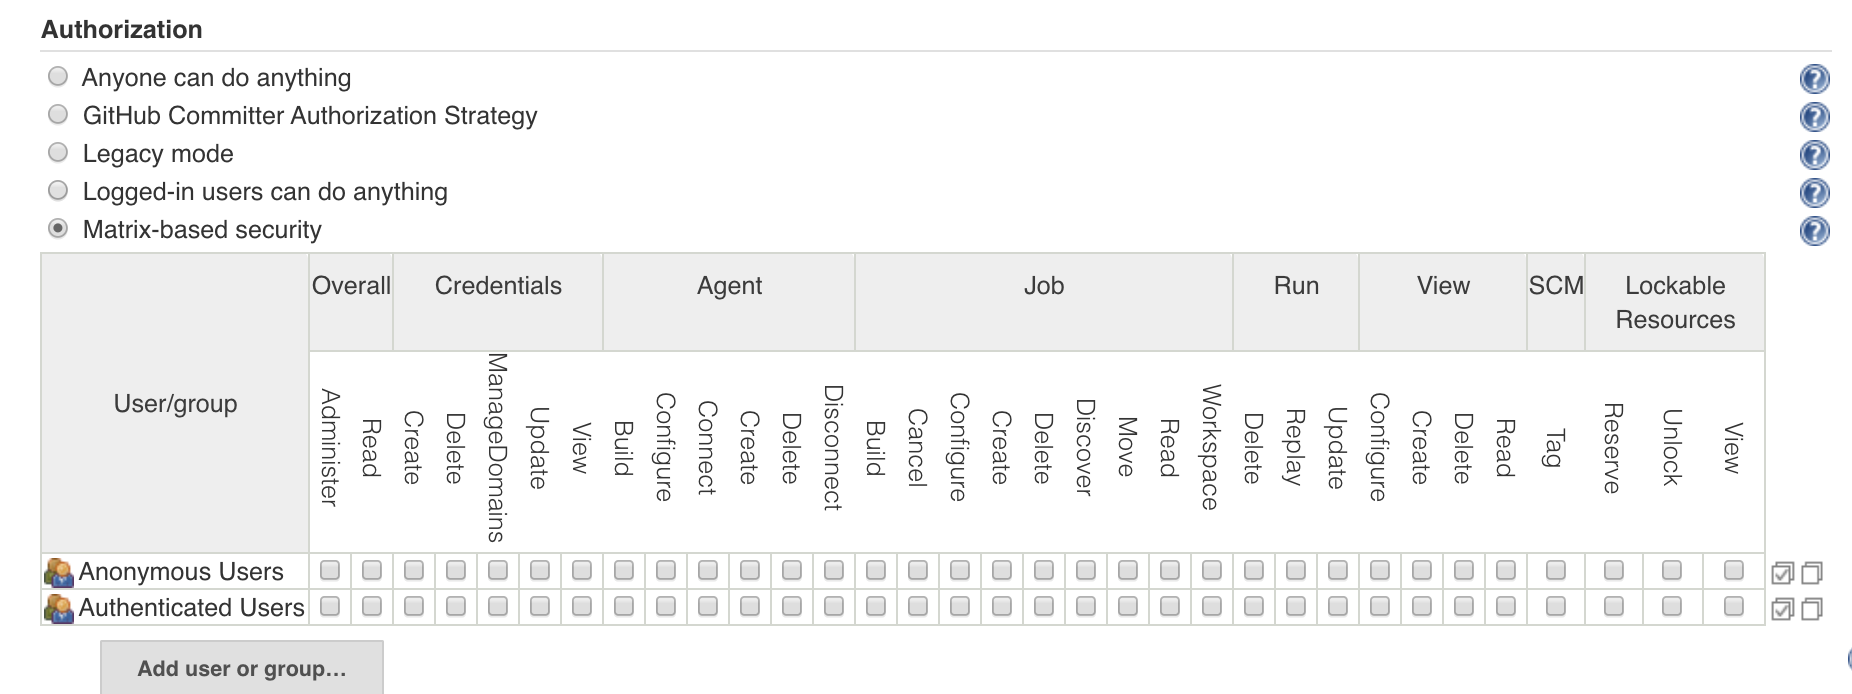
Click on the button "Add user or group..." and when prompted, enter the GitHub username. In my case, it's "hcho3". Since I am the admin, I will grant myself all permissions; for all others, grant read-only access.

Screen Shot 2019-11-23 at 9 54 36 AM

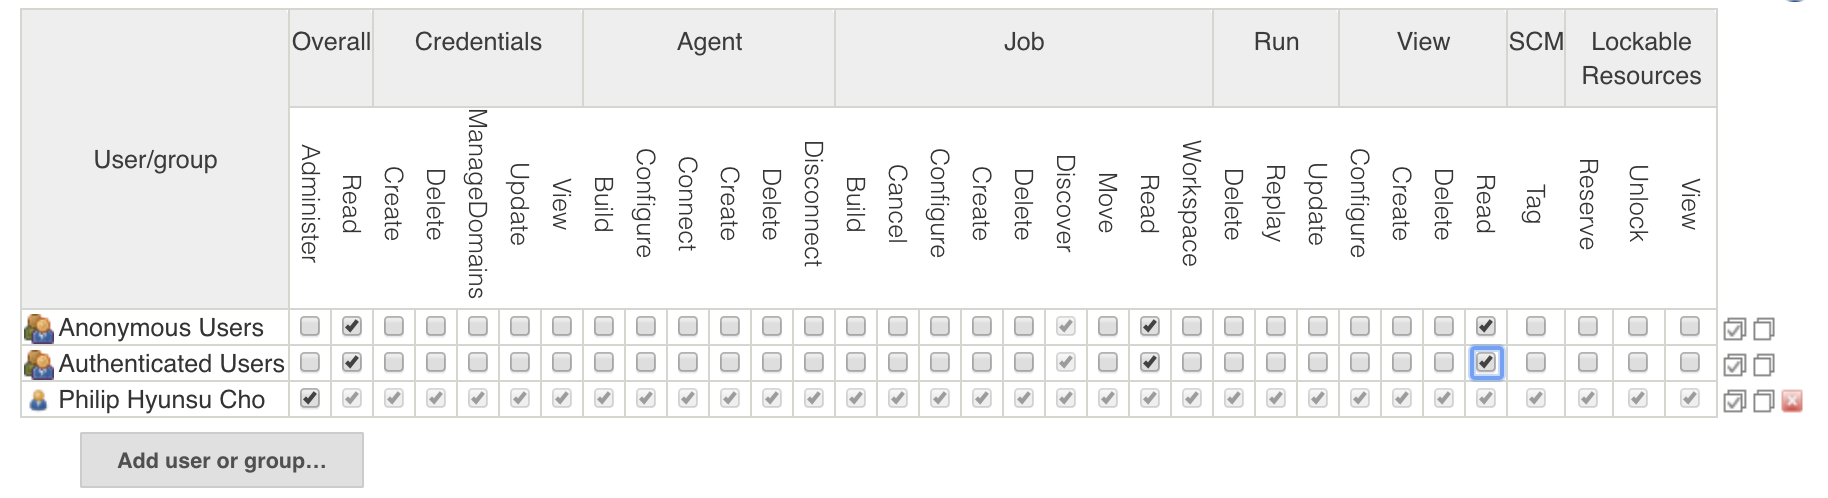
Note: collaborators will have be manually added to this matrix. For example:

Screen Shot 2019-11-23 at 9 57 57 AM

  1. In the same page titled Configure Global Security, navigate to Access Control for Builds and set Project Default Build Authorization form to "Run as Specific User." Set User ID to ubuntu.

Screen Shot 2019-11-23 at 2 28 37 PM

  1. In the same page titled Configure Global Security, navigate to CSRF Protection and check the checkbox for "Prevent Cross Site Request Forgery exploits." Select "Default Crumb Issuer" and tick the checkbox "Enable proxy compatibility".

Screen Shot 2019-11-23 at 11 14 07 PM

  1. Navigate to Manage Jenkins > Configure System. Set "# of executors" to 0, since all jobs will be run in worker EC2 instances. The master-worker arrangement lets us run multiple test jobs simultaneously.

  2. In the same page titled Configure System, fill out the form "GitHub Servers." This is needed to create a webhook to listen to GitHub events so that, e.g. every push event will trigger CI. For "Credentials," create a new personal access token with permissions admin:repo_hook, repo, and repo:status. Tick the checkbox "Manage hooks." Now save the configuration and refresh the page (Configure System). Then press the button "Re-register hooks for all jobs."

Screen Shot 2019-11-26 at 9 45 14 AM

  1. Navigate to Manage Jenkins > AWS. Enter the name of the S3 bucket you'd like to use to store stashes and artifacts from Jenkins builds. Set the region to us-west-2 (Oregon) and select "IAM Instance Profile" for Amazon Credentials.

Set up IAM user for launching worker pool

See here if you need an introduction to the concept of IAM (Identity and Access Management). An IAM user is essentially a sub-account with restricted set of privileges.

  1. Go to the AWS website and navigate to the IAM console. Then create a new IAM policy named XGBoost-CI-Workers with the following set of permissions:
  • EC2: full access
  • IAM: List, Write
    Or use this JSON template:
{
    "Version": "2012-10-17",
    "Statement": [
        {
            "Effect": "Allow",
            "Action": [
                "ec2:*"
            ],
            "Resource": "*"
        },
        {
            "Effect": "Allow",
            "Action": [
                "iam:ListRoles",
                "iam:PassRole",
                "iam:ListInstanceProfiles"
            ],
            "Resource": "*"
        }
    ]
}
  1. Create two IAM roles: XGBoost-CI-Master and XGBoost-CI-Worker. Here are the list of policies to attach to XGBoost-CI-Master:
  • AmazonEC2FullAccess
  • IAMFullAccess
  • AmazonS3FullAccess
  • ECRFullAccess, a custom (inline) policy to be defined by the JSON template
{
    "Version": "2012-10-17",
    "Statement": [
        {
            "Sid": "VisualEditor0",
            "Effect": "Allow",
            "Action": "ecr:*",
            "Resource": "*"
        }
    ]
}

And assign the following policies to XGBoost-CI-Worker role:

  • AmazonS3FullAccess
  • ECRFullAccess (see above)
  1. Now navigate to the EC2 console. Select to highlight the entry for the Jenkins master instance and click the "Actions" button to get the dropdown menu appear:

Screen Shot 2019-11-26 at 1 11 53 AM

Then select Instance Settings > Attach/Replace IAM Role. In the next dialog page, choose XGBoost-CI-Master IAM role. Now the Jenkins master instance have all permissions that are associated with the XGBoost-CI-Master role. Super cool.

  1. Navigate to the EC2 console > Key Pairs and generate a new key pair (public key / private key). I give the name xgboost-ci. Note that a pem file is downloaded. Do not lose it, as it is the only time you'll have access to the private key.

Create AMIs (Amazon Machine Images) for workers

This section is glossing over many details. I hope to have an automatic script to automate AMI generation.

We need to create AMIs for the following targets:

  • Linux CPU Runner
  • Linux GPU Runner
  • Windows Builder
  • Windows CPU Runner (Windows 2008R2)
  • Windows GPU Runner (Windows 2012R2 + CUDA 9.0)
  • Windows GPU Runner (Windows 2016 + CUDA 10.0)
  • Windows GPU Runner (Windows 2019 + CUDA 10.1)

For the Linux targets, it suffices to create a machine with Ubuntu 18.04 LTS and install Git, Python and Docker. (For GPU target, also install CUDA driver and nvidia-docker.) The use of Docker simplifies our job greatly, since all other package installation is abstracted into Dockerfiles. On the other hand, we can't use Docker on Windows targets, as nvidia-docker does not support Windows Docker. So we need to install all packages manually. Off of my head, they are:

See #7 for more details on setting up Windows machines.

Important: Make sure you registered the public key of the key pair xgboost-ci in each Windows machine. Otherwise, Jenkins master will fail to establish connection with Windows workers.

Register workers in Jenkins

TODO: want to implement a custom scaling logic in lieu of the EC2 plugin, since I've seen some failure modes before (dmlc/xgboost#4984 (comment))

  1. Install the Amazon EC2 plug-in.
  2. Navigate to Manage Jenkins > Configure System and scroll down to find the section titled "Cloud". Click on the button "Add a new cloud" and select "Amazon EC2" in the dropdown menu. The form like below should appear:

Screen Shot 2019-11-26 at 12 33 41 AM

  1. Enable the checkbox titled "Use EC2 instance profile to obtain credentials". Thanks to this option we do not need to enter an AWS credentials, so leave "Amazon EC2 Credentials" blank. Select us-west-2 for Region. Now locate the private key (pem) file generated in Step 4 of the previous section and paste the content into the big text box titled "EC2 Key Pair's Private Key". Verify the setting by pressing the button "Test Connection".

Screen Shot 2019-11-26 at 1 19 52 AM

  1. Now add all the AMIs to the AMI list (see "Add" button in the previous figure).
  • Description: Linux CPU Slave
    • AMI ID: (AMI ID)
    • Instance Type: c5.4xlarge
    • EBS Optimized: enable
    • Security group names: XGBoost-CI-Fleet
    • Remote user: ubuntu
    • AMI Type: unix (keep all 4 boxes as default)
    • Labels: linux cpu (space in the middle)
    • Usage: Only build jobs with label expressions matching this node
    • Idle Termination Time: 5
    • Number of Executors: 4
    • Instance Cap: (set an appropriate number to enforce appropriate level of spending)
    • IAM instance profile: (full Instance Profile ARN for XGBoost-CI-Worker IAM role, in the form of arn:aws:iam::<AWS account ID>:instance-profile/XGBoost-CI-Worker)
    • Associate Public IP: enable
    • Connection Strategy: Private IP
  • Description: Linux GPU Slave
    • AMI ID: (AMI ID)
    • Instance Type: g4dn.xlarge
    • EBS Optimized: enable
    • Security group names: XGBoost-CI-Fleet
    • Remote user: ubuntu
    • AMI Type: unix (keep all 4 boxes as default)
    • Labels: linux gpu (space in the middle)
    • Usage: Only build jobs with label expressions matching this node
    • Idle Termination Time: 5
    • Number of Executors: 2
    • Instance Cap: (set an appropriate number to enforce appropriate level of spending)
    • IAM instance profile: (full Instance Profile ARN for XGBoost-CI-Worker IAM role, in the form of arn:aws:iam::<AWS account ID>:instance-profile/XGBoost-CI-Worker)
    • Associate Public IP: enable
    • Connection Strategy: Private IP
  • Description: Linux Multi-GPU Slave
    • AMI ID: (AMI ID, same as LInux GPU Slave)
    • Instance Type: g4dn.12xlarge
    • EBS Optimized: enable
    • Security group names: XGBoost-CI-Fleet
    • Remote user: ubuntu
    • AMI Type: unix (keep all 4 boxes as default)
    • Labels: linux mgpu (space in the middle)
    • Usage: Only build jobs with label expressions matching this node
    • Idle Termination Time: 5
    • Number of Executors: 1
    • Instance Cap: (set an appropriate number to enforce appropriate level of spending)
    • IAM instance profile: (full Instance Profile ARN for XGBoost-CI-Worker IAM role, in the form of arn:aws:iam::<AWS account ID>:instance-profile/XGBoost-CI-Worker)
    • Associate Public IP: enable
    • Connection Strategy: Private IP
  • Description: Windows build
    • AMI ID: (AMI ID)
    • Instance Type: c5.9xlarge
    • Security group names: XGBoost-CI-Fleet
    • Remote user: Administrator
    • AMI Type: unix (keep all 4 boxes as default) <- Do not choose Windows, since we are using SSH to establish connection.
    • Labels: win64 build (space in the middle)
    • Usage: Only build jobs with label expressions matching this node
    • Idle Termination Time: 5
    • Override temporary dir location: C:\\Windows\\Temp <- Don't forget this, otherwise Windows worker won't launch
    • Number of Executors: 1
    • Instance Cap: (set an appropriate number to enforce appropriate level of spending)
    • IAM instance profile: (full Instance Profile ARN for XGBoost-CI-Worker IAM role, in the form of arn:aws:iam::<AWS account ID>:instance-profile/XGBoost-CI-Worker)
    • Associate Public IP: enable
    • Connection Strategy: Private IP
  • Description: Windows Server 2008R2 CPU
    • AMI ID: (AMI ID)
    • Instance Type: c5.4xlarge
    • Security group names: XGBoost-CI-Fleet
    • Remote user: Administrator
    • AMI Type: unix (keep all 4 boxes as default) <- Do not choose Windows, since we are using SSH to establish connection.
    • Labels: win64 cpu (space in the middle)
    • Usage: Only build jobs with label expressions matching this node
    • Idle Termination Time: 5
    • Override temporary dir location: C:\\Windows\\Temp <- Don't forget this, otherwise Windows worker won't launch
    • Number of Executors: 1
    • Instance Cap: (set an appropriate number to enforce appropriate level of spending)
    • IAM instance profile: (full Instance Profile ARN for XGBoost-CI-Worker IAM role, in the form of arn:aws:iam::<AWS account ID>:instance-profile/XGBoost-CI-Worker)
    • Associate Public IP: enable
    • Connection Strategy: Private IP
  • Description: Windows Server 2012R2 GPU CUDA 9.0
    • AMI ID: (AMI ID)
    • Instance Type: p2.xlarge
    • Security group names: XGBoost-CI-Fleet
    • Remote user: Administrator
    • AMI Type: unix (keep all 4 boxes as default) <- Do not choose Windows, since we are using SSH to establish connection.
    • Labels: win64 gpu cuda9 (spaces in between)
    • Usage: Only build jobs with label expressions matching this node
    • Idle Termination Time: 5
    • Override temporary dir location: C:\\Windows\\Temp <- Don't forget this, otherwise Windows worker won't launch
    • Number of Executors: 1
    • Instance Cap: (set an appropriate number to enforce appropriate level of spending)
    • IAM instance profile: (full Instance Profile ARN for XGBoost-CI-Worker IAM role, in the form of arn:aws:iam::<AWS account ID>:instance-profile/XGBoost-CI-Worker)
    • Associate Public IP: enable
    • Connection Strategy: Private IP
  • Description: Windows Server 2016 GPU CUDA 10.0
    • AMI ID: (AMI ID)
    • Instance Type: g4dn.xlarge
    • Security group names: XGBoost-CI-Fleet
    • Remote user: Administrator
    • AMI Type: unix (keep all 4 boxes as default) <- Do not choose Windows, since we are using SSH to establish connection.
    • Labels: win64 gpu cuda10_0 (spaces in between)
    • Usage: Only build jobs with label expressions matching this node
    • Idle Termination Time: 5
    • Override temporary dir location: C:\\Windows\\Temp <- Don't forget this, otherwise Windows worker won't launch
    • Number of Executors: 1
    • Instance Cap: (set an appropriate number to enforce appropriate level of spending)
    • IAM instance profile: (full Instance Profile ARN for XGBoost-CI-Worker IAM role, in the form of arn:aws:iam::<AWS account ID>:instance-profile/XGBoost-CI-Worker)
    • Associate Public IP: enable
    • Connection Strategy: Private IP
  • Description: Windows Server 2019 GPU CUDA 10.1
    • AMI ID: (AMI ID)
    • Instance Type: g4dn.xlarge
    • Security group names: XGBoost-CI-Fleet
    • Remote user: Administrator
    • AMI Type: unix (keep all 4 boxes as default) <- Do not choose Windows, since we are using SSH to establish connection.
    • Labels: win64 gpu cuda10_1 (spaces in between)
    • Usage: Only build jobs with label expressions matching this node
    • Idle Termination Time: 5
    • Override temporary dir location: C:\\Windows\\Temp <- Don't forget this, otherwise Windows worker won't launch
    • Number of Executors: 1
    • Instance Cap: (set an appropriate number to enforce appropriate level of spending)
    • IAM instance profile: (full Instance Profile ARN for XGBoost-CI-Worker IAM role, in the form of arn:aws:iam::<AWS account ID>:instance-profile/XGBoost-CI-Worker)
    • Associate Public IP: enable
    • Connection Strategy: Private IP

Add XGBoost repo to Jenkins via the Blue Ocean interface.

  1. Navigate to Blue Ocean by clicking "Open Blue Ocean" on the left sidebar. This is "easy" interface for Jenkins. If you want to know what Blue Ocean is, see this link.
  2. Click on the button New Pipeline on the top right. You'll then be asked where the code is; then select GitHub. As part of the setup, you'll be asked to create a new Personal Access Token from GitHub. I used this step to create a new build/test pipeline for dmlc/xgboost. The pipeline is called xgboost".
  3. You'll see a bunch of builds start and immediately fail. Ignore it for now. Go to the repository configuration page (https://xgboost-ci.net/job/xgboost/configure). Under "Branch sources," add "Filter by name (with wildcards)" option and set the Include field to master release_* PR-*.

Screen Shot 2019-11-26 at 3 12 30 AM

Also add behavior "Filter pull requests by commit message", which will skip CI for any pull request whose last commit's message contains the phrase [skip ci].

Save the configuration. Upon saving, Jenkins will scan the repository and find all branches and pull requests that are eligible for building and testing. So far, we've excluded any branch that is neither master or a release.
4. Now install the AnsiColor plugin to enable colored consoled output. This also fixes all failing tests. Then run "Scan repository now" to create build jobs for all branches and currently open pull requests.

Set up pipeline for Windows targets

Currently, we set up a separate testing pipeline for Windows targets. The pipeline configuration is stored in Jenkinsfile-win64.

  1. Access the classical interface of Jenkins by visiting https://xgboost-ci.net. Then on the left sidebase, click "New Item." (If you don't see this, make sure to log in first.)

  2. Create xgboost-win64 pipeline by copying from xgboost pipeline:

Screen Shot 2019-11-28 at 1 42 20 PM

  1. In the configuration page that follows, keep everything the same, except for Build Configuration. Change the Jenkinsfile name to Jenkinsfile-win64.

Screen Shot 2019-11-28 at 1 44 18 PM

@trivialfis
Copy link

Adding Jenkins to systemd service: https://wiki.jenkins.io/display/JENKINS/Installing+Jenkins+as+a+Unix+daemon

@trivialfis
Copy link

Maybe saving Jenkins configuration via: https://wiki.jenkins.io/display/JENKINS/JobConfigHistory+Plugin Or maybe you have better options. ;-)

@hcho3
Copy link
Owner Author

hcho3 commented Nov 26, 2019

@trivialfis I believe Jenkins is already a system service in the Ubuntu environment; apt-get install jenkins does it.

@hcho3
Copy link
Owner Author

hcho3 commented Nov 26, 2019

@trivialfis Very interesting. I'll check it out. All manual config is rather tedious.

@trivialfis
Copy link

trivialfis commented Nov 26, 2019

@hcho3 I see. Running systemctl status jenkins does see the service, which is a longer shell wrapper script. Thanks for clarifying.

@hcho3 hcho3 changed the title How to set up a Jenkins master node from scratch. [WIP] How to set up a Jenkins master node from scratch. Nov 26, 2019
@hcho3 hcho3 pinned this issue Nov 26, 2019
@hcho3 hcho3 changed the title [WIP] How to set up a Jenkins master node from scratch. How to set up a Jenkins master node from scratch. Nov 26, 2019
@hcho3
Copy link
Owner Author

hcho3 commented Nov 26, 2019

@trivialfis This doc is now complete. Hope this helps you understand how the CI is set up.

@trivialfis
Copy link

@hcho3 This is great! I will try to start with some simple tasks like upgrading the packages etc, so that I can learn to co-maintain it

Sign up for free to join this conversation on GitHub. Already have an account? Sign in to comment
Labels
None yet
Projects
None yet
Development

No branches or pull requests

2 participants