| id | title |
|---|---|
versioned-migrations |
Versioned Migrations |
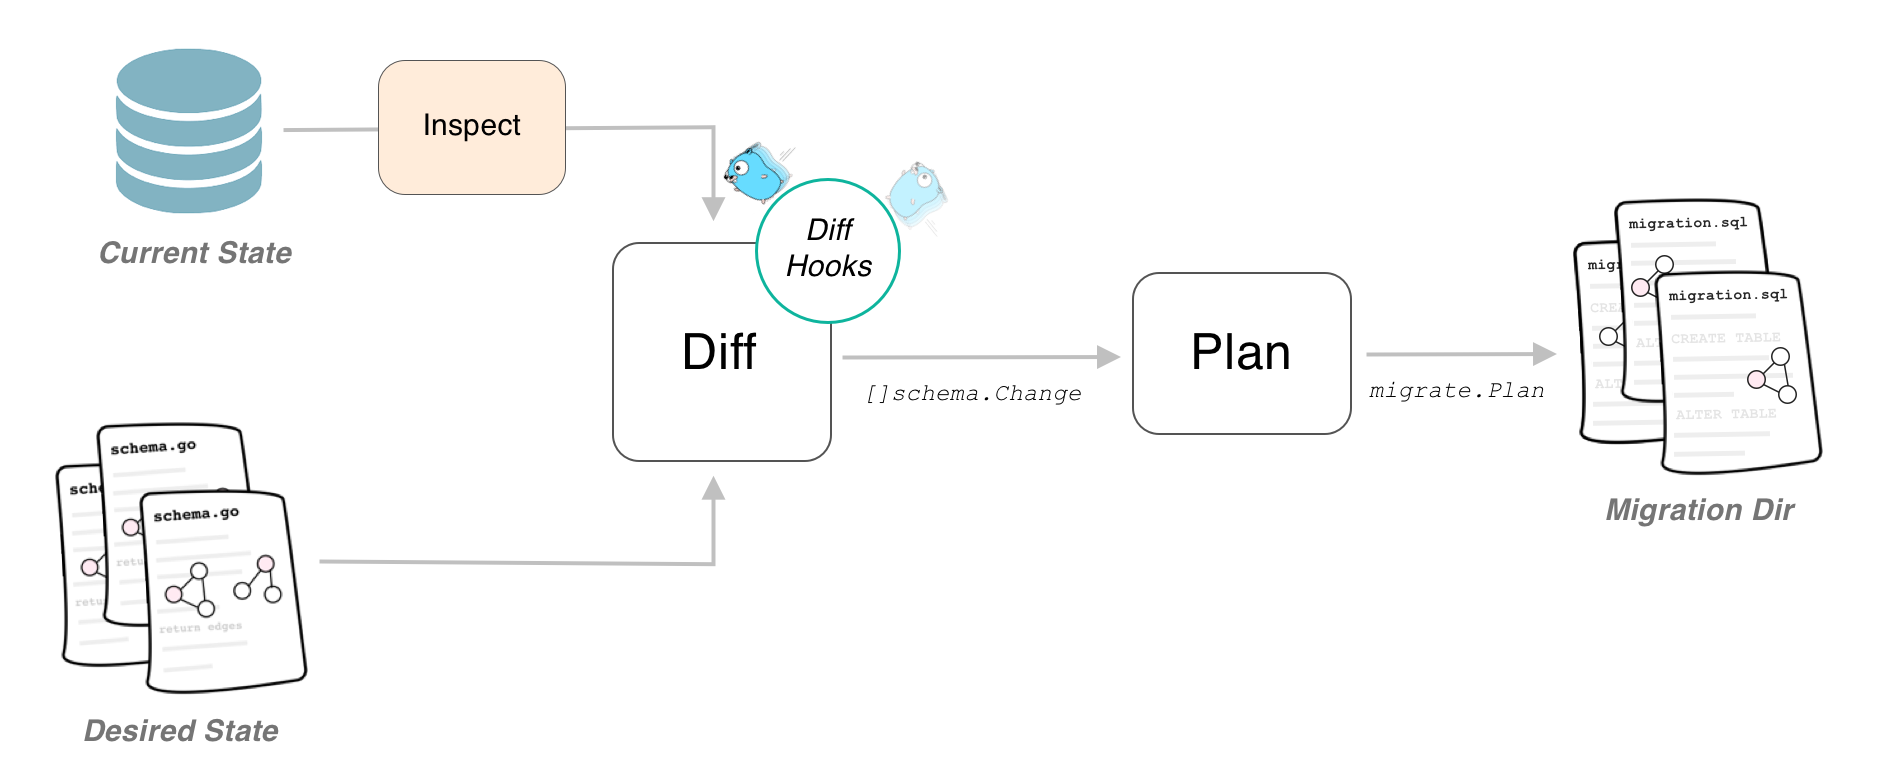
If you are using the Atlas migration engine you are able to use the versioned migrations feature of it. Instead of applying the computed changes directly to the database, it will generate a set of migration files containing the necessary SQL statements to migrate the database. These files can then be edited to your needs and be applied by any tool you like (like golang-migrate, Flyway, liquibase).
If you want to use an instantiated Ent client to create new migration files, you have to enable the versioned migrations feature flag in order to have Ent make the necessary changes to the generated code. Depending on how you execute the Ent code generator, you have to use one of the two options:
- If you are using the default go generate configuration, simply add the
--feature sql/versioned-migrationto theent/generate.gofile as follows:
package ent

//go:generate go run -mod=mod entgo.io/ent/cmd/ent generate --feature sql/versioned-migration ./schema- If you are using the code generation package (e.g. if you are using an Ent extension), add the feature flag as follows:
//go:build ignore

package main

import (
	"log"

	"entgo.io/ent/entc"
	"entgo.io/ent/entc/gen"
)

func main() {
	err := entc.Generate("./schema", &gen.Config{}, entc.FeatureNames("sql/versioned-migration"))
	if err != nil {
		log.Fatalf("running ent codegen: %v", err)
	}
}
After regenerating the project, there will be an extra Diff method on the Ent client that you can use to inspect the
connected database, compare it with the schema definitions and create SQL statements needed to migrate the database to
the graph.
package main

import (
    "context"
    "log"

    "<project>/ent"

    "ariga.io/atlas/sql/migrate"
    "entgo.io/ent/dialect/sql/schema"
   _ "github.com/go-sql-driver/mysql"
)

func main() {
	client, err := ent.Open("mysql", "root:pass@tcp(localhost:3306)/test")
	if err != nil {
		log.Fatalf("failed connecting to mysql: %v", err)
	}
	defer client.Close()
	ctx := context.Background()
	// Create a local migration directory.
	dir, err := migrate.NewLocalDir("migrations")
	if err != nil {
		log.Fatalf("failed creating atlas migration directory: %v", err)
	}
	// Write migration diff.
	err = client.Schema.Diff(ctx, schema.WithDir(dir))
	// You can use the following method to give the migration files a name.
	// err = client.Schema.NamedDiff(ctx, "migration_name", schema.WithDir(dir))
	if err != nil {
		log.Fatalf("failed creating schema resources: %v", err)
	}
}
You can then create a new set of migration files by simply calling go run -mod=mod main.go.
You can also generate new migration files without an instantiated Ent client. This can be useful if you want to make the migration file creation part of a go generate workflow. Note, that in this case enabling the feature flag is optional.
package main

import (
    "context"
    "log"

    "ariga.io/atlas/sql/migrate"
    "entgo.io/ent/dialect/sql"
    "entgo.io/ent/dialect/sql/schema"
    "entgo.io/ent/entc"
    "entgo.io/ent/entc/gen"
)

func main() {
    // Load the graph.
    graph, err := entc.LoadGraph("/.schema", &gen.Config{})
    if err != nil {
        log.Fatalln(err)
    }
    tbls, err := graph.Tables()
    if err != nil {
        log.Fatalln(err)
    }
    // Create a local migration directory.
    d, err := migrate.NewLocalDir("migrations")
    if err != nil {
        log.Fatalln(err)
    }
    // Open connection to the database.
    dlct, err := sql.Open("mysql", "root:pass@tcp(localhost:3306)/test")
    if err != nil {
        log.Fatalln(err)
    }
    // Inspect it and compare it with the graph.
    m, err := schema.NewMigrate(dlct, schema.WithDir(d))
    if err != nil {
        log.Fatalln(err)
    }
    if err := m.Diff(context.Background(), tbls...); err != nil {
        log.Fatalln(err)
    }
    // You can use the following method to give the migration files a name.
    // if err := m.NamedDiff(context.Background(), "migration_name", tbls...); err != nil {
    //     log.Fatalln(err)
    // }
}The Atlas migration engine does not support applying the migration files onto a database yet, therefore to manage and execute the generated migration files, you have to rely on an external tool (or execute them by hand). By default, Atlas generates one "up" and one "down" migration file for the computed diff. These files are compatible with the popular golang-migrate/migrate package, and you can use that tool to manage the migrations in you deployments.
migrate -source file://migrations -database mysql://root:pass@tcp(localhost:3306)/test upIn case you already have an Ent application in production and want to switch over from auto migration to the new versioned migration, you need to take some extra steps.
-
Create an initial migration file (or several files if you want) reflecting the currently deployed state.
To do this make sure your schema definition is in sync with your deployed version. Then spin up an empty database and run the diff command once as described above. This will create the statements needed to create the current state of your schema graph.
-
Configure the tool you use to manage migrations to consider this file as applied.
In case of
golang-migratethis can be done by forcing your database version as described here.