Before getting started, check out the #bentoml-contributors channel in the BentoML community slack.
If you are interested in contributing to existing issues and feature requets, check out the good-first-issue and help-wanted issues list.
If you are interested in proposing a new feature, make sure to create a new feature request ticket here and share your proposal in the #bentoml-contributors slack channel for feedback.
-
Make sure to have Git, pip, and Python3.7+ installed.
Optionally, make sure to have GNU Make available on your system if you aren't using a UNIX-based system for a better developer experience. If you don't want to use
makethen please refer to the Makefile for specific commands on a given make target. -
Fork the BentoML project on GitHub.
-
Clone the source code from your fork of BentoML's GitHub repository:
git clone git@github.com:username/BentoML.git && cd BentoML
-
Add the BentoML upstream remote to your local BentoML clone:
git remote add upstream git@github.com:bentoml/BentoML.git
-
Configure git to pull from the upstream remote:
git switch main # ensure you're on the main branch git branch --set-upstream-to=upstream/main -
Install BentoML with pip in editable mode:
pip install -e .This installs BentoML in an editable state. The changes you make will automatically be reflected without reinstalling BentoML.
-
Install the BentoML development requirements:
pip install -r ./requirements/dev-requirements.txt
-
Test the BentoML installation either with
bash:bentoml --version
or in a Python session:
import bentoml
print(bentoml.__version__)
-
Confirm that you have the following installed:
- Python3.7+
- VS Code with the Python and Pylance extensions
-
Fork the BentoML project on GitHub.
-
Clone the GitHub repository:
- Open the command palette with Ctrl+Shift+P and type in 'clone'.
- Select 'Git: Clone(Recursive)'.
- Clone BentoML.
-
Add an BentoML upstream remote:
- Open the command palette and enter 'add remote'.
- Select 'Git: Add Remote'.
- Press enter to select 'Add remote' from GitHub.
- Enter https://github.com/bentoml/BentoML.git to select the BentoML repository.
- Name your remote 'upstream'.
-
Pull from the BentoML upstream remote to your main branch:
- Open the command palette and enter 'checkout'.
- Select 'Git: Checkout to...'
- Choose 'main' to switch to the main branch.
- Open the command palette again and enter 'pull from'.
- Click on 'Git: Pull from...'
- Select 'upstream'.
-
Open a new terminal by clicking the Terminal dropdown at the top of the window, followed by the 'New Terminal' option. Next, add a virtual environment with this command:
python -m venv .venv
-
Click yes if a popup suggests switching to the virtual environment. Otherwise, go through these steps:
-
Open any python file in the directory.
-
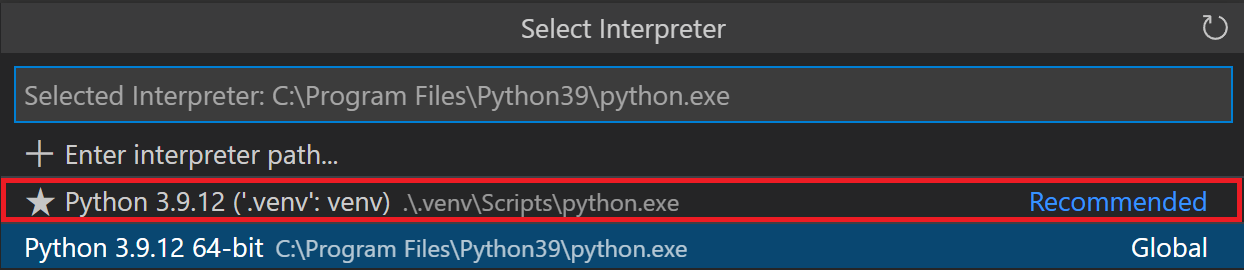
Select the interpreter selector on the blue status bar at the bottom of the editor.

-
Switch to the path that includes .venv from the dropdown at the top.
-
-
Update your PowerShell execution policies. Win+x followed by the 'a' key opens the admin Windows PowerShell. Enter the following command to allow the virtual environment activation script to run:
Set-ExecutionPolicy -ExecutionPolicy RemoteSigned -Scope CurrentUser
-
Make sure you're on the main branch.
git switch main
-
Use the git pull command to retrieve content from the BentoML Github repository.
git pull
-
Create a new branch and switch to it.
git switch -c my-new-branch-name
-
Make your changes!
-
Use the git add command to save the state of files you have changed.
git add <names of the files you have changed>
-
Commit your changes.
git commit
-
Push all changes to your fork on GitHub.
git push
-
Switch to the main branch:
- Open the command palette with Ctrl+Shift+P.
- Search for 'Git: Checkout to...'
- Select 'main'.
-
Pull from the upstream remote:
- Open the command palette.
- Enter and select 'Git: Pull...'
- Select 'upstream'.
-
Create and change to a new branch:
- Type in 'Git: Create Branch...' in the command palette.
- Enter a branch name.
-
Make your changes!
-
Stage all your changes:
- Enter and select 'Git: Stage All Changes...' in the command palette.
-
Commit your changes:
- Open the command palette and enter 'Git: Commit'.
-
Push your changes:
- Enter and select 'Git: Push...' in the command palette.
To view internal debug loggings for development, set the BENTOML_DEBUG environment variable to TRUE:
export BENTOML_DEBUG=TRUEAnd/or use the --verbose option when running bentoml CLI command, e.g.:
bentoml get IrisClassifier --verbosetype checker: pyright
We are using buf for formatting and linting
of our proto files. Configuration can be found here.
Currently, we are running buf with docker, hence we kindly ask our developers
to have docker available. Docker installation can be found here.
Run linter/format script:
make format

make lint
Run type checker:
make typeThe proto files for the BentoML gRPC service are located under bentoml/grpc.
The generated python files are not checked in the git repository, and are instead generated via this script.
If you edit the proto files, make sure to run ./scripts/generate_grpc_stubs.sh to
regenerate the proto stubs.
Test test out your changes in an actual BentoML model deployment, you can create a new Bento with your custom BentoML source repo:
- Install custom BentoML in editable mode. e.g.:
- git clone your bentoml fork
pip install -e PATH_TO_THE_FORK
- Set env var
export BENTOML_BUNDLE_LOCAL_BUILD=Trueandexport SETUPTOOLS_USE_DISTUTILS=stdlib- make sure you have the latest setuptools installed:
pip install -U setuptools
- make sure you have the latest setuptools installed:
- Build a new Bento with
bentoml buildin your project directory - The new Bento will include a wheel file built from the BentoML source, and
bentoml containerizewill install it to override the default BentoML installation in base image
If you want other team members to easily use your custom BentoML distribution, you may publish your branch to your fork of BentoML, and have your users install it this way:
pip install git+https://github.com/{YOUR_GITHUB_USERNAME}/bentoml@{YOUR_REVISION}And in your BentoML projects' bentofile.yaml, force the Bento to install this distribution, e.g.:
service: "service:svc"
description: "file: ./README.md"
include:
  - "*.py"
python:
  packages:
    - pandas
    - git+https://github.com/{YOUR_GITHUB_USERNAME}/bentoml@{YOUR_REVISION}
docker:
  system_packages:
- gitMake sure to install all test dependencies:
pip install -r requirements/tests-requirements.txtYou can run unit tests in two ways:
Run all unit tests directly with pytest:
# GIT_ROOT=$(git rev-parse --show-toplevel)
pytest tests/unit --cov=bentoml --cov-config="$GIT_ROOT"/pyproject.toml
Run all unit tests via ./scripts/ci/run_tests.sh:
./scripts/ci/run_tests.sh unit

# Or on UNIX-based system
make tests-unitRun given tests after defining a target under scripts/ci/config.yml with run_tests.sh:
# example: run Keras TF1 integration tests
./scripts/ci/run_tests.sh keras_tf1# example: run e2e tests to check for http general features
./scripts/ci/run_tests.sh http_serverTo run the whole test suite, minus frameworks integration, you can use:
make tests-suiteIf you are adding new ML framework support, it is recommended that you also add a separate test suite in our CI. Currently we are using GitHub Actions to manage our CI/CD workflow.
We recommend using nektos/act to run and test Actions locally.
The following tests script run_tests.sh can be used to run tests locally.
./scripts/ci/run_tests.sh -h
Running unit/integration tests with pytest and generate coverage reports. Make sure that given testcases is defined under ./scripts/ci/config.yml.

Usage:
  ./scripts/ci/run_tests.sh [-h|--help] [-v|--verbose] <target> <pytest_additional_arguments>

Flags:
  -h, --help            show this message
  -v, --verbose         set verbose scripts


If `pytest_additional_arguments` is given, the additional arguments will be passed to all of the tests run by the tests script.

Example:
  $ ./scripts/ci/run_tests.sh pytorch --run-gpus-tests --capture=tee-sys
All tests are then defined under config.yml where each field follows the following format:
<target>: &tmpl
  root_test_dir: "tests/integration/frameworks"
  is_dir: false
  override_name_or_path:
  dependencies: []
  external_scripts:
  type_tests: "integration"
By default, each of our frameworks tests files with the format: test_<frameworks>_impl.py. If is_dir set to true we will try to match the given <target> under root_test_dir to run tests from.
| Keys | Type | Defintions |
|---|---|---|
root_test_dir |
<str> |
root directory to run a given tests |
is_dir |
<bool> |
whether target is a directory instead of a file |
override_name_or_path |
<str> |
optional way to override a tests file name if doesn't match our convention |
dependencies |
<List[str]> |
define additional dependencies required to run the tests, accepts requirements.txt format |
external_scripts |
<str> |
optional shell scripts that can be run on top of ./scripts/ci/run_tests.sh for given testsuite |
type_tests |
<Literal["e2e","unit","integration"]> |
define type of tests for given target |
When type_tests is set to e2e, ./scripts/ci/run_tests.sh will change current directory into the given root_test_dir, and will run the testsuite from there.
The reason why we encourage developers to use the scripts in CI is that under the hood when we use pytest, we will create a custom report for the given tests. This report can then be used as carryforward flags on codecov for consistent reporting.
Example:
# e2e tests
http:
  root_test_dir: "tests/e2e/bento_server_http"
  is_dir: true
  type_tests: "e2e"
  dependencies:
    - "Pillow"

# framework
pytorch_lightning:
  <<: *tmpl
  dependencies:
    - "pytorch-lightning"
    - "-f https://download.pytorch.org/whl/torch_stable.html"
    - "torch==1.9.0+cpu"
    - "torchvision==0.10.0+cpu"
Refer to config.yml for more examples.
Currently, BentoML is PEP518 compatible. We define package configuration via [pyproject.toml][https://github.com/bentoml/bentoml/blob/main/pyproject.toml].
BentoML has moved its benchmark to bentoml/benchmark.
BentoML also provides git hooks that developers can install with:
make hooksPush changes to your fork and follow this article on how to create a pull request on github. Name your pull request with one of the following prefixes, e.g. "feat: add support for PyTorch". This is based on the Conventional Commits specification
- feat: (new feature for the user, not a new feature for build script)
- fix: (bug fix for the user, not a fix to a build script)
- docs: (changes to the documentation)
- style: (formatting, missing semicolons, etc; no production code change)
- refactor: (refactoring production code, eg. renaming a variable)
- perf: (code changes that improve performance)
- test: (adding missing tests, refactoring tests; no production code change)
- chore: (updating grunt tasks etc; no production code change)
- build: (changes that affect the build system or external dependencies)
- ci: (changes to configuration files and scripts)
- revert: (reverts a previous commit)
Once your pull request is created, an automated test run will be triggered on your branch and the BentoML authors will be notified to review your code changes. Once tests are passed and a reviewer has signed off, we will merge your pull request.
Refer to BentoML Documentation Guide for how to build and write docs.