⚛ + 🔥 = 🌯
This quickstart shows you how to connect your React web app to Cloud Firestore, listen for its data, and display the data in real time. We'll also configure Firebase Performance Monitoring so you can get some performance stats.
Let's build a web app that displays, in real time, the tastiness of a burrito. Yum!
To see the completed app, check out this StackBlitz workspace.
If your project doesn't have a Cloud Firestore database instance yet, check out these instructions to create a new instance. Please initialize it in locked mode.
-
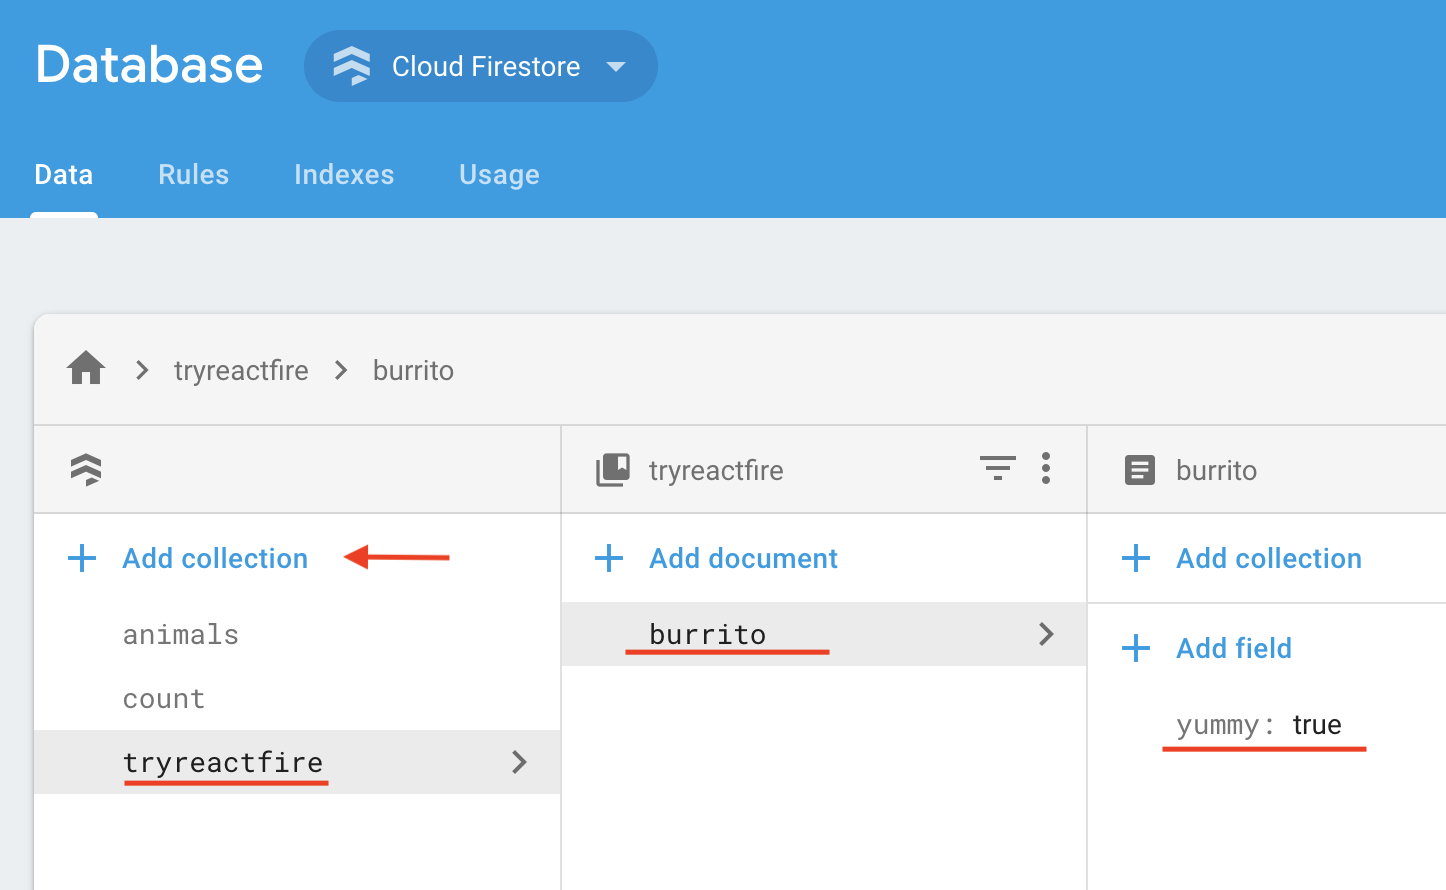
Go to the Database tab in the Firebase console.
-
Add a document.
-
In the Data tab of the console, click Add Collection
-
Name the collection tryreactfire
-
Add a document with ID burrito and boolean field
yummy: true
-
-
Add security rules to allow access to your burrito document.
- In the Rules tab of the console, add the following security rules:
rules_version = '2'; service cloud.firestore { match /databases/{database}/documents { match /tryreactfire/burrito { allow read, write: if true; } } }- Publish the rules.
Prerequisite: make sure you have Node.js installed.
In a terminal, create a fresh React app in a directory of your choice.
npx create-react-app myapp
cd myappIgnore npm warnings.
npm install --save firebase reactfire-
In the center of the Firebase console's project overview page, click the Web icon to launch the setup workflow.
If you've already added an app to your Firebase project, click Add app to display the platform options.
-
Enter your app's nickname.
Note: Firebase Hosting is not required for you to use Firebase products with your web app.
-
Register the app.
-
Copy the Firebase config object. This will be used in Step 5.
-
Continue to Console
Open the src directory and add code to index.js as described below.
-
Import from ReactFire
//...
import { FirebaseAppProvider } from 'reactfire';
//...
-
Add the Firebase config object
Add the firebaseConfig constant and paste the config object from Step 4.
//...
const firebaseConfig = {
  /* Paste your config object from Firebase console here
   */
};
//...
-
Wrap your app in a
FirebaseAppProviderModify the component passed to the render function.
//...
ReactDOM.render(
  <FirebaseAppProvider firebaseConfig={firebaseConfig}>
    <App />
  </FirebaseAppProvider>,
  document.getElementById('root')
);
//...
Open the src directory and add code to App.js as described below.
-
Import from ReactFire
//...
import { doc, getFirestore } from 'firebase/firestore';
import { FirestoreProvider, useFirestoreDocData, useFirestore, useFirebaseApp } from 'reactfire';
//...
-
Add a function component
//...
function BurritoTaste() {
  // easily access the Firestore library
  const burritoRef = doc(useFirestore(), 'tryreactfire', 'burrito');

  // subscribe to a document for realtime updates. just one line!
  const { status, data } = useFirestoreDocData(burritoRef);

  // easily check the loading status
  if (status === 'loading') {
    return <p>Fetching burrito flavor...</p>;
  }

  return <p>The burrito is {data.yummy ? 'good' : 'bad'}!</p>;
}
//...
-
Render your new
BurritocomponentReplace the
Appfunction with the following://... function App() { const firestoreInstance = getFirestore(useFirebaseApp()); return ( <FirestoreProvider sdk={firestoreInstance}> <h1>🌯</h1> <BurritoTaste /> </FirestoreProvider> ); } //...
-
Run your app.
npm run start # or yarn start -
Edit the value of
yummyin the Database tab in the Firebase console and watch it update in real time in your app! 🔥🔥🔥
The example app in this repository shows a number of ReactFire use cases. The Firestore file demonstrates how to work with lists of data in its AnimalsList component. The Auth file demonstrates how to show a sign in form in its SignInForm component, and shows how to access user details in its UserDetails component. The full example app code can be found here.